What is graphic dictation?
Graphic dictation for preschoolers is a unique game that is interesting both for children in kindergartens and for 1st grade students. The child is given a sheet of paper in a box; the younger the child, the larger the markings; the starting point is marked on the form.
The teacher explains the task, and the “dictation” begins. You need to listen carefully to the step-by-step instructions and draw lines several cells up, right, left, down or diagonally.
The end result should be a whole drawing. It could be some kind of animal: an elephant, a giraffe or a horse - a plant, a flower, and for older children a castle or an intricate pattern.
If the child gets distracted by his desk neighbor or another trifle and listens to the task, then the drawing will not work. This helps children realize how important it is to listen carefully to the teacher and not wander around.
In kindergartens, for such activities they usually use manuals by D.B. Elkonina or O.A. Kholodova. There is even a whole course of step-by-step lessons for children of different ages, developed by K.V. Shevelev.
The benefits of mathematical dictations
Graphic dictation for preschoolers is a useful technique for diagnosing the level of development and preparing for school in kindergarten and at home. In preschool educational institutions, educators more often use manuals by the authors: D.B. Elkonina, O.A. Kholodova. K.V. Shevelev developed a whole course of step-by-step lessons for children 4–5 years old, 5–6 years old, as well as first-graders. Shevelev’s special notebooks develop the following skills and abilities in preschool children from the preparatory group:
- coordination of movements;
- attention;
- memory;
- perseverance;
- imagination;
- lexicon;
- fine motor skills;
- spelling vigilance.
At the same time as physical skills, the child increases self-esteem. He is aware of the need to listen to instructions. Does the job clearly and quickly, without being distracted by a bird in the window or the laughter of a neighbor at his desk.
Another goal of graphical mathematics is to broaden one's horizons. You need to select pictures according to the age and level of development of the children, but this is only at first. Later, draw pictures that are unfamiliar to preschoolers. After drawing such an arithmetic problem on a piece of paper, tell a story about an unusual animal, introduce it to its habitat, and show a photograph.
Numerical dictation assignments are a good way to adapt kindergarteners to school. They teach six-year-olds independence and orientation in a new space. This will help in mastering the elementary school curriculum, when meeting a new team and teacher.
The ability to hold a pencil, follow oral instructions, decipher text, and write is an excellent foundation for preparing for first grade.
You can ask your child to print out sheets, templates, and help interpret instructions. This helps to introduce the future preschooler to office equipment and instill respect for elders.
What will you need to complete the tasks?
Another advantage of the technique: simplicity and accessibility. To complete tasks, it is not necessary to buy special manuals or various office supplies. All you need to do is take a checkered piece of paper, a simple pencil and an eraser. Therefore, the exercise can be done at home, while waiting to see a doctor, or on a long trip.
Note!
Dog coloring page - useful tips on how to draw a dog. Instructions with basic drawing steps for children (160 photos)
- Sketches: a master class on creating simple and complex drawings with your own hands with step-by-step diagrams for beginners + photo examples of original works
Easy gouache drawings - TOP-160 photos and step-by-step instructions for drawing with gouache. Best Reviews of Easy Drawings for Beginners
To diversify the lesson and interest the kids, you can bring colored pencils and then color the resulting drawing. And to draw diagonal lines in a drawing, you may need a ruler.
If the lesson is held in a classroom, be sure to remove all unnecessary items from the desk. Instructions and tasks for graphic dictations in grade 1 can be found on the Internet and printed. Parents should not create assignments on their own.
Execution Rules
The preparatory group perceives the task “Continue the drawing in the cells” best. You can do such exercises with them at any time, they will always be happy with them. And you need very little material to complete these tutorials - a squared sheet of paper, a pencil and an eraser to correct mistakes. The rules to follow are quite simple:
- Prepare the material necessary for the implementation. The teacher should have a drawing already completed, which the children will check with at the end of the dictation.
- Younger children should put a dot on the sheet, which will be the starting point, and older children should be asked to put it themselves, explaining where to start.
- For beginner children, you need to draw arrows - the directions of the sides, this will make it easier to avoid mistakes.
- Explain that 1 step = 1 cell, 2 steps = 2 cells, etc.
- Conduct the dictation calmly, without rushing.
- Evaluate the result, praise those who tried especially hard.
Important! Under no circumstances should you rush! If someone doesn’t have time, you need to wait for him, because even one wrong or missed step will lead to the loss of the final result. The pace gradually increases only when the children are already accustomed to graphic dictations and have gained experience in writing them.
Example of the task “Mirror it”
Tips for completing graphic dictation
- During dictation, you cannot pronounce words other than indicating the number of cells and the direction in which you need to move. Children need to be focused and focused;
- Try to create silence in the group so that everyone can concentrate;
- If a group of children is completing a task, and someone did not have time or did not complete it, then he should simply put the sheet and pencil aside so as not to distract the attention of the rest of the audience. This needs to be discussed at the very beginning of the dictation;
- For younger children, you can start by making fun riddles about who they are going to draw. This will further fuel their interest in the process.
Recommendations for classes
Sometimes during lessons with a child various difficulties may arise. To prevent this from happening, it is better not to forget a few tips from experienced teachers.
- Before the first lesson, you need to explain to your child the essence of the game. It's best to show with a simple example. Explain why the lesson is being taught. Motivate for successful execution.
- The teacher should give step-by-step instructions, noticing whether the child is keeping up. All questions that arise must be answered immediately, without delaying until the end of the lesson. It is better not to repeat directions several times, so as not to confuse preschoolers.
- You need to carefully monitor the correct posture and position of the baby’s hands. Correct if the child is hunched over or holding a pencil incorrectly.
- It is advisable to ensure a calm atmosphere and silence in the classroom. This will help the baby concentrate and better perceive the teacher’s instructions.
- Make sure there is good lighting while practicing. This will make it much easier to complete tasks and help maintain good vision.
- The difficulty of tasks should be increased gradually. You should not immediately give complex drawings with many details, and on the contrary, a task that is too simple will seem boring to the child.
- There is no need to scold your child for mistakes. Don't forget, your child is just learning.
- Always notice your baby's successes. This will help him build self-confidence.
- It is necessary to control the time of classes so as not to overtire the child. Take small warm-up breaks periodically.
What does graphic dictation look like?
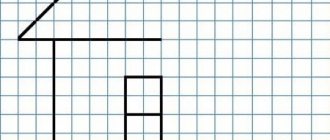
This is an educational game in which lines are drawn on a sheet of checkered paper. The teacher or parent says in which direction the line should be made - up, down, left, right. Listening carefully to the teacher's instructions, the child draws lines in the appropriate direction.
It looks like this: ←1 ↑3 ←1 ↑1 ←1 ↑4 ←1 ↑2 →2 ↑1 →1 ↑2 →1 ↓1 →1 ↑1 →1 ↓1 →1 ↑1 →1 ↓2 ← 4 ↓1 ←1 ↓3 →1 ↓1 →8 ↓3 ←1 ↑2 ←1 ↓5 ←1 ↑2 ←1 ↑1 ←4 ↓3
First lesson
The first lesson with graphic dictations at the age of 6, and for children of other ages, is somewhat different from subsequent ones. For the first time, it is better to follow clear instructions.
The lesson should be a trial lesson. There is no need to demand excellent results from kids. The goal of the lesson is to introduce the child to the principle of operation, goals and objectives of the exercise.
Note!
- Drawing ideas: TOP-200 photos of the best ideas for do-it-yourself drawings + reviews of techniques with simple drawing schemes
Pencil drawings are easy and beautiful - a master class on pencil drawing for beginners. Simple diagrams with a description of the work + photos of the best drawing ideas
- How to draw a squirrel: TOP-120 photos of the best drawing methods and techniques. Step-by-step master class for beginners with examples of the best drawings
It is necessary to explain all this clearly and clearly, while stirring up the child’s interest in the task. For example, a teacher can say: “Children, today we will draw interesting figures. But I won’t tell you yet what it will be. You must listen carefully to my instructions in which direction and how many cells to draw the line, and not confuse right and left. We draw the pencil evenly without lifting it from the paper. And then we’ll see what kind of figure we get.”
It’s better to look at the first drawing together with the guys on the board. Conduct a so-called master class for beginners and children.
The teacher must note all the results of the work, keep a detailed diary of classes, thus monitoring and encouraging success, analyzing and explaining the most common mistakes made.
If the level of failure in the group is high, perhaps the pictures are too complex for children to understand and easier examples need to be selected.
Note!
- How to draw anime - useful tips and simple diagrams for beginners. Instructions with the basic steps of drawing anime (160 photos)
3D drawings: TOP-150 photos of the best methods and techniques. Step-by-step DIY drawing master class for beginners
How to draw a girl's face with a pencil - instructions on how to draw with a pencil for beginners. Master class with a description of the technique + photos of the best drawing options
In subsequent lessons, you can complicate the tasks, reduce the completion time, organize speed competitions between preschoolers, give more complex or even unknown pictures, and after the lesson talk about the drawn figure.
A fun activity for preschoolers - graphic dictations
Egorova Natalya Viktorovna
A fun activity for preschoolers - graphic dictations
Fun activity for preschoolers –
graphic dictations.
Drawing by cells is a very exciting and useful activity for children. This is a playful way to develop a child’s spatial imagination, fine motor skills of the fingers, and perseverance.
Graphic dictations help develop attention, the ability to listen to the teacher, and spatial orientation. They will also prepare your child's hand for writing. They will teach the baby to be more attentive. This is a great way to develop logic, abstract thinking, and meticulousness. With the help of these activities, the child develops, corrects the correctness of his movements, “gets a steady hand,” this skill will help him in school. Graphic dictations can be successfully used from the age of five.
What are graphic dictations? Graphic dictations are drawing in cells using the pointers in the task. To complete them we will need: a sheet of paper on which the cells are drawn, a pencil, an eraser. The tasks contain arrows (showing direction) and numbers (showing the number of cells that need to be passed in the indicated direction). If you follow the signs accurately and carefully, draw a line in the right direction at the right distance, you get a picture. It could be an animal, various objects, vegetables, fruits, trees, transport and much more.
Drawing by squares is a good way to teach your child to use a pencil and pen. Teach how to hold it correctly, practice so that your fingers don’t get so tired from holding an object at school. This exercise will help teach your child to count correctly; here you will need to count the cells so that by drawing a line you will get a picture.
I practice graphic dictation, both with the whole group of children and in individual lessons with children. Children really like these exercises. Children also take great pleasure in drawing themselves on lined sheets with tasks.
How to do graphic dictation
(Rules for drawing by cells).
Graphic dictation can be performed in two versions:
1. The child is offered a sample of a geometric design and asked to repeat exactly the same design in a checkered notebook.
2. An adult dictates a sequence of actions indicating the number of cells and their directions (left, right, up, down). The child does the work by ear, and then compares his image of the ornament or figure with the example in the manual using the method of superimposition.
When offering children such tasks, the teacher must follow some rules :
• When the teacher begins to dictate, he cannot pronounce any other words. And even more so repeat the same direction twice.
• Dictations are written in complete silence.
• If the child gets confused, he quietly puts down the pencil and calmly waits until the teacher finishes dictating. Only after this can you find out the error.
I start getting acquainted with the cage from the middle group.
I start work with the simplest thing - I write tasks in a notebook with a large square, the child must continue the row. Learning to see a cell and a line. We write sticks, squares, corners, simple patterns, each time complicating the tasks. We first divide the patterns into segments - we train, then all the particles are assembled into a pattern.
The following notations are used in the tasks: the number of cells being counted is indicated by a number, and the direction is indicated by an arrow.
Before you start writing a graphic dictation, you should explain to the children how the dictation will be carried out. First, we talk with the children that I will dictate to them how many cells the lines need to be drawn and in what direction. And they will draw these lines along the cells without lifting the pencil from the paper, and then together we will see what happens. Encourage the children to try to draw straight and beautiful lines, then the drawing will turn out wonderful.
For the first time, you can draw on the board with the children so that they can see how they need to work, and the children will be able to complete subsequent dictations without prompting. Before the dictation, you need to repeat where the right and left hands are, how to draw a line to the right and left. You can agree with the children about any marks (draw the letters “p” and “l” on the board, make marks on the walls, or stipulate that, for example: the right hand points to the window, and the left to the bedroom, etc.)
Then we move on to drawing under dictation.
To begin with, on the sheet with the dictation, in the upper corners, you need to mark - right and left. We give the child a squared notebook sheet, a pencil and an eraser.
In older groups, at the top of the picture we always indicate how many cells need to be moved away from the edge and top to start the dictation. In the indicated place, for example: retreat 5 cells from the edge to the left, count 6 cells from above. This is where you need to put a point. For younger children, it is better to count the cells on their own and set a reference point (from this point the child will draw lines under dictation).
It’s better to start with the simplest: - one cell up (1, one cell to the right (1), one cell down (1), one cell to the left (1). The result is a square.
Then, at our discretion, we complicate the tasks.
You need to dictate clearly, the child must perceive everything by ear. At the end of the work, look at how well the children’s figures coincide with the given elements. Review the sample. If the baby made a mistake, find out together where exactly. You can use an eraser to wipe away the point of failure and continue. The main thing is to support the child, praise him, if something doesn’t work out, you can offer to redraw the picture from the original.
Before each lesson, be sure to talk with your child about the fact that there are different directions and sides. Show him where is right, where is left, where is up, where is down. Pay attention to the baby that every person has a right and a left side. Explain that the hand with which he eats, draws and writes is his right hand, and the other hand is his left. For left-handers, on the contrary, it is necessary to explain to left-handers that there are people for whom the working hand is the right, and there are people for whom the working hand is the left.
This activity includes graphic dictation, discussion of images, tongue twisters, tongue twisters, riddles and finger gymnastics. Each stage of the lesson carries a semantic load. Activities with your child can be arranged in different sequences.
Application:
Who is suitable for graphic dictations?
Graphic dictations on cells are most interesting for children aged 5 - 9 years. But to complete the tasks, the baby will need certain initial skills:
- The skill of orienting a piece of paper in space. Understand what right, left, up, down means.
- The ability to count to ten or at least to the maximum number of cells in the drawing.
- Ability to hold a pencil correctly and draw relatively straight lines.
Otherwise, it is recommended to select the correct complexity of tasks depending on the age and skills of the child.
Where to get graphic dictations
Fortunately, the variety of manuals whose authors come up with interesting schemes for graphic dictations is great today. The manuals can be ordered in bookstores and even purchased online versions of publications. There are sites on which parents and teachers post dictations that they have invented for their children. So you definitely won’t have a shortage of samples. Each dictation in the manual is accompanied by instructions for dictation, but even if you come across a diagram without instructions, you can dictate the direction of movement and the number of cells yourself.
Temporary restrictions
In classes with children of any age, breaks should be taken every ten minutes. You can do a warm-up, read the poem “Our fingers are tired,” stand up to jump or play.
The time frame for classes depends on the child’s age, his perseverance and many other factors.
Typically, classes with children 5 years of age and younger last no more than 15 minutes. Graphic dictations with children 6 years old take 15-20 minutes. With older guys, at least 20 minutes, but no more than half an hour.
The teacher must monitor the children’s progress himself, changing the time depending on this. Lessons that are too long tire children and reduce their performance, while lessons that are too short will not allow them to learn all the planned material.
Graphic dictation or mathematical?
Graphic and mathematical dictation are often presented as one and the same. But I don't completely agree with this. Although a mathematical dictation may offer the same tasks as a graphical one, this is only one type of mathematical dictation.
The mathematical dictation itself may not be associated with drawing lines on the cells.
Nevertheless, graphic dictation is always performed on a sheet of paper with a checkered pattern. Teachers come up with different versions of dictations on cells to use them for different purposes.
This includes diagnostics of development levels, for example, perseverance, attention, fine motor skills, etc.; These are also developmental exercises for the formation of these personal qualities of children, starting from preschool age.
In recent years, entire series of graphic dictations have been developed. They are released in entire collections. For the most part, such special notebooks help preschoolers in the process of preparing them for educational activities.
Sketching
The child is given a completed drawing and a blank form. The child copies the picture by cells. You need to carefully monitor in which direction and how long the lines go.
It is important to interest the baby in drawing. For younger kids these should be simple templates. Boys may like cars or interesting geometric shapes, girls are happy to draw flowers and patterns.
Options for drawing by cells
Options for drawing by cells for children 6-7 years old can be divided into three groups:
- Drawing according to the proposed scheme, where the student must independently reproduce a similar drawing in his notebook.
- Drawing dictated by a parent or teacher. This task is performed by ear, and the adult indicates the direction of action - the number of cells up, down, right, left.
- Tasks without a drawn figure, but only with indication of the symbols by which the child himself draws. This is one of the most difficult options that is offered to older children. With this version of graphic dictation, the number of cells is indicated by a number, and the direction of movement is indicated by an arrow.
Drawing “Icicles are crying” - spring theme for younger groups
Continue the drawing by cells
In this type of task, children are presented with a symmetrical repeating pattern, which must be continued, for example, to the end of the line. The pattern can be of different levels of complexity, both the most elementary and more difficult. You can print such tasks on sheets of paper, or purchase special printed notebooks and put them in a math corner in the garden. Parents at home can come up with a pattern themselves by drawing it in a regular notebook, which the children will have to repeat.
An example of a simple checkered pattern
Symmetrical (mirror) drawing in cells
Mirror drawing in cells invites the child to complete part of the drawing, half of which has already been completed. But not just complete the drawing, but exactly as shown. The finished part can be located on the left or right, or maybe on top or bottom. The second option is more difficult. The child must strictly observe symmetry and draw the number of cells that was initially specified. These tasks are more difficult than others, but they perfectly develop abstract and logical thinking, perseverance and accuracy.
Drawing according to instructions with arrows
This method differs from dictation by less control on the part of teachers. The child is given a piece of paper with a dot and a small instruction, usually in the form of arrows with the number of cells. The child draws a picture at his own pace.
You can conduct a workshop for beginners and young children to explain how the task is performed. This method perfectly trains perseverance and attentiveness in children.
Graphic dictations for preschoolers literacy consultation (senior group)
Graphic dictations for preschoolers by cell will allow the future first-grader to correctly “place” the hand, acquire graphic writing skills for the preschooler, and help organize interesting activities. On the one hand, graphic dictation is an entertaining drawing in cells, on the other hand, it is a useful, effective technique.
Graphic dictation: what is it?
Graphic dictations for preschoolers in cells. Every child has a rich imagination and a desire to play always and everywhere. These innate abilities can be used to systematically prepare a preschooler for a new period of life for him - school time.
Graphic dictation is a didactic task that allows you to develop the child’s thinking and imagination, his ability to “see” in projection, and navigate in space.
In fact, working with a pencil is not difficult. The child only needs to draw a specific picture, moving the pencil in the right direction, following the recommendations of the adult conducting the graphic dictation.
The main thing that the future student must understand is that you cannot be distracted, otherwise, instead of a beautiful and correct picture, you will get a misunderstanding that will upset the child.
Graphic dictations will not require artistic abilities from a preschooler. He only needs to strictly follow the instructions to get a good result. There is no need to reproduce complex illustrations. The graphic collection contains simple images: an elephant, a giraffe, other animals, or rather, their outlines. There may also be houses, various vehicles, flowers, the drawing of which does not require detailed elaboration. Everything that a preschooler is asked to draw should be well known and understandable to him. In addition, do not forget about the duration of the work. To prevent fatigue from crowding out interest, graphic dictation should take little time.
Why graphic dictation is useful for preschoolers
Using graphic dictation, you can prepare your child to complete assignments at school. The child feels responsible, which has a positive effect on his self-esteem.
Graphic dictation helps develop many qualities:
- attentiveness;
- perseverance;
- discipline.
A preschooler is actively developing:
- imagination;
- perception;
- lexicon;
- thinking;
- memory;
- attention to detail;
- horizon.
It is worth noting the development of physical capabilities. This:
- coordination of movements;
- fine motor skills.
How to do graphic dictation correctly
In order for the child to receive satisfaction from the work done, you need to adhere to the rules for conducting graphic dictation. The very first and basic rule is not to rush. If a child does not keep up with the instructions of the teacher or adult conducting the lesson, if due to haste he makes a mistake, as a result of which the picture does not turn out, then such a graphic dictation will not be useful.
The second rule is clear instruction for the preschooler. A misunderstood task will not be completed correctly.
Instructions for dictation
The instructions begin with a dot on a piece of paper. Or rather, the teacher first prepares a sheet of paper in a box, on which there is already a dot. This is the start for a future picture.
If this is the child’s first time taking graphic dictation, the preschooler needs help. To do this, the teacher points on a sheet of paper with arrows in the direction in which the child should move the pencil to get the desired figure. The arrows are needed first. In the second and subsequent lessons, the child can navigate without them, following the instructions of an adult. Moreover, there is no need to put an end to it. The child will choose where to start, again following the advice of the teacher.
The teacher must remember that every action is spoken out. Every step: left, right, up, down. The teacher should also explain to the preschooler that one cell is one step. It is important to explain what vertical and horizontal are. Talk about an inclined line, how it differs from vertical and horizontal. This initial knowledge will help the child complete the proposed work better.
The teacher must have a ready-made version of the graphic dictation. After completing the work with a preschooler, you need to sort out possible mistakes and praise him for his diligence.
How long can a child complete graphic dictation?
Each child develops perseverance differently. This depends on the physical and mental characteristics of the preschooler. Therefore, it will not be possible to fit all children into a single framework. However, there are approximate time limits that can be used when conducting graphic dictation:
- For children of five years of age, the lesson should not last longer than a quarter of an hour;
- For six-year-old children, classes should last no more than 20 minutes;
- For seven-year-old children, classes should last no more than 25-30 minutes.
Periodically during class you need to set aside time for physical exercises and finger exercises. After all, what seems too easy for an adult causes complexity and tension for a preschooler.
Methods for performing graphic dictations
Among the most successful methods of conducting graphic dictation, three will be highlighted. They not only activate the work of the “gray cells” of the future student, but also cultivate such qualities as auditory and visual attentiveness, accuracy, discipline, and perseverance.
Doing dictation by ear in the cells
The auditory option for performing graphic dictation is considered one of the most difficult. It is important for the child to understand verbal instructions and transfer the instructions to paper. In this case, the child should already have knowledge of the following concepts:
- up;
- down;
- right;
- left;
- horizontal line;
- vertical line;
- slanted line;
- one step is one cell.
The work requires the child's concentration. Any distraction can negatively affect the result.
At the request of the teacher, the child begins to work from the starting point. It may already be marked on a piece of paper. Or the child draws it independently, following the teacher’s instructions. The teacher says the steps, the child performs. All tasks sound clearly, understandably, calmly. The child is given time to complete each step. What will it turn out to be: transport, plant? Or maybe an animal: a cat or a dog? The child does not yet know for sure, but when half of the steps have been completed, outlines already appear, and the little thinker begins to “recognize” the future picture. The happier the soul becomes if the guesses are confirmed.
After the graphic dictation, the picture depicted by the child and the sample are compared.
Drawing from a model: pictures
This assignment will require attention to detail.
To get twin pictures, the child needs to understand the location of the image on the checkered sheet, count the steps, and understand in which direction the lines go. There are two sheets of paper on the table in front of the child. The first one shows the finished drawing. The second sheet is still waiting for the image. The child, peering at the image on the sample, must transfer it to his sheet. Without attentiveness the task cannot be completed. For example, the sample is a dinosaur. It involves a lot of actions and movements with a pencil, a lot of steps with counting cells. The work is painstaking and requires extreme visual attention. But when the graphic dictation is completed, the child develops a feeling of pride for a well-completed task.
Finish half
Essentially, the child needs to finish a picture that already has one half. The child must follow the rules of symmetry so that the image does not turn out askew. This graphic dictation allows you to develop the child’s thinking abilities, the ability to navigate on a paper plane, and attentiveness to details.
It is easier and easier for children to complete half of the picture than to take a graphic dictation by ear. Therefore, it is recommended to offer such work to children of middle preschool age, and the schemes should be easy. Bunny, house, butterfly, ship - the designs can be varied. It is possible, taking into account the psychological characteristics of gender types, to offer specific drawings to boys (tank, rocket, car) and girls (doll, flower). Encouraging work to be done, no matter how easy it may seem to an adult, is unacceptable. The child works at his own pace; temporary stress will only harm him.
All these techniques help the child to become more comfortable with a pencil, master new concepts that will be useful in elementary school, and develop abilities that are also necessary for future students. Graphic dictation will also help preschoolers imagine themselves as students. And the first graphic skills that a child will acquire will help him later better understand and remember letters, their outline, and master the alphabet. After the pictures, you can try to draw letters using the arrows and following the teacher’s step-by-step instructions.
Simple graphic dictations for preschoolers
To conduct a graphic dictation, you need to prepare a workbook for your child. The notebook should be squared. There are notebooks for sale in large and small squares. It is better to offer five-year-olds to work with large cells.
To work, children will also need an eraser, colored pencils, and a ruler for drawing lines. The teacher should take care of clear pictures with samples. Next, following the teacher’s instructions, the child can perform a graphic dictation. To make it more interesting for children, you can come up with a fairy tale, according to the plot of which you need to disenchant the hidden pictures. And children are little wizards who can create a wonderful image using ordinary cells and lines.
Simple graphic dictations in cells - these are often images of animals
Parrot
Excavator
Ship
Elephant
Bear
Bug
Graphic dictations can become one of the favorite pastimes of an inquisitive preschooler. Meanwhile, the development of attention, graphic memory, spatial orientation, and the ability to use a pencil will be useful to a child in primary school. Graphic dictations are a good way to prepare a child for school assignments. The main thing that is important for parents and teachers to remember is not to overwork the child, not to take him beyond the boundaries of interest and desire to learn and learn. Classes must be motivated. And of course, difficult tasks should appear only when the child has mastered the concepts and learned basic graphic writing skills. Everything should be comprehended gradually, taking into account the individual characteristics of the child.
Symmetry
The baby is given half of the drawing and must complete the other half himself, maintaining symmetry. The technique affects spatial orientation, thinking, the ability to compare and find one’s own mistakes.
The benefits of the technique
Graphic dictations are often given for 1st grade. It does not matter what type of methodology the teacher or parent uses. The activity has a positive effect on the baby’s abilities and helps him develop the following vital qualities:
- coordination of movements;
- fine motor skills;
- attentiveness;
- perseverance;
- ability to count;
- spatial and abstract thinking;
- graphic skills;
- determination.
In addition, the child learns to adequately assess his successes, perceive instructions by ear and always finish what he has started. The baby expands his horizons and increases his vocabulary. The technique will perfectly help mothers prepare kindergarteners for school.
Study guides with complete instructions can be purchased at office supply stores and bookstores, or downloaded online and printed. Some graphic dictations by cell are attached below.
Graphic exercises are a fairly simple task for preschoolers. Therefore, some mothers consider it unnecessary and useless. But that's not true. Dictations help children gain self-confidence, develop attentiveness and perseverance, so necessary for adaptation to school.
Examples of graphic dictations in cells for preschoolers
For a simple pattern, the teacher puts a starting point and begins to dictate: 1 cell to the right, 1 up, 1 cell to the right, 1 down, etc. to the end of the line. It turns out to be a simple drawing. This may be the first option for graphic dictation for beginner children. Next, the teacher asks to step back 1 cell down and draw a mirror image of the picture.
Kangaroo by cells