How to make a horse from plasticine
A horse is a noble animal with a proudly arched neck and a developing mane. She has a massive body and refined and at the same time strong legs. It is difficult to recreate a plasticine horse in all its natural perfection, but we will try. And to make your work easier, we offer instructions on how to make a horse from plasticine.
Features of sculpting a horse
As already mentioned, only sculptors can sculpt a natural horse, so the sculpting process is based on stylized horses. This applies not only to horses, but also to plasticine hedgehogs, so if you don’t get the perfect horse the first time, don’t be discouraged.
Such crafts are suitable for children who study in older groups of kindergarten or in primary school. Classes are held with the goal of instilling a love for animals and developing in children a love of beauty and artistic taste. In addition to these positive qualities, sculpting a horse allows you to exercise your little fingers and teaches you to analyze the appearance of a horse.
Let's start looking at instructions on how to mold a horse from plasticine.
History of the craft
Clay is a material that is plastic in its raw form and acquires fairly high strength after firing. Thanks to the combination of such characteristics, clay products have been incredibly popular from ancient times to the present day. In the old days, dishes and clay figurines were made in almost all regions of our country. At the same time, each locality developed its own forms and original traditions of painting and decoration. The village of Dymkovo (Kirov region) has become famous throughout the country thanks to its craftsmen who make small, bright figurines capable of making a variety of sounds. Interestingly, the traditional Dymkovo toy was invented not for the amusement of children, but for protection from evil spirits. In the old days, it was believed that evil spirits were afraid of loud sounds. That is why in ancient times all Dymkovo toys could rattle or whistle; they were traditionally made for the festival of Pandemonium, during which it was supposed to drive out evil spirits and have fun with the whole world.
Simple plasticine horse
This manufacturing option is good because in the process of constructing a horse with a child, you can repeat the names of the figures and correlate them with the parts of the horse figurine.
What to prepare for modeling:
- plasticine;
- board;
- stack.
Before starting work, we recommend showing your child photographs of horses. Tell your child that this animal consists of a body, a neck that is curved, an oval head and long legs. The horse is decorated with a thick tail and a luxurious mane. Once the child is familiar with the pictures, you can begin to work.
Instructions on how to make a horse from plasticine:
- Prepare the material. If it was not warm, it needs to be warmed up and kneaded.
- Roll into a ball from a single piece. Divide the resulting figure into several parts. Roll each part with a roller. Divide the resulting figures into six cylinders. Try to divide so that each separated element is the same.
- Take one piece from the cylinder and roll it out into a long but thick sausage. This will be the head. The part where the nose and mouth will be located needs to be slightly lengthened. We leave the back of the figure massive.
(Step 2) - You should have a piece of the first cylinder left. We will sculpt a neck from it. We form a figure similar to a crescent. Press the top with your fingers. This place will be intended for the mane.
- Let's start sculpting the body. Take four pieces from the separated plasticine and make an oval shape out of them. Set the workpiece aside.
- From the remaining four pieces we form the legs. They should be thick on top and thin on the bottom. Make hooves from small peas of plasticine.
(Step 3) - When all the large details are ready, you can create the horse figure. Attach the head to the body. We carefully cover all joints, do it evenly so as not to deform the product. We do the same with other parts.
- From the remaining material you need to make ears, mane and tail. Use black to make your eyes. Make nostrils on the head using a stack.
- Let's start shaping the horse. We attach the ears to the head. They should be located with a wide part near the head, and their shape should be pointed towards the top. We coat the parts to remove the joints.
(Step 4) - Place the resulting horse figure on the table. We bend the legs to create a walking horse. All that remains is to add the mane and tail. They are made from thin sausages. If there is no plasticine left, megamaster.info recommends cutting through the mane and tail with a sharp and thin object. To make your horse even more beautiful, you can add bangs.
The instructions on how to make a horse from plasticine are finished. You can admire the result. The finished horse can be used in your collection of plasticine works. If you don’t have one yet, replenish it by making a dog out of plasticine.
Manufacturing technology
The famous toy is made in stages. And these stages are represented by modeling, mandatory drying, firing, whitewashing and painting itself.
Making a Dymkovo toy step by step:
- Modeling. The figure is sculpted in parts. Take oily, washed clay, diluted with sand. Balls of different sizes are rolled out of it. Then they are flattened into a flat cake. The body of the toy is made from them, and small parts are attached to the body. The joints are thoroughly moistened with water, and then the joints are smoothed with a wet cloth. For example, a horse consists of a cylindrical base, four short cone-shaped legs, and a curved neck with a muzzle.
- Drying and firing. The drying stage is required. How long to dry depends on the size of the craft, and on the characteristics of the room too. Previously, firing was carried out in a Russian oven; toys were literally heated red-hot and left to cool in the oven. Today, figurines are fired in special modern equipment, thanks to which the process is no longer so labor-intensive and, of course, less dangerous.
- Whitewash. After being in the oven, the toy turns red-brown. You can’t apply patterns to such a base, so the craftsmen always bleach it. This happens using a solution of chalk powder and milk. When the milk sours, the solution hardens and an even casein layer forms on the surface. Surprisingly, numerous ways to simplify the whitewashing stage led to nothing. And today they whitewash a toy in the same way as many centuries ago. Only children in class can paint the figure with white gouache.
We invite you to watch a video on how to sculpt a toy body and attach parts using the example of a horse.
The processing continues with one of the most interesting stages – painting.
Multi-colored horse
Modeling from plasticine for children should be exciting, and in order to make it so, we recommend using bright colors and creating only interesting crafts. For example, you can make a colorful, playful horse from orange and black.
To carry out the work, we will not need new materials, the same board, plasticine of a brand convenient for work and a stack.
We proceed step by step:
- We take the main color and divide it into 2 large parts, five medium ones and four small ones. From two large ones we roll out the torso and head. From the middle ones we make the neck and legs, and from the four small ones we make hooves.
- We sculpt the body to the head. We coat the joints for the cast figure. We attach the hooves to the legs and sculpt everything to the body. When attaching the legs and when sealing the joints, be careful; the finished horse should not wobble.
- We make a lot of thin sausages for the bangs, mane and tail. Attach to the head and torso. Using a stack, we cut through and slightly open the horse’s mouth. In order for the horse to get an interesting color, make several small cakes and smear them on the back.
- All that remains is to make the eyes. We construct them from white cakes. We put black balls on them and place them on the head.
The modeling is finished, the horse is ready. Admire the result.
You can also draw a horse
System of images and plots
If we compare the surviving images of the first products with modern examples of this folk art, we cannot help but notice that over hundreds of years their creators have stepped far forward. The toy got rid of the simplicity of its form and ornamentation and became more decorative, and the number of plots increased significantly.
Although craftsmen claim that no two figures are absolutely identical, five main typical groups can be distinguished:
- Female images (young ladies and mistresses, nannies and nurses with a child in their arms, water bearers). The ladies have corsets and crinolines, umbrellas in their hands, fashionable hats and outfits; nurses in kokoshniks, wide skirts, aprons with frills. Static figures full of majesty and dignity.
- Cavaliers are often depicted on horseback in profile. Compared to women's images, they are smaller in size and look simpler.
- Animals. Initially, figurines were created depicting totem animals: a ram, a goat, a deer, a bear, and images of various domestic animals were gradually added. A distinctive feature of this type: an upturned head and short legs, widely spaced. Often the figures are “dressed up” in bright colorful costumes of musicians with instruments in their hands.
- Birds (roosters, turkeys, ducks). Ducks have lush capes, roosters and turkeys have bright, curly tails.
- Compositions. They can include both people and animals. They present various scenes from Russian city and village life: tea drinking, folk festivals, sleigh rides and many others.
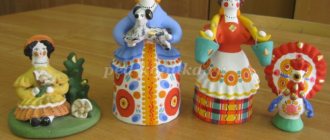
Dymkovo plasticine horse
Dymkovo horses are made from clay, and the finished products are decorated with a variety of patterns. But since we are considering plasticine modeling for children, we will make a plasticine Dymkovo horse.
Manufacturing process:
- Take your base color and divide it into two parts. One should be larger, the other smaller. We will need the first for making the head and neck, the second for the legs and torso.
- The difference between the Dymkovo horse and the others is that it has cone-shaped legs and a short and thick neck. The parts are easy to make, which is why such plasticine crafts for children are popular. For the legs and torso, roll out a thick roller.
- Using a stack, the previously obtained roller must be cut on each side in the center. This way you can get legs. The figure needs to be arched. We bend it until the legs are firmly on the surface of the desktop.
- Take the second part of the material and roll it up. From the resulting figure, mold an oval and a cone. The first part will be used as the head, the second will be needed for the neck.
- We connect the neck to the head. We iron the joints. We fasten the head and torso.
The instructions on how to make a Dymkovo horse from plasticine are coming to an end. It remains to design a few small parts.
What should be done:
- mold two cones from plasticine, these are ears, attach them to the head;
- the tail and mane for the horse can be made from thin sausages.
If you look closely at the photo, you will notice that the clay is painted. We won’t paint the plasticine, but you can add a few multi-colored cakes to the horse’s body. Smooth them over the material so that the finished figurine is beautiful.
The instructions on how to make a Dymkovo horse from plasticine are over. Of course, if you really want to make a product as close as possible to the original, you can apply patterns to plasticine using water-based paint, but this substance should only be used under adult supervision.
In another article, read the instructions for sculpting bunnies
Manufacturing secrets
It is easier for children to make a Dymkovo toy from plasticine. But real masters use local red clay for their work, mixing it with river sand. All parts of the figures are molded separately and then connected. The joints are smoothed using liquid clay.
The resulting toys are first dried in air and then fired in a hot oven. The surface is whitened. In the old days, for this purpose, they took chalk and diluted it in milk. The paints were made from chicken eggs mixed with kvass. The patterns were drawn with a pen. They were simple: circles, dots, wavy lines, zigzags. Moreover, each element had its own meaning. The circle symbolized the sun. Dots depicted human footprints. The wavy line reminded of water, the crossed stripes indicated a well.
The colors used were bright and festive. To give the finished toys a shine, they were coated with beaten egg white.
Plasticine Rainbow Dash
The cartoon about ponies is very popular among little girls. There are many characters in it, but the one we will sculpt below occupies a special place. Instructions on how to make such a horse from plasticine will be especially interesting for girls.
In our work we will use all the materials we are familiar with, with one exception. You will need a set of plasticine that contains all possible colors.
Instructions on how to make a plasticine pony craft for children:
- Let's start with making the head. For this we need blue. Roll a large and a small ball. We connect them to each other. We transform a small part into a tubercle. Using a stack on this tubercle, highlight the nostrils.
- We do not remove the stack and make holes on the face for the big and cute eyes of this horse. For the eyes you will need cakes of different sizes. We will list the colors in descending order of size. The largest color is black, followed by white, purple, black again, and the smallest white dots complete the eyes. We collect the cakes indicated by color in descending order. Decorate the finished eyes with eyelashes. This plasticine eye sculpting for children may seem difficult due to the miniature parts, so it can be done by an adult.
- Attach triangular ears to the made head. The head work is finished for now.
- Let's start making the body. Take a long block. On one side, make it narrow, then bend the part at an angle to create a neck.
- Take matches. They will be needed for fastening. We sculpt legs from medium blue balls. We pull them out to get cones. We insert a match into the base of each leg for fastening. We attach the legs to the body and the head.
- The horse must be decorated with a fluffy rainbow tail. Each individual hair of the ponytail must be composed according to the shades of the rainbow. We fasten all the parts and attach them to the horse figurine. We make the horse's mane and bangs.
- Those who have already seen the cartoon know that our horse stands out not only with its rainbow tail, but also with its wings. For them you need to make several blue cakes and apply notches on them with a tool. Attach the wings to the horse.
- Almost done. All that remains is to attach its distinctive sign to the horse - a lightning bolt.
You learned how to make Dash the horse from plasticine. The finished figurine looks very attractive. Girls will surely love such a graceful horse. If it’s difficult to make a craft, but you want to make a cute creature, try making a cat out of plasticine.
Complex coloring pages with a lot of small elements
Dymkovo toys (templates for drawing, as well as drawings for coloring, are freely available on the Internet), due to the variety of their options, can be used in work with older children.
For schoolchildren attending grades 3–5, it will be interesting to paint more complex patterns with a lot of small details.
Teachers recommend drawing parents’ attention to the following pictures:
| Sketch for coloring | Description of the drawing and the principle of working with it |
| "Walk". This picture for coloring is a complete artistic composition. It depicts a man and a woman floating in a boat on a river. The task facing the child is to make colorful not only people’s costumes, consisting of small parts, but also the objects surrounding them. These include the celestial bodies, the pattern on the ship and the waves. The main colors that the student will work with are red, blue, white, black and their derivatives. | |
| "The Bears". This sketch shows a family of bears. Animals are depicted in human form: they wear clothes and jewelry. The difficulty in coloring this drawing lies in the large number of small details of the characters' clothing. To complicate the task, you can invite the child to make the picture as realistic as possible (paint the bears in the appropriate colors, as in life, and their clothes in the shades most often found in adult wardrobe items). Typically, children work with this image using blue, red, black, yellow, brown and white colors. | |
| "Rider". This is one of the most popular pictures for coloring, used by teachers when working with them. It depicts a boy standing on a horse. In this case, the child will need to carefully paint the smallest details of the image of the young man, as well as reproduce the color of the animal and surrounding objects. It is recommended to work with brown, black, red, blue, yellow, orange, blue and green. |