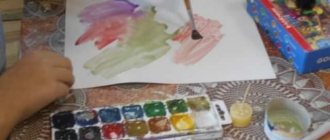
Choose the right paper.
As mentioned above, paper texture plays an important role when you write wet on wet. Hot pressed paper (smooth texture) has less absorbent, so colors will float on the surface longer.
Cold-pressed paper (semi-smooth texture) and rough paper (dry without wringing), on the other hand, absorb water much faster.
Use a hair dryer.
Use a hairdryer when painting wet on wet, and you won't have to wait for the desired layer to be ready to continue working.
A hairdryer was used in the squirrel painting. The watercolor strokes came out with well defined and soft edges. This technique gives watercolor painting a subtle, crystalline, translucent appearance.
Note: Be careful not to dry out the paper.
Lifting of paint from the surface of the paper.
As long as the paper is still damp, you can easily make adjustments if something goes wrong. Just blot your brush thoroughly and lift the paint off the paper. In some cases, it may be necessary to change the water to clean water before lifting. The trick here is that a wet brush absorbs more water than it releases, so it will pick up wet pigment from the surface of your painting.
Also, you can make some adjustments when the paper is dry, but there is a chance that your painting will lose its freshness and look overloaded.
Note: Pay attention to the pigments you use: some are harder to lift than others.
Seize the right moment.
If you apply paint when there is a sheen to the paper when it's wet, the colors will spread over a large area of your painting, creating vague shapes. When you need to make a soft, but not too diffuse brush stroke, simply wait until the surface is not glossy, but still damp and cool to the touch.
The water/pigment ratio is also very important. In the picture above, the first stroke was applied on shiny wet paper. The second one was made when the paper was no longer glossy, but the paint on the brush had a lot of water in it, so it spread considerably. The third brushstroke was done at the same time, but with more pigment.
Do you want to learn how to draw? Online drawing schools.
Retain moisture with a damp cloth.
If you need the paper to remain wet for a longer period of time, you can take any moisture-resistant surface (eg glass, plastic), place a thin, damp cotton cloth on it, and then a sheet of paper dampened with water on both sides.
With this simple trick, the paper will hold water for hours.
Online mini-course “Techniques for painting the sky in watercolor”
The mini-course “Techniques for painting the sky in watercolor” is several online lessons in which you will learn to convey various states of the sky, paint realistic volumetric clouds and depict the effects of rays of light breaking through clouds.
Preparatory stage
All work on creating a drawing can be divided into several stages. The stage of direct application of strokes is not always considered the main one. Preparation is also of utmost importance.
First of all, the artist must prepare a comfortable workspace. A sheet of watercolor paper is placed on a suitable flat surface. For horizontal orientation, a regular table will do. If it is necessary to obtain visual effects by spreading paints, then the paper is placed on the tablet at a certain angle.
A sketch is created on the prepared surface. This is a quick sketch of the future drawing. Sketching is used where it is necessary to capture the relative position of objects at the current moment in time. For example, Natalya Kovaleva did sketching from life in Pskov.
In watercolor technique, sketch plays a special role. Drawing in the raw differs from other techniques in the dynamism of the picture.
In the process of changing colors, the artist may lose the main idea, so with the help of a quick sketch he seems to fix the picture. And already on the formed sketch, various textures or visual effects are obtained.
The pencil is used until the water hits the sheet of paper. A pencil will not write on a damp sheet of paper. If the paper was moistened, then this is considered an irreparable error and you will have to start work from the very beginning. The need to use a pencil is thought out in advance. The pencil should not be visible through the watercolor, so after sketching, all strokes are erased with a clean eraser so that only barely visible lines remain.
Working out details
This stage is considered additional and final. The artist evaluates the location of the watercolor and corrects drips, removes paint that has flowed beyond the permissible limits.
The master uses a slightly moistened, low-hardness brush. If it is necessary to clear a particular fragment of paint, then use a brush or cotton swab dipped in clean water. Those places from which the paint has been removed again require the application of strokes. To avoid repeated mistakes during the correction process, it is recommended to use thin brushes.
In the paintings there are objects located in the shadows. However, their significance in the interpretation of the plan should not be diminished. To give importance to such elements, artists usually deliberately darken them even more. You can remove the emphasis from bright objects by adding water to the stroke.
After all the above measures, the painting is allowed to dry to such an extent that the moisture on the sheet is barely felt.
Just a few minutes later the artist begins drawing the details. They seem to fill the drawing with life. Such details include birds, ripples in the water, fallen leaves, spots on fruit. Details are formed with thicker paint and thin brushes. Here the technique is not applicable in any way.
Preview:
"Painting on a wet layer of paper"
(summary of an art lesson in the preparatory group)
Materials and equipment:
- tassels,
- foam sponges,
- paints, gouache,
- sheets of thick white paper,
- rags,
- baths with water.
- looking at paintings by artists,
- remember the genres of painting.
Introduce children to a new genre of painting - working with paints “wet”. Learn to classify reproductions of paintings by genre - portrait, landscape, still life. To consolidate children's knowledge and skills in mixing colors and obtaining new shades. Encourage children to independently convey images of objects, using the means of expression available to them (stain, color, decor). Develop fantasy and imagination. Teach children to evaluate their own drawings and the drawings of their friends in accordance with the task.
(Children stand on a carpet on which there are flowers of different colors.)
Hello guys and dear guests. Today is an unusual day for us, guys, many guests have come to us - say hello to them, smile at them and we will start working with you.
To begin with, I would really like to know in what mood you came today. You and I know that mood has its own color, here in our fairy-tale meadow many colorful flowers have grown - please, each of you choose a flower that is similar to your current mood.
What color did you choose for Styopa's flower? Why? What's your mood, Tonya? How about Olya?
I’m very glad, guys, that you all chose bright and rich colors, which means that your mood is joyful, good, bright, and all the gloomy flowers remained in our meadow. Let's return our beautiful bright flowers to our fairy-tale meadow, let them grow and delight our guests.
Now let’s stand in a circle, hold hands, close our eyes and wish each other health, good mood, kindness, happiness and that everything works out for you in class today.
Well done, now let’s go quietly and sit down.
First, let's remember what genres of painting you know?
Landscape, portrait, still life.
Right. Here on the table I have reproductions of paintings. I ask Vanya, Kostya and Diana to come out. From all the variety of paintings, let Diana choose still lifes, Vanya - landscapes, and Kostya - portraits. The children start working.
Vanya, what genre did you choose?
Guys, did Vanya choose the right paintings?
Why, Vanya, did you decide that this was a landscape?
Vanya reads a poem:
If you see in the picture, a river is drawn, Picturesque valleys, and dense forests, Blonde birches, or an old strong oak, Or a blizzard, or a downpour, or a sunny day. Either the north or the south can be drawn. And we can see any time of the year from the picture. Without hesitation, let’s say: it’s called a landscape!
What genre did Diana choose?
Why did you decide that all these paintings belong to the still life genre?
Diana reads a poem:
If you see in the picture, a wonderful vase on the table, There is a bouquet of beautiful, snow-white chrysanthemums in it, There is a lot of dishes, both glass and simple, Maybe a cup or saucer, with a gilded border. And it also happens that there is game drawn there, and finally, let’s put in ripe peaches and plums. And there might also be a cake in the picture. And that’s why the painting will be called a still life!
Guys, Diana chose the right paintings - is this a still life?
Kostya is left with the last genre - portrait.
Kostya recites a poem about the “Portrait” genre.
If you see in a picture someone’s profile or full face, Or maybe someone’s perky and cheerful eye, Maybe sad or brave, maybe kind or evil. In a painted picture, this is the main person. Maybe dad or mom, maybe grandpa and me. Drawn in the picture, maybe my whole family. It’s not difficult to guess here, there is no uncertainty. That beautiful painting is called a portrait.
Did Kostya choose the right paintings?
Well done guys, all the genres were divided correctly.
Today we will get acquainted with another genre of painting - painting on a “wet” layer of paper.
Let's remember what “painting” actually is.
“Painting” is a very easy word to remember: it consists of two words: lively - write. Pictures painted with different paints or other colored materials, such as pastels, wax crayons, are called painting. Today we will start painting on a “raw” sheet of paper. Our main tool today will be a foam sponge; we will wet our sheet with it. Today the colors will not behave as usual. They will blur, spread out, go beyond the boundaries of your drawing - you should not be afraid of this. This time you don’t have to mark your drawing with a pencil, just imagine what you want to draw. The work is done very quickly, with light movements. The hand moves freely. For the “wet” technique, the theme of drawing “Fur-bearing Animal” is very successful - after all, fluffiness can only be done using the “raw” technique. Today you will feel like a little wizard. Let's try to get started.
But first, let’s do the same as you and I mix colors and play the game: “One, two, three - run a little.”
Well done, well done, now let’s start working.
Children draw. When the work is finished, move them aside to dry and conduct physical education with the children:
Our scarlet flowers are opening their petals. The breeze breathes slightly, the petals sway. Our scarlet flowers cover the petals. They shake their heads and quietly fall asleep.
Well, now let's look at our work.

