Work algorithm
There is no need to first tear off pieces of colored paper; you can do it differently. Tear-off appliqué from colored paper is performed as follows:
- a large colored sheet is placed on a sheet of cardboard;
- press a piece of paper to the tape with the blunt tip of a pencil;
- then tear the paper off the cardboard;
- again place a large colored sheet on the cardboard base and repeat the steps.
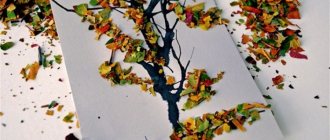
The finished cut paper applique will consist of many individual colored fragments fixed on cardboard using double-sided tape. For example, a cut paper applique “Autumn” involves the use of different colors. The selection of shades depends on the creative imagination of the child who performs this task. Some kids who work in patchwork technique have appliqués full of different colors, while others choose only yellow shades for their activities.
Corrugated paper aster
- Secrets of builders: working with couplings
DIY New Year's crafts - 9 best options
- Autumn paper crafts
You will need: corrugated paper of purple, yellow, green and light green, scissors, wire, glue gun, pencil, ruler, watercolor paints, brush.
Master Class
- Prepare a strip of purple corrugated paper 4 cm wide.
- Tint one edge of the strip with purple paint and set aside to dry.
- Fold the strip several times.
- Make cuts along the unpainted edge. The first blank is ready.
- Make the second blank in the same way, only take a purple strip 6 cm wide.
- Prepare a strip of yellow paper 3 cm wide.
- Fold the yellow strip several times and make cuts.
- Wrap the wire with a light green piece of corrugated paper and secure with glue. This will be the stem.
- Wrap a yellow blank around the end of the stem - these will be the stamens.
- Twist the ends inside the purple piece, which is 4 cm wide, using a pencil.
- Step back from the base of the stamens and glue the petals.
- Take a 6cm wide purple blank and wrap it around the bud as shown in the photo.
- Twist the ends of the petals and straighten the middle.
- Cut out 6 sepals from green paper, then glue them on.
- Cut 6 long leaves of different sizes from light green paper and glue them to the stem.
The corrugated paper aster is ready! You will find even more flowers HERE.
I recommend watching this video!
Note! DIY ant craft
Types of tear-off appliqués
Tear-off paper applique has become so popular and in demand that numerous varieties have begun to appear. For example, in elementary school, teachers began to use a special technique - handigyrim. Its specificity lies in the fact that special handmade paper (handi) produced in Korea is used for the work. When creating an appliqué using the cutting technique, you first need to wet the pieces of paper in water, then twist them and fill the contours with these “sausages.” As a result, the effect of watercolor painting is observed.
Jobs for kids
A simple applique made from torn pieces of paper can be done even by children of 2-3 years of age. At such a young age, not all children know how to use scissors, glue, or make beautiful and straight lines. To show your child’s creative abilities at this time, the ideal option would be applique and mosaic made from torn pieces of paper. The baby's fingers will develop, and in the future he will not have difficulties with writing skills.
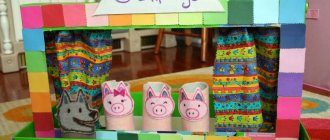
Pumpkin
You will need: rolls of toilet paper or paper towels, scissors, twine or rope, stick, pva glue, for decoration - glitter or book pages.
Master Class
- Cut the sleeve into circles.
- Apply glue to one piece, sprinkle with glitter or glue a piece of page and leave to dry.
- Decorate with glitter or book pages with every detail.
- Gather the circles onto twine to form a pumpkin.
- Glue the stick into the middle of the pumpkin.
The pumpkin made from bushings is ready! You can find even more crafts made from bushings HERE.
The main differences between patchwork techniques
Ordinary pictures require the use of a variety of ready-made templates. The child must first transfer them to paper of the desired color. Armed with scissors, he carefully cuts out all the blanks. If your baby has not yet learned how to hold scissors correctly, it will be difficult for him to work with them. As a result, he will not see the beautiful application and will be upset.
At the age of 4-5, children experience their first transitional period, so psychologists do not advise choosing tasks that can hurt the child. Having experienced failures at this time, he will not be able to tune in to positive growth or be motivated to demonstrate creative abilities. An application made from torn pieces of paper “Autumn Tree” is an excellent chance to avoid failures associated with using scissors in your work.
Example of tear-off technique
Have you decided to spend a free evening with your child and prepare a gift for dad for his birthday? In this case, choose a picture option, stock up on colored paper, cardboard, glue in the form of a pencil and start creating. We offer a work plan for those who decide to create a “color masterpiece.”
At the first stage, you need to select a background of thick cardboard. If the applique is associated with autumn, you can use blue, white, gray dense material. Pay special attention to its density, since when working with glue, the base will become saturated with it and will not be able to withstand the entire application.
Now you can proceed to selecting a pattern for the future application. Have you decided to make a picture dedicated to late autumn? In this case, you can use a tree or flowers as a base design. First, it is important to draw the outline of the future picture onto the base with a pencil. For example, when choosing an autumn theme, you can mark a tree trunk, branches, and a place for leaves on cardboard. If the application is made by a schoolchild, in addition to the tree, the base depicts birds flying south and the contours of clouds.
The algorithm is similar to coloring different images in a coloring book. But working with pieces of paper does not involve painting, but gluing the fragment with paper of the desired color. In the first task, parents or a teacher can help the child, prepare colored pieces of a certain size for him, and show the child how to properly glue them inside the outline.
First, large pieces are selected, and each of them is glued separately. Then small pieces are used to fill the remaining space in the circuit. Do not forget while working that it is important to select fragments not only by parameters, but also by color. The task of adults is to control that during work the baby does not go beyond the boundaries of the intended contour. Otherwise, the application will turn out untidy and ugly.
DIY autumn crafts for the garden and school
Autumn crafts
- These are works made most often from natural materials. Acorns and chestnuts, cones and nuts, seeds and berries, and even colorful leaves - all these are universal craft materials that autumn is so generous with. The section presents master classes and photographs from exhibitions from kindergartens and schools. If you were asked to make a craft with your child in kindergarten on the themes: “Gifts of Autumn”, “Pantry of Autumn”, “What Autumn Brought to Us”, “Golden Autumn”, etc. — be sure to look at the materials from this section.
The change of seasons brings variety to our lives and serves as a source of creative inspiration. Autumn is a special time. The energy accumulated over the summer is looking for a positive outlet, and nature pleases with an abundance of bright colors. Clear days alternate with monotonous rains, and cheerful walks with quiet homework. This is the best time to make crafts from natural materials with your children.
Autumn inspires
Contained in sections:
Includes sections:
- Leaves. Crafts and applications from leaves 834
- Autumn bouquet. Fine art, compositions, drawing 455
- Autumn wreath 55
- Crafts from vegetables and fruits 418
- Rowan. Fine art, crafts, rowan drawings 410
Master class: application “Autumn Forest” for children of middle preschool age
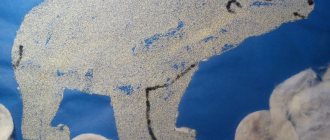
I bring to your attention a simple application for children of middle preschool age on the theme “ Autumn ”: 1) To work you will need: colored paper in red, orange, yellow, brown and blue, scissors, glue, black felt-tip pen. 2) On yellow and red paper.
Collective work with children of the middle group “Autumn has come to us”
Topic: “ AUTUMN ” Materials: Whatman paper, colored pencils, wax crayons, leaves, clover flowers, berries, maple and birch seeds, PVA glue, glue brush, oilcloth, hand rags. Goal: To develop the ability to arrange leaves of different colors and sizes on the background, to move them in search.
Where to get templates
The easiest option is to draw the outlines for the future application on cardboard yourself. In addition, you can use ready-made templates by purchasing a special set. Such kits include not only several thick bases with printed pictures, but also sheets of colored paper and glue.
If desired, you can also print the pictures using a computer and printer. The children themselves can also take part in making the outline of the future applique.
You won’t have any difficulties tearing the paper; you can turn this activity into an exciting game. If you carefully examine the finished work, it looks like a mosaic. School-age children, when gluing small pieces of paper, leave practically no empty spaces between them. Therefore, their work looks like a real piece of patchwork art. Children do not immediately master the basics of this interesting work, but parents or educators can always come to the rescue.