We planted a vegetable garden, look what’s growing!
Natalya Grigorievna Konovalova, teacher at MBDOU No. 27, Uglegorsk, Sakhalin region
This is possible when children have at least basic knowledge about nature, master simple methods of growing plants, learn to observe nature and see its beauty. It is on this basis that children’s love for nature, their native land, and the Motherland is formed.
Preschoolers are in kindergarten almost every day (except weekends), from morning to evening. Where can they learn hands-on interactions with nature?
For this purpose, we have our own vegetable garden in each section of our kindergarten. A vegetable garden in a kindergarten is one of the conditions that is necessary for the implementation of environmental education of children in kindergarten. Its presence promotes the child’s contact with natural objects and introduces preschoolers to seasonal changes.
Here children have the opportunity to observe the development of plants, remember their names and appearance characteristics, note characteristic features, acquire watering and care skills, and understand the role of nature in human life. In addition, this is a feasible joint work of children, which makes it possible to learn responsibility, contributes to the unification of the children's team, and the preservation and strengthening of children's health. A vegetable garden in a kindergarten is also an opportunity to see the results of your work.
In our garden, the children, together with the teacher, planted dill, lettuce, carrots, beets, onions, parsley, and peas and take care of them. In the process of observation and hard work, they learned that their growth and development depend not only on sunlight, heat, moisture, soil, but also on care.
We teach children watering, loosening, weeding, we explain that they loosen so that air can flow better to the roots of plants, we teach them to distinguish cultivated plants from weeds.
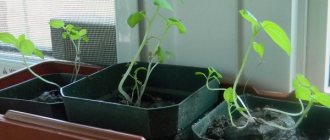
Working in the vegetable garden and flower garden in spring and summer, preschoolers gain basic understanding of growing plants from seeds.
Such constant activity is a method of environmental education: it teaches children to systematically think and really care about the plants that are in the same living space as them.
Working in nature allows a child to see the result of his help to living things, and contributes to the development of sympathy, compassion, and empathy for living beings in children.
Thus, with competent guidance from the teacher, a vegetable garden in a kindergarten has a huge impact on the harmonious development of children.
[mailerlite_form form_id=4]
Why do you need a vegetable garden in kindergarten?
A vegetable garden in a kindergarten is needed to introduce preschoolers to nature and its seasonal changes.
In addition, a vegetable garden in a kindergarten and the feasible work of children on its territory influence the formation of elementary environmental concepts in preschoolers.
A vegetable garden in a kindergarten is also an opportunity to see the results of your work. Joint work in the garden provides an opportunity to learn responsibility, contributes to the formation of work skills and the unification of the children's team. And, of course, a vegetable garden in a kindergarten and work in the fresh air help preserve and strengthen the children’s health.
• Regulations on the natural site of the Omsk BDOU "Kindergarten No. 21 of a combined type"
• Work grid
• Content of the activity
• Work calendar for the 2013 - 2014 academic year
• Work calendar for the 2014 - 2015 academic year
• Work schedule for summer 2015
AVAILABLE TYPES OF WORK
IN THE FLOWER GARDEN, VEGETABLE GARDEN
FOR PRESCHOOL CHILDREN
The first spring tillage is done by adults. It is done as early as possible. Children dig again. Digging is only available to children of senior preschool age. Not all children should be involved in digging, but in subgroups. The teacher explains in detail how to use a shovel correctly and how to turn over the earth. When digging, children may be distracted, because... This is a short rest. After digging, the children take part in laying out the beds and leveling the beds with a rake.
Children in all groups can sow seeds. You must first water the beds properly and sow only in damp soil. It is necessary to emotionally tell that such a small seed contains life, that in the presence of heat and moisture, a sprout will hatch from the seed. It is necessary to examine the sprouted seeds and sprouts in the group. The children must be told what they will plant.
Recommendations
- For a vegetable garden on a window, you need to choose the sunny side; if there is none, you will have to come up with additional lighting.
- Compliance with the temperature regime in the room should not be lower than +17 degrees.
- Mini garden beds require ready-made soil. There is no question of any fertilizers - their use in preschool institutions is strictly prohibited.
WHAT TO PLANT IN A CHILDREN'S GARDEN
The smaller the child, the simpler the children's garden should be. For one child, one bed will be enough. You need to sow a little of everything on it: carrots, radishes, turnips, lettuce, peas, cucumbers (for open ground).
Little children love everything bright, so you can sow marigolds and nasturtiums along the edge of the children's garden bed. These unpretentious annual flowers will be the main decoration of a small vegetable garden. And the child will proudly note that his garden bed is the most beautiful, especially if you remind him of this.
If your family has two or three kids, be sure to give each a separate garden bed, combining them into a common children’s garden. But help the kids make each one different from the other. Have a competition to see whose garden bed is better. Then they will try very hard to take care of their small gardens.
For an older child, you can make a children's garden, consisting of a vegetable and berry bed and a flower bed. There you can add a few zucchini, a couple of pumpkins, plant 4 - 5 strawberry bushes.
And plant some unpretentious annuals in the flowerbed (which can be replaced with others next year).
The main thing is to constantly watch the growth and development of plants with your children. Tell them about those growing in the children's garden. Slowly teach him to take care of him regularly. Can you imagine what joy there will be when the first harvest ripens?
Let the child pull out the first radish or pick the first cucumber. Wash them and make your baby a salad that he will eat with great pleasure!
And most importantly, constantly praise your child for coming up with such a beautiful garden and for taking care of it so well. Believe that in the future you will receive the best assistant who will be happy to work in the garden and vegetable garden.
Mini-garden project
STAGE 1 – PREPARATORY
1 Drawing up a work plan for the project. Plan work on the project in stages (teachers from 06/01/18 to 06/08/18)
2 Organizing beds, planting seeds in the garden. Create conditions for the implementation of the project (teachers, parents from 06/01/18 to 06/15/18)
.
3 Work with methodological literature. Create methodological support for the project (educators from 06/01/18 to 06/08/18)
.
4 Development of consultations for parents “Beneficial properties of vegetables. How to teach your child to eat fruits and vegetables."
,
“ Proper nutrition of children ”
,
“Labour education of a child in the family”
,
“Ecological education of a child in the family” (educators from 06/01/18 to 08/31/18)
.
5 Selection of visual teaching aids and demonstration material. Create conditions for the implementation of the project (teachers, parents from 06/01/18 to 06/14/18)
.
STAGE 2 – MAIN
1 Conversation with children about what a vegetable garden is and why it is needed. Expand children's knowledge about cultivated plants in the garden (teachers from 06/15/18 to 06/19/18)
.
2 Review of encyclopedias of illustrations about cultivated plants. Arouse interest in plants, a desire to take care of them, deepen and expand knowledge about plant species (educators throughout the project )
.
3 Reading fiction: Sven Nordkvist: “Trouble in the Garden ”
,
“Stranger in the Garden ”
, Agnia Borto:
“Let’s Draw a Vegetable Garden ”
,
“Grandmother Had Forty Grandchildren”
.
Y. Tuwim “Vegetables”
, T. Shorygina:
“Summer Rain”
,
“Basket of Vegetables”
,
“Sprout”
, J. Brzechva
“Tomato”
, T. Bokova
“Harvest Festival”
.
Expand children's knowledge about the importance of a vegetable garden for people, introduce children to what crops are grown in vegetable gardens (educators throughout the project )
.
4 Experimentation: examining seeds through a magnifying glass, identifying favorable conditions for seed germination. Expand children's knowledge about seeds, where they come from and how plants emerge from them (educators from 06/22/18 to 06/29/18)
.
5 Didactic games: “Vegetables and fruits”
,
“Describe the vegetable”
,
“Guess what it is”
,
“Tops-roots”
,
“The fourth odd one”
, Lotto game
“In the garden, on the field, in the vegetable garden ”
,
“One is many”
.
Expanding vocabulary, classifying plants by place of growth: the difference between vegetables and fruits (educators throughout the project )
.
6 Role-playing games: “ Shop : plot - products”
,
“Bon appetit : the plot is a dining room”
,
“Cafe”
,
“Fair”
.
Development of gaming activities. Speech development (educators throughout the project )
.
7 Practical activities: watering plants, weeding beds, loosening the soil. Develop responsibility for caring for plants. Arouse interest in growing garden crops (educators from 06/13/18 to 08/31/18)
.
Do-it-yourself landscaping of a summer area
Natalia Chernikova
Do-it-yourself landscaping of a summer area
I always enjoy looking at my colleagues’ photo reports about landscaping . And one can only rejoice at how well equipped the playgrounds are. We have problems with this. Of the new stationary equipment, we only have a slide. Everything else is done by the hands of teachers and parents of students.
Every year we rack our brains over how to get out of this situation and arrange the site .
We mainly use plywood, boards, logs, and available materials for equipment.
So, for several years now, the train has been serving well as a development center for the development of fine motor skills of the hands. At first we had him like this.
Over time, the mechanisms of the locomotive fell into disrepair. This year we updated it. And the locomotive became like this.
Its details are bright and interesting.
Nearby is homemade equipment also aimed at developing fine motor skills. A few years ago, we found the backrest of a baby crib useful for such equipment. But it broke down without serving us even 3 years.
Now we have new equipment, made of durable wooden cuttings, metal crossbars. I would like to believe that it will serve us for a longer period.
Nearby is Moidodyr, where children can wash their hands using a washstand.
For role-playing games, we have an airplane.
And also a gas station for cars, a car, a motorcycle, which I also talked about.
We have a creativity center: a table, a bench, a stand for fine art works.
And for many years now, a table in the shape of a ram for drawing with semolina and sand has been pleased with its functionality.
When children are doing creative work at the table, the rest of the children are running around and playing outdoor games. In order to be able to organize construction games at the same time, the idea came to make another table. And do you know what we made it from? From a wooden reel with wires on it. We dug one part of the coil into the ground, painted the top part, and made flowers on the surface of the table using colored self-adhesive paper. Our table turned out to be large.
There is an opportunity for everyone to gather there to play board games. There are plans to make a bench so that we don’t have to take chairs out of the group every day.
The flowers in our flower beds in the shape of swans have already grown up and delight us with beauty.
A health track was created, which I also talked about. Survived until the end of summer.
We have physical education equipment “Apple and Pear”
made from plywood. They are used for rolling balls. We have been using this equipment for several years.
We made multi-colored gates for climbing. An arc made of a hoop with plastic colored balls placed on it. We placed the gate where there is at least some green soft grass.
This year, to organize the outdoor game “Carousel”
A carousel made from several hoops of different sizes and multi-colored satin ribbons was hung on the veranda.
To organize games to develop breathing, we made a guide in the form of an inverted umbrella and butterflies.
We are building the lords for next summer. I'm looking for ideas from you, colleagues. Thank you.
I wish you all creative success!
"Gnomes". DIY decoration for a kindergarten area Quite recently, a couple of kind gnomes “settled” in my house. I made these fairy-tale little men to decorate the beds on our children's plot. DIY flowers for garden decoration. Master class Hello, dear colleagues! I bring to your attention a master class on making flowers from scrap materials with your own hands. Do-it-yourself site design With the onset of warm days, children’s stay in the fresh air increases and teachers face the problem of organizing interesting activities. Summer decoration of a children's plot with your own hands “Matryoshka” The long-awaited summer will come soon. I really want the kindergarten area to look bright, lively and interesting in the summer! Kindergarten site. Do-it-yourself summer decoration of a preschool educational institution site A kindergarten is a special institution; it is practically a second home for its employees and children. And you always want to make your home cozy and warm. Do-it-yourself summer design of the site “Childhood’s Country” CHILDHOOD’S COUNTRY A kindergarten is a special institution, practically a second home for its employees and children. And you always want to make your own home. Summer decoration of the site with your own hands “You cannot raise a full-fledged person without instilling in him a sense of beauty...” R. Tagore I have been working on this topic for 2 years. This is the direction.
Source
DIY stuffed animal
Previously, you could find a really scary, disheveled scarecrow, planted on a pole in the center of the garden. Now everyone wants to make something beautiful and neat, and the garden scarecrow has not escaped this trend. In modern gardens there are neatly, one might even say stylishly dressed scarecrows.
From the usual two wooden sticks and a country flower pot you can get a magnificent lady. All that remains is to dress her up and draw a face on the pot, and instead of hair you can use hay or grass planted directly in the pot.
Sometimes crafts are truly touching. For example, a stuffed animal can be made from a children's toy. More precisely, taking her head. A beautiful smiling crow with a straw body, in a beautiful hat with a bright flower and a dress looks simply elegant. True, the question immediately arises as to who such a crow can drive away, rather the opposite.
In the original garden you can find whole groups of stuffed animals. Which looks very colorful and with a touch of humor. As you know, a scarecrow is made from straw; unfortunately, it is not always possible to find enough to create little men. Then ordinary grass can come to the rescue or just make a small scarecrow.
If you delve into the ancient times, you can find out that the scarecrow’s master’s clothes were given for a reason to dress him. It was a kind of ritual. The straw man, dressed in the owner's shirt or pants, took responsibility for the safety of the garden not only from birds, but he also served as a kind of amulet against the evil eye.
Ready-made stuffed animals that are sold in the store
A straw man in country style will look especially harmonious. It will organically fit into the garden and will not only protect it, but also add some zest.
The perfect DIY garden scarecrow
HOW TO CREATE A CHILDREN'S GARDEN
It may consist of one or several (if you have more than one child) beds. To make it interesting for the child, and for him to understand that this is his personal “possession,” the children’s garden is planted away from the adult. It should be located so that it is convenient for the child to approach it from any side.
The beds should not be in an open sunny place, otherwise the small gardener may overheat in the sun. It is best to choose a small area in diffuse partial shade, for example, under an old apple tree.
In order for a child to feel the difference between his own and adult beds, it is better to give them some unusual shapes - a semicircle, a triangle, an oval. It is clear that the beds should be small so that the child can care for the plants from all sides.
The child’s contribution to the children’s garden depends on his age. Psychologists recommend starting this work with children after four years of age. It is clear that the contribution of children to the children's garden will be minimal. You, the adults, must prepare the land, form the beds, and mark the furrows. At the same time, you must discuss all your actions with your child.
Let him decide what shape the bed will be. What will grow on it, what and how you will plant and sow together. Be sure to buy your kids a set of children's agricultural tools: a shovel, a rake, a hoe, a small watering can.
Let him and you use his rakes to loosen the soil in the garden bed. But he must sow the seeds himself, and water the crops too. It doesn’t matter that you then finish all the work for him. He won't even notice it.
For older children, shift some part of the preparatory work onto their shoulders, but also resolve all other issues together with them.