Individualization of tasks
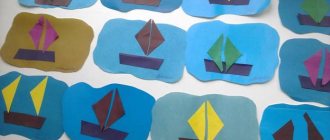
In fine arts classes, it is imperative to use an individual approach. So, for children who are not yet very good at handling scissors, you can offer to make only boats (hulls), and for those who are already good at cutting out parts - boats with a sail.
During the applique class, the teacher should actively encourage the manifestation of children's activity and creativity. Some children cope with any work quickly, so they definitely need to complicate the task even more - offer to supplement the composition with details: for example, cut out the sun and clouds from paper or decorate their boat with details. You can also give paints so that the child can depict rain or fish looking out of the water.
There are many options here. The main thing is to captivate the child so that his interest in creativity only becomes stronger.
Some children quickly and efficiently cope with basic work; they definitely need to be given additional tasks in order to maintain interest in creativity
Volumetric machine applique
Many adults remember this option. Previously, there were children's magazines on sale, where the authors included special car templates for appliqué for children, from which they assembled a full-fledged car.
Today it is difficult to find something like this; adults can print any model on their own. Assembly instructions are simple:
- You can use the suggested options.
- Next, the vehicle is printed on a thick A4 sheet.
- After that, it is cut along the dotted line.
- For convenience, a ruler is used; it will help make the folds even.
- Next, the parts are glued together with tape or PVA glue.
Thus, you can make any model that will become a full-fledged interior decoration. The work is suitable for older people, as gluing and folding parts requires skill.
Templates for printing and cutting
The proposed templates can become the basis for creating your own crafts. And in order not to waste time, you can simply print out the boat and make a bright applique.
Assembling geometric shapes with children
Applications on the theme of a boat can become the basis for educational activities for children. To develop design skills and spatial imagination, you can invite children to fold a sailboat from geometric shapes. Examples of finished ship options:
Several ideas for boat applique
In this work, the triangular sail received a curved shape by twisting it with an ordinary pencil: And here the triangle was bent in half, and one half seemed to float freely in the sea wind: In this boat, a rectangular sail was used, glued in such a way as to create a bulge in the center: In addition This means that in the preparatory group, children can create boats using other techniques, for example, origami, and then create from them compositions with chaotic “ragged” waves:
And instead of colored paper or cardboard, you can use bright fabrics with unusual patterns, cutting out the same geometric details from them. Fabric appliques can be used not only to create panels, but also postcards, decorate clothes, pillows:
It is easy to interest children in the younger group with such an unusual game: each of the children independently makes an applique boat, and then all the works are combined together into one large panel. This lesson will teach children to work in a team, and each of them will understand that he is responsible for the overall final result.
Making the applique “Boat and Steamship”
Schemes for creating an applique with a steamboat
Applications consisting of a large number of parts are suitable for making by children in the older group.
Step-by-step instructions on how to make a steamer applique with your own hands:
- First, we prepare the applique pieces by cutting them out from colored cardboard or paper. To do this, you can use stencils with different geometric shapes.
- For the base of the steamer, you need to cut a trapezoid. We fold the red blank in half and cut off a part from the edge at an angle. We unfold it - we get this figure.
- Next, glue a trapezoid onto the background and an orange rectangle above it.
- We cut the yellow rectangle into two parts and get two identical squares - these are the windows of the ship.
- The yellow rectangle at the very top is the steamer's chimney. We draw a bright stripe on it. At this stage you can add waves and seagulls.
- The last thing the ship lacks is portholes. We cut them out of light paper.
Children in the middle group can be asked to make an applique using a ready-made template. You don’t need detailed instructions for this, children just need to cut out the parts of the steamer, and then glue them step by step onto the background
Applications from geometric shapes for the younger group of kindergarten
Young children are taught to engage in creative activities from the age of 2–3 years. This is a simple geometric applique in the form of recognizable objects.
The main work is done by adults - preparing templates and samples. A drawing with clear geometric contours made of colored paper should correspond to the image that the children liked. Then they willingly join in the creative process.
Simple geometric figures should be recognizable to children:
- circle;
- square;
- triangle;
- rectangle.
Not all children in the younger group of kindergarten can pronounce the names of geometric shapes. But they are able to find and highlight objects that have a common shape or color. The teacher just has to show the child where and in what order to stick the figures.
For example, the face and eyes of a cat are circles, the ears and nose are triangles. The mustache and pupils of the eyes can be completed upon completion of the work. Children over 3 years old should learn to work with templates, which they themselves apply to colored paper, trace and cut out along the contours.
Creative activities on making appliqué for preschoolers develop creative thinking, attentiveness, perseverance and fine motor skills of the fingers.
Christmas tree
Children love preparing for the holidays. Anticipation of matinees, themed entertainment and special events for preschoolers begins from an early age. Children are taught to make simple applications based on the seasons and upcoming holidays.
It is proposed to make a Christmas tree from triangles of the same color. You can show children several options on how to make triangles:
- cut corners from a rectangular sheet of paper, marking with a ruler along the perimeter the distance from each right angle at 2 cm, 2.5 cm, 3 cm and 3.5 cm (the values can vary);
- make 4-5 triangular templates and invite the child to trace them himself;
- offer one large triangle and show how to fold it in half and make markings on it for cutting to make a Christmas tree.
Note! The difficulty of performing a geometric composition depends on age perception. In any case, teach children to economically lay out templates on colored paper.
It’s not easy for the little ones to cope even with carefully gluing together the forest beauty. Older children will willingly take on the task of decorating the New Year's tree. Suggest using a hole punch to make colored balls from scraps of colored paper left over from earlier projects to decorate it.
Along the way, consolidate your knowledge of the color, shape and size of triangles. Remind them of safety precautions to avoid getting hurt with scissors, and show them how to use glue economically.
At preschool age, pupils are able to master all these skills, creating beautiful geometric applications on any topic.
Chick
Preschoolers aged 3-5 years willingly perform work using geometric elements. A hen, cockerel or chick that has just hatched from an egg is made according to a general pattern.
The remaining elements will determine who should turn out in the picture. The combined elements will create a more specific image.
The background for the application is a sheet of blue cardboard so that the overall picture can be decorated with sun and clouds.
Completing of the work:
- invite the child to cut out 2 circles of different sizes (torso and tail) from yellow paper;
- 2 brown triangles – chicken feet;
- a triangular beak and a scallop (3 small circles) are made from red paper;
- black color is the eye of a small chicken.
Children will assemble an image from ready-made fragments. If everything is satisfactory, the geometric figures are glued to the base. The drawing can be supplemented with grains, clouds, the sun and trees in the background, which one of the adults will do.
Fish
Show your children a few sample works, and they will eagerly join in the application of geometric shapes for kindergarten. Children 3.5 - 4 years old will love making colored fish from different figures. To do this you will need to cut:
- large green oval (torso);
- 3 semicircles (bottom pebbles);
- 2 small circles of different sizes for the fish’s eye;
- 2-3 blue circles (air bubbles);
- 3 orange triangles (fins, tail).
As you can see, there is nothing difficult for a preschooler - the child can handle it himself if he is given suitable templates. For those who find the work too simple, try making the task more difficult.
Offer to make semicircular scales, vary the shape of the fish tail, and fill the aquarium yourself.
Ladybug
The sunbug or ladybug is one of the first insects that children are introduced to. Simple compositions are easy for children to understand. Several geometric shapes - the application is ready.
To make a simple applique of geometric shapes you will need several green and yellow stripes - this is grass. A red circle cut in half is the back of a bug.
You will need a brown semicircle to represent the head and several small circles. These are the eyes and spots for the opening wings.
When the children's panel is ready, remind them that the antennae still need to be finished, and the work will be completed. Don't forget to praise your child for his efforts. Creating such a picture will captivate the child and delight parents with the charm of simplicity.
Piglet
Creating a funny pig is a fun creative task for any child. It will help consolidate knowledge about color and geometric shape.
To complete this you will need 2 pink circles – a head and a torso. The top element is shaped like a head - stick on the patch and eyes.
It is better to take the other two circles of a darker color and cut them in half. These will make the ears, front and back legs of the piglet. The remainder of the dark semicircle is a dashingly curled ponytail. You can cut it out of paper or draw it in with a felt-tip pen, and at the same time mark holes on the patch.
Helpful advice! Don’t forget to remind your child in what order to stick the shapes so that you don’t have to redo the finished craft. When all the elements are ready, all that remains is to connect all the fragments together and glue them to the base.
We create an applique with a boat from cereals
Another fascinating tutorial is creating appliqués from cereals. You can use buckwheat, rice, millet and even semolina.
A step-by-step description of the process of creating a panel with a boat from cereals:
- We prepare the necessary materials: cardboard for the base, PVA glue, various cereals, as well as a drawing of a ship.
- Then the boat is transferred to the base with a simple pencil, and work begins on filling its contours with cereal.
- To begin with, a contour is laid out. The base is smeared with glue, grains are glued to it.
- Then the inside.
- The remains of semolina and other cereals are shaken into a bowl or carefully blown away.
Using the same principle, you can make a warship out of sand:
Photo gallery of finished works - ideas for teachers
The application is combined with gouache painting and plasticineography
The applique is combined with drawing with wax crayons A combination of applique (boats made using origami) and drawing (sky and reeds) Original waves are made of strips using the breaking technique
Simple origami, which is complemented by drawing
Application in the form of a postcard for dad with original waves (the teacher prepares them)
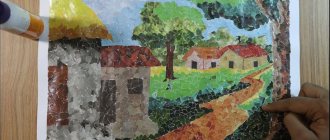
A broken applique with filling in a drawn template. Children fill in the drawn outline with pieces of paper; sails made from bright fragments look colorful
Applique classes should practice and improve the visual skills of preschoolers, as well as expand their horizons and knowledge about the shape of surrounding objects. Thus, the theme of a boat or a boat sailing along a river can be played out in a very interesting way, using the right motivation and using unusual materials.
Composition options based on theme
According to the visual arts program for the middle group, an application on the theme “Boats float on the river” is offered to preschoolers in October. The composition options are designated as “Fishing boats went to sea” and “Yachts on the lake”.
However, this lesson can be carried out in the spring, connecting the theme with spring streams, along which it is so fun to float paper boats (“A paper boat floats along a stream”).
You can make such an applique for Defender of the Fatherland Day - let it be a warship sailing on the waves, which the children will present as a gift to dad.
The lesson can also be associated with reading V. Suteev’s fairy tale “The Boat”, designating the topic as “A Boat for Animals”. This will be a more fabulous option, and instead of a sail, the teacher can offer each child a fresh or dried leaf of a tree.
The application can be timed to coincide with the reading of the fairy tale “The Ship” by V. Suteev and create the same image
Video: cartoon “Boat” (1956)
Motivating start to class
In order for a child to do work with joy, he must be motivated. This can be done in different ways, for example, using a game character who comes to the children for class and asks for help.
This could be Leopold the cat. The hero reports that he was invited to visit the little mice, but they live far away. To reach them, you need to cross a wide river. And for this you need a boat. Of course, the kids will enthusiastically get to work to help the cat.
Some famous character, for example, Leopold the cat, comes to the guys and asks for help - they need to make him a boat
Another option is a telegram from Doctor Aibolit. Sick animals are waiting for him in Africa. But to go there, you need a ship with sails (after all, it’s a long way to sail).
You can start the lesson with a riddle to intrigue the children. For example, this option:
- A cap is floating along the river From a huge soldier The guys are waving their oars It’s not a cap, it’s... (a boat)
What follows is a discussion of what geometric shape the boat most resembles (a rectangle because it is long). As a result, the teacher invites the children to make their own boats.
Another way is for the teacher to invite the kids to use their imagination and draw a picture based on the poem. The poem “Ship” sounds:
- The boat sailed on the waves, the sail was rushing towards the clouds. The waves rose towards the side and crashed against the ship. Svetlana Sirena (Kotlyar)
Then a conversation is held on the poem, after which the children begin the creative process - creating an image of a paper boat.
You can start a conversation about spring, about how fun it is to launch boats along streams when the sun warms everything around with its warm rays.
To maintain the interest of preschoolers in the topic of application, the teacher must conduct appropriate finger gymnastics or physical education.
Table: finger gymnastics “The wind walks across the sea...”
| Text | Movements |
| The wind blows across the sea | children shake their palms, imitating waves |
| And the boat speeds up | palms cupped |
| He runs in the waves | move fingers starting with thumb |
| With full sails. | fingers spread wide |
Table: physical education (based on a poem by A. Barto)
| Text | Movements |
| Tarpaulin, | put a hat on your head |
| Rope in hand | Place clenched fists next to each other, spread your arms - show the length of the “rope” |
| I'm pulling the boat | cup your palms |
| Along a fast river. | rock the boat |
| And the frogs jump at my heels, | jumping in place |
| And they ask me: | press your hands to your chest |
| - Take it for a ride, captain! | extend open palms forward |
