Application is an excellent activity designed to comprehensively develop a child. Break applique is a separate direction. All age groups can use this technique, but it is most useful and interesting for children of primary preschool age. At this age, the development of fine motor skills is important for the development of a child, which this activity does an excellent job of. Let's look at examples and operating principles.
Lesson technology cut applique
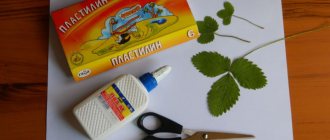
Teacher: Guys, today we will look at interesting works and try to repeat them. Shows ready-made cut-out appliqués. Teacher: Do you know what such work is called? That's right, applique. This word is translated from Latin as “attachment.” This type of art has been known since ancient times; appliqués were made from pieces of leather, paper and fabric, which were glued to a base. The applique was used to decorate clothing, household items and home interiors. Take a close look at the pictures. What material is the applique made of? What gives it such edges? Yes, you can use your hands instead of scissors. Teacher: Let's also learn how to make cut-out appliqué. Let's make a birch tree. To do this you need:
- choose a background,
- glue a birch trunk to it,
- draw branches with a pencil,
- prepare leaves from colored paper by tearing them off,
- glue the leaves to the tree.
Torn paper may end up smooth or with fluffy edges. Try tearing the paper in different ways - lengthwise and crosswise, you will notice a certain pattern. Teacher: I suggest you get ready for work.
Teacher: Let’s quickly repeat the safety precautions together.
Teacher: Now it remains to check whether all the material for work is available.
Children's independent work on making cut-out appliqué. Teacher: Your works turned out to be wonderful, I hung them in the office. Now continue the sentence:
- Today's lesson was interesting for me...
- I learned...
- I wanted …
- I found out that …
Cleaning workplaces. The trash is thrown into the bin, the glue is closed, and the remaining paper is folded into a pile. Teacher: Guys, you did a good job today. Thank you, you are great!
Lesson on cut-out appliqué “The sun is out” in the middle group
Yulia Mishchenko
Lesson on cut-out appliqué “The sun is out” in the middle group
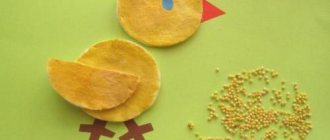
Broken applique “The sun came out” (middle group)
Target:
1. Continue teaching how to compose the image of the sun and a cloud using cut-out appliqué.
2. Consolidation of skills in cutting appliqué technique.
3. Development of fine motor skills, synchronization of movements of both hands.
Equipment and necessary materials: illustrations of the sun, a template with an outline image of the sun and clouds, colored double-sided paper (yellow, red, orange, blue, light blue, PVA glue, tassels, oilcloth linings.
Progress of the lesson:
I invite the children to listen to the song “The sun is shining for everyone.”
Conversation after listening: Who or what is the song about? What kind of sun is it?
Guys, look out the window, is the sun shining for us today?
Yes, guys, it’s cloudy today, the sun is hidden behind the clouds.
Let's call the sun to come out and illuminate the whole earth!
Sunny, show yourself!
Red, gear up!
Hurry up, don't be shy,
Warm us guys up!
Guys, I propose to help our sun, let’s drive away the cloud, and then the sun will come out and warm us.
Look, in front of you are templates with the image of a cloud and the sun.
First of all, we will paste over the cloud, but not just, but with pieces of paper that we will finely tear. Show work.
Well, now let’s stick on the sun, but in order for you to get a beautiful and neat sun, you need to stretch your fingers.
Finger gymnastics “Give us warmth, sunshine”
We held out our palms.
And they looked at the sun. (Children stretch their palms forward and rhythmically turn them up and down.)
Give us warmth, sunshine,
So that there is strength. (They make a movement with their fingers, as if beckoning to them.)
Our fingers are tiny
They don’t want to wait a minute, (They rhythmically bend and straighten their fingers.)
Knock - knock, with hammers, (Bend down and alternately rhythmically knock on their knees with their fists.)
Clap - clap, with little paws, (They clap their knees rhythmically.)
Jump - jump like bunnies,
Jumping on the lawn. (They tap their knees with bent fingers.)
We continue our work, now we will paste the sun in the same way as the cloud.
Look, our sun has peeked out from behind the clouds, but what is our sun missing? That's right, rays. Let's add some rays too. During all work, it is necessary to ensure that children do not glue pieces of paper outside the outline.
In conclusion, I praise all the children, organize an exhibition of works for parents in the locker room, and note that now it has become light and sunny in the group and in the reception area!
Thank you for your attention!
Lesson notes, broken applique
- The introductory part is to demonstrate the finished applications and ask the children if they know what technique the work was done in. Tell the children about the applique and the material for it.
- Studying new material - types and techniques of application.
- Preparation for work - physical training, preparation of the workplace. Check with the children whether they have the necessary material to complete the work using the cut appliqué technique. Tell children about safety rules while working.
- Completion of work by students.
- Results – an exhibition of works and comments for each work.
- Cleaning after application.
- Conclusion - ask the children what new they learned in today’s lesson, what they learned. Thank the children for their efforts.
Principle of operation
Paper crafts using the cut appliqué technique are made in 2 main ways.
Simple option
This option is suitable for the youngest children.
The stages of such creativity are as follows:
| № | Stage | Description |
| 1 | Preparing the template | At the initial stage, an adult (parent or teacher) must select a drawing suitable for the work - an outline on the basis of which the craft will be made. In this case, you can take a ready-made drawing or draw it yourself. When there is a background, all that remains is to put a picture on it. Its elements are torn off from colored paper and then glued to the main canvas. It is important to keep in mind that a large number of parts will be glued to the top of the canvas. |
| 2 | Selecting Colored Paper | The paper that serves as the background for this craft must be thick enough, so when choosing, you should pay attention not only to the color of the base, but also to the thickness. Children can be involved in the work. Along with them, you can choose the color of the paper that will be used for filling. After this, the child himself begins to tear off pieces of any size. |
| 3 | Gluing paper to background | It is necessary to take each piece of paper, apply an adhesive substance to one of its surfaces, and then apply it to the base one by one. It is most convenient to use a glue stick, because with its help you can evenly distribute the adhesive over the surface. When the space is filled, the work is completed. The result is a monochrome product, much like a mosaic. |
The option is more complicated
Cut-out paper applique (templates for products can be classic or abstract) always starts with an idea. After choosing a suitable example, the child begins to do everything independently, but at the same time, an adult must supervise his creative process in order to prevent mistakes.
Tear paper applique on a fairy tale theme
The stages of the complex version are as follows:
- Take thick colored paper. It can be any color.
- Attach a stencil to thick colored paper and trace it. If desired, you can apply a design to the surface of the paper without using a stencil.
- Select thin paper of the desired color and start tearing pieces from it.
- Fill the space with torn paper pieces. To do this, an adhesive is applied to each fragment; it is best to use a glue stick.
- After filling the entire space, the work is considered completed.
Templates for cut appliqué
First class cut-out applique, details with photo
Mushroom Material:
Progress:
- Cut two ovals from colored paper. One will be the stem of the mushroom, the other will be the cap.
- Trace ovals on paper with a pencil.
- Tear off any excess paper around the ovals.
- Tear each oval into small pieces.
- Lubricate the paper with a glue stick and glue the base of the mushroom. Do the same with the hat.
Broken applique second class, details with photo
Ladybug Material:
Progress:
- Print out the ladybug template on white paper.
- Fill the body with red using finely torn paper of the appropriate color and glue.
- Using black paper using the tearing technique, glue the spots onto the back and make a muzzle.
- Glue on the eyes from white paper.
Decoration of the composition
When the painting is ready, you can decorate it using all kinds of materials to give it a finished look and make the work unique.
- A few shells, dried flowers and leaves, ribbons, bows, buttons, beads, beads, rhinestones are perfect for this (adults should supervise the children’s work, especially if small parts are used in the process of creating a masterpiece).
- The resulting creation can be inserted into a beautiful frame. And then the child can safely participate in competitions with his works.
All these ideas will help you and your children create real masterpieces using a minimum of materials. And most importantly, this is a very fun and interesting process that can become leisure time for the whole family.
The finished work can become a wonderful interior decoration, and you can also present it at any children's craft competition. Such educational crafts will be very useful for teaching in kindergarten.
There are a lot of different techniques of varying complexity; you can choose something suitable for the creativity of children of different ages, from the youngest to the preparatory group.
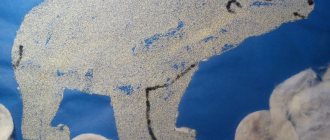
Broken applique third grade, details with photo
Bullfinch Material:
Progress:
- Draw a silhouette of a bullfinch with a pencil.
- Using the cutting technique, prepare red pieces of paper.
- Glue these pieces immediately around the breast, and then fill everything inside.
- Prepare black scraps of paper.
- Glue them over the outline of the silhouette of the bullfinch, then continue gluing inside.
- Glue paper eyes onto the bird.
- Draw or cut out a branch from paper on which the bullfinch will sit and glue it.
Using napkins for applique
If you tear a napkin into small pieces and stick it on, you will create a volume effect and the craft will turn out airy.
If you are doing a craft with the image of trees, the trunks are cut out or drawn, and the leaves will be light, made from napkins. Pieces of napkins can also be rolled into balls.
Broken applique fourth grade, details with photo
Winter Material:
Progress:
- Using the cutting technique, make a tree trunk. Glue to the background. When choosing a background, avoid white.
- Paint the house with paints.
- Finely tear the white paper - it will appear as snow.
- Using glue and small white pieces, cover the trees, house, and street with “snow.” You can glue small pieces throughout the picture, creating the appearance of snow falling on the city.
Cut-out birch applique, step by step with photo
Material:
Progress:
- Tear out a birch trunk from white paper and glue it to the background.
- Using the same technique, make branches and attach them to the paper with glue.
- Tear small black strips of paper and glue them to the trunk.
- Tear a lot of identical small leaves from green paper.
- Lubricate the places for the leaves with glue and glue the leaves to the paper.
Hedgehog applique, step by step with photo
Material:
Progress:
- Draw a hedgehog figure on the background sheet.
- Finely tear the paper for the muzzle and body.
- Lubricate the face with glue and attach the brown scraps.
- Glue black pieces of paper to the body.
Sunflower cut-out applique, step by step with photo
Material:
Progress:
- Using a simple pencil, draw a sunflower on a white sheet of paper.
- Using the tearing technique, finely tear black paper and glue it into the core of the sunflower.
- Make a sunflower hat using small yellow pieces and glue.
- After tearing green paper, cover the trunk and leaves of the plant.
“Fox” applique made using the cutting technique
You will need:
- White base
- Chanterelle pattern
- Paper in three colors: orange, black and white
- Glue
Execution stages. Trace the stencil or draw the fox yourself on a white base.
Take orange paper and tear it into random pieces. Applying glue to each piece, we gradually fill the outline of the fox entirely. If the craft is being done by small children, it is better to cover the entire chanterelle - the base - with glue and stick the dry pieces from bottom to top.
Tear off two small, approximately identical pieces of black paper—the eyes—and glue them onto the fox. Another part will be needed for the spout. Tear off a small piece from a white sheet and make the tip of the fox's tail. Our fox is ready.
You can also not prepare pieces of paper in advance, but tear them off from the strip at the gluing site. Watch the video to see how this is done.
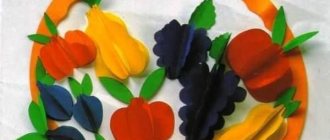
Cut-out applique vegetables, step by step with photo
Material:
Progress:
- Draw the outlines of vegetables on white paper and cut them out.
- Glue vegetables to the background.
- Tear many small pieces of the appropriate color for the vegetable.
- Apply glue to the vegetable template and glue on all the small scraps.
Cut-out applique pond with baby frogs, step by step with photo
Material:
- Colored paper
- PVA glue
- Pencil
Progress:
- Prepare small rectangles that will make up the parts of the frog’s body.
- In the background, mark the silhouettes of frogs with a simple pencil.
- Finely tear the green paper and glue the leaves to the silhouette.
- Make eyes and mouth from pieces of a different color.
- Using the cutting technique, prepare a lot of small blue pieces of paper.
- Apply glue to the area under the pond and glue blue pieces of paper.
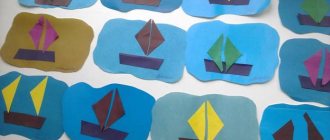
Cut-out applique bear, step by step with photo
Material:
- Colored paper
- Glue
- Simple pencil
Progress:
- Draw or print a bear template on brown paper.
- Attach it to the background paper and trace it with a pencil.
- Carefully tear into identical small pieces and glue them to the outline.
- Glue the bear's feet and ears from yellow paper.
- Make eyes and a muzzle from colored paper.
Example of a craft “Autumn Tree”
Let's look at a sample of a broken autumn tree applique. This is a simple and very beautiful option for children in the middle or senior kindergarten group.
For work you will need materials:
- glue stick;
- set of colored paper: yellow, orange, brown, green, blue;
- cardboard base (you can use white paper);
- additional decorations in autumn style: golden beads, small stones;
- a cloth for wiping off glue.
Work algorithm:
- Invite your child to apply the drawing to the base. Let it be a large tree with a lush crown. You can draw the sun and clouds in the sky, and bushes and paths on the ground.
- Next, select the main shade for the wood - yellow, orange, brown. The paper is torn into pieces and evenly pasted inside the contours of the tree. Dark colors are used for the trunk, light colors for the crown.
- They cover the sky with blue pieces, leaving space for clouds.
- The sun is decorated in yellow. Thin rays can be drawn with a pencil or felt-tip pen.
- The finishing touches are glued on – pebbles on the ground, beads on the tree as fruit.
The picture is ready, it can be framed. You can also wipe off any excess glue on the image before the glue dries completely.
Landscape application, step by step with photo
Material:
- Colored paper
- Pencil
- Glue
- Paints
Progress:
- On a white background sheet of paper, draw a landscape: the contours of a field, a river and trees.
- Use small scraps of green paper to make foliage for trees and grass for the field. It is better to take two shades of green. Glue the paper to the background.
- Their pieces of blue and light blue paper make a river and clouds. Secure with glue.
- Cover the sun with small yellow pieces.
- Color the remaining background with paints.
When making an application it will be easier to use a template. If you are good at drawing, you can draw the base on paper. When working with children, do not forget to remind them about safety precautions when working with scissors and glue.
Landscape made of paper
In order to create an entire landscape using the cut-out appliqué technique, you will need several sheets of colored paper, as well as pencil glue and a sheet of cardboard as a base.
- Now the most fun part of the job is tearing and crumpling colored paper.
- If you use crumpled paper to create a composition, it will look even more interesting and voluminous.
- Now you can collect parts for a future application.
- Develop your child's imagination by asking him what a piece of paper looks like.
- This way you can find creative and unexpected solutions.
- In addition, for children this is a real game, so the creative process will become even more interesting. If you have already outlined the elements of the picture on a sheet of paper, you can safely glue the details to the base.
- Attach the corners first so you can experiment by moving the paper pieces around.
When the picture is ready, carefully glue all the parts and let them dry thoroughly. The picture is ready, you can decorate it if you want and put it in a frame.