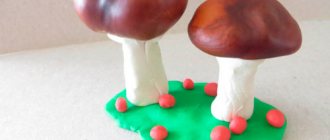
Small children experience the world by touch. Application helps to embody the images and objects seen on paper or using other materials. For small children, paper dishes using the appliqué technique will be a good opportunity to learn the names of objects. And adult children hone their skills of believability in crafts.
It can be made from paper, fabric and plasticine. Tableware applique is most often simple and almost all of its types are suitable for preschoolers and kindergarteners. And having supplemented the basic craft with his own elements, the child will take the craft to school.
Glasses in applique
Offer to make your child a refreshing glass of lemonade. Cut out the glass. The lemon circles will be made from circles and triangles of colored paper. Ice cubes are made from soaked thin napkins. Add a straw and the craft is ready.
You can make a summer cocktail using a colored paper coffee cup. Cut it in half lengthwise and stick it on cardboard. Garnish with a citrus slice (umbrella). Decorate the background as desired.
Summary of a lesson on appliqué in the senior group “Cup and Saucer”.
Transcript
1 Summary of a lesson on appliqué in the senior group “Cup and Saucer”. The use of technologies for the development of children's creativity, information and communication technologies. Goal: To acquaint children with ceramic dishes, with the material from which they are made, to teach them to distinguish between different shapes of dishes, and to introduce them to one of the ways of decorating dishes: painting. Objectives: 1) Teach children to independently determine the initial shapes for cutting out cups and saucers in a symmetrical way. 2) Continue to teach techniques for cutting out flower shapes from paper folded in half (connecting parts to depict a decorative flower that is more complex in structure). 3) Develop the ability to combine applique with painting (cut out large parts of the flower from colored paper folded in half, and draw small parts with a felt-tip pen). 4) Continue to promote mastery of curved cutting techniques. 5) Develop aesthetic perception and imagination. Materials: The teacher has a cup and saucer with rounded walls; table (3-4 flowers in a side position), paper for showing cutting techniques. Children have a thick colored square sheet of paper, for a cup a square is 10x10 cm, for a saucer a rectangle is 12x3 cm; multi-colored squares, green, red, blue markers, scissors, paste, napkin, oilcloth, glue brush. Progress of the lesson: Part 1. Organizational. P. Let's look at painted porcelain dishes, which are made from special clay.
2 What is this? (this is a cup and saucer) Any product first originates in the artist’s workshop. The artist decided to create a cup. What could it be? (Low and round. Straight, like a glass. Similar to a barrel). And he came up with comfortable handles for the cups: curly, intricate. And also painting. I came up with it and drew everything on paper. It turned out beautifully! Then the artist sculpted a cup out of plasticine so everyone could see what it would look like. Now it can be sent to the factory. Here, some craftsmen make the shape of a cup based on the artist’s model, others paint it, and still others send it to a special kiln for firing. And only then the cup is ready. Tea and table sets, teapots, candlesticks, sugar bowls, and oil dishes are made at the porcelain factory. Look at several cups and saucers with your children. P. What are the cups decorated with, what elements are in the pattern? (flowers, twigs with berries, leaves, etc.) the pattern combines large flowers and thin twigs. How is the edge of the dish shaped? (border). P. Today we will cut out a cup and saucer and decorate it with a pattern. What shape is the cup? (tall cup, widening towards the top). What shape is the saucer? (low, wide). Both the cup and the saucer have rounded walls. Tell me, what shape will be the initial shape for the cup? (square). What shape will be the initial shape for the saucer? (rectangle). 2
3 Part 2. Task: fold the square in half and cut out a cup with rounded edges. The handle for the cup can be cut separately using scraps of paper from the original shape. Fold the rectangle in half and cut out a saucer with rounded edges. Glue the cut out cup and saucer onto a sheet of paper so that the saucer slightly covers the bottom of the cup. Post a table with approximate elements of the pattern. P. Several flowers and twigs are pasted and drawn on the table, which can be used to decorate dishes. Large parts of the flower will need to be cut out of colored paper folded in half, and small parts will need to be drawn with a felt-tip pen. The branches are thin, so they need to be drawn. (Show the children how to cut out and draw one of the flowers shown on the table), for example the second. Glue the flower in an inclined position, draw a curved stem and several branches nearby. Draw stamens on the flower. P. Everyone can decorate their cup with any flower and any branches from those shown on the table. But you can come up with an unusual flower yourself. 3
4 4
5 Part 3. Final. Game exercise. Place 4-6 appliqués with the images facing down in the middle of the table. For those who still have their work, invite them to take turns taking one of the appliqués lying on the table and placing theirs on the easel. P. Interesting to know if they are different from each other? Compare and name the differences in the shape of the products, if any, and in the patterns on the cups (ask 2-3 people). 5
Cups and teapots
Using the cutout appliqué technique, create dishes for children's tea parties. If the product is made of white sheet, then it is decorated with paints or felt-tip pens, and scrapbooking paper will immediately make a beautiful cup.
Cut out the stencil and fold it in half. The dotted lines are the fold locations. Glue it together and the cup is ready.
They also make tea sets.
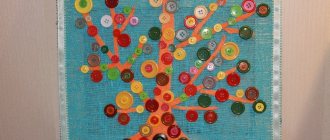
The composition of buttons looks no less interesting. It is important to choose a color scheme so that the work is not too colorful.
For the next creation you need an openwork napkin (it can be cut out), colored paper, cardboard, paints, scissors and glue.
We glue an openwork napkin onto the cardboard. A cup is cut out on top. Decorate randomly. Draw or cut out white steam. We complement the tea party with candy. You can create a cup from the cover of a magazine or newspaper, or special gift packaging.
For your attention – a teapot made of fabric.
Simply cut out the thin fabric and glue it onto the cardboard. The centers of flowers can be buttons or beads.
Children's applique – Teapot and teaware
I suggest you consider a composite applique made of cardboard and colored paper “Teapot”.
For kids, you need to cut out all the necessary details in advance, and children 5-6 years old will be able to do it themselves, using downloaded template files from our website, and for decoration - a visual example of a picture of a teapot.
In this application I used my own template. For you and your child, we have drawn printable files “Teaware”. The set of files consists of templates: teapot, mug, saucer, teaspoon, pie dish. I believe that such templates will be of help to educators in children’s educational institutions. Let's first look at making a simple version of the applique for five-year-old children.
To apply the teapot we will need:
• Colored cardboard; • Template of teapot parts; • Colored paper; • Album (1 sheet for the base); • Glue; • Scissors; • Pencil.
Attention! The child must do the craft entirely himself. Your task is to control, explain and give hints.
MANUFACTURING PROCESS.
Using the template, we will transfer the details of the teapot onto cardboard. The base of the teapot is yellow, and the spout, handle, bottom and part of the lid are red. Photo-1.
Carefully cut out all the parts of the teapot. Photo-2.
At this stage, you can invite your child to make a teapot from parts themselves.
This task develops a holistic perception of the subject.
If the child is at a loss, offer him a sample as a hint. Photo-3.
Let's start assembling the teapot.
We will use a landscape sheet or a sheet of white cardboard as a base for the applique.
First, glue the container itself (circle), then glue the part of the teapot spout to it.
All that's left is to glue the handle! Photo-4.
Next we glue the red bottom of the teapot and the first part of the lid.
At the end, we glue the last part of the lid and the circle - the handle. Photo-5.
The base of the teapot is ready! To decorate the pot-bellied teapot, cut out several circles from colored paper. Photo-6.
Now let's decorate the teapot to your taste with multi-colored circles - peas, arranging them randomly, or making up your own pattern from them. Photo-7.
(
Templates come with decorations such as stickers or decals.
).
We have a bright and elegant teapot! Please bring some cups - we'll drink tea!
How to make a flat object visually voluminous?
In this joint work, we are examining not only the topic “Dishes”. The teapot is pot-bellied, remember?
And after completing the craft, you should definitely draw the children’s attention to this word. Such a word will amuse them and arouse visual interest.
In our application example, and of course, in the template files, attention is paid to highlighting (giving) volume to flat parts. After all, visual volume is created not only by details, but also by their location in an application or drawing.
This makes the object look flat. Let's attach an oval-shaped part. So what's going on? A flat object, as if by magic, looks three-dimensional (round, like an inflated balloon).
Why is the oval black? Black color can mean emptiness, and we may have coffee or tea in our cup. What's in the kettle? Black tea is brewed in a very hot kettle. Be careful!
For children, this is the simplest, most understandable and visual explanation. In their next creative works, they will definitely try to make their own appliqué or drawing with a volumetric effect. In any case, they will definitely want to experiment!
Download “Teaware” file templates.
ONLINE VIEW: tableware.pdf
— If you do not have a program for reading PDF files (Russian version), download it from the official website. — Free program “ Adobe Acrobat Reader DC”
» — A program for reading, printing and reviewing PDF files.
The files are distributed free of charge in electronic PDF format, and only on the website www.asreda.com.
Not for commercial use. Article on the topic: “ Samovar template for applique .”
Article on the topic: “ Finger Theater. Felt geese ."
Article on the topic: “ Sew a phone from felt and learn numbers .”
__________________
© Anastasia Obolentseva, for www.asreda.com
Comments on posts are temporarily disabled.
✉ MESSAGE TO THE AUTHOR - for registered users.
Complex panel of coffee beans
And a panel of coffee beans in the shape of a cup will definitely amaze everyone. This is a complex craft, so children will need adult help. Prepare:
- Thick cardboard 2 mm (pressed)
- Superglue, PVA
- Plastic bottle 1.5 l
- Masking tape and regular tape
- Ground coffee
- Coffee beans
Cut this shape out of the bottle.
Cut off the neck and get half a cup.
Glue it to the plastic “bottom” and cover it with masking tape.
Apply PVA glue and sprinkle with ground coffee.
Cut out a saucer from thick cardboard and bend it slightly.
We also cover it with glue and sprinkle it with ground coffee.
Then we glue the grains onto superglue or hot glue.
Let's start assembling the panel. Again, take thick cardboard or a thin sheet of drywall. Come up with a frame. Cover the background with crumpled paper (suitable for baking). Decorate the edges with broken cinnamon sticks, siding or coffee beans. Glue the cup and saucer. Glue a handle from the grains.
They are also made from natural materials. You can make a panel of tea leaves using a herbarium of currants, cherries, and dried berries.
Paper applications are not always suitable for children's games. They are not durable and get dirty quickly. But they will become a worthy interior decoration or a craft for school. With the help of dishes, kids learn the names of dishes and their purpose. A master class with coffee beans is suitable for children in grades 4-5.
Abstract of the GCD in the senior group on the application on the topic: “Tea party for the doll Masha”
Topic: “Tea party for Masha’s doll.”
Goal: To develop imaginative and spatial thinking, hand-eye coordination, imagination and creativity.
Objectives: Exercise children in carefully gluing ready-made shapes onto a colored base, Teach children to cut along straight and diagonal lines. And also, continue to learn how to cut out rounded corners and cut out a circle. Develop creativity and spatial imagination. Distinguish geometric shapes, know their names (circle, square, oval, rectangle, triangle, rhombus); Educational areas: Cognition, socialization, artistic creativity, reading fiction. Materials: Teaware from a doll's corner. Samples of silhouettes of dishes with pasted patterns. Works of other children on the topic of tea utensils. A tray on which lies: colored paper for origami - multi-colored stripes and squares, a paper napkin or rag, Pencil - glue, oilcloth, scissors. Course of the lesson: V. - Children, look at the beautiful dishes for Masha’s doll’s tea party, I brought you from the doll’s corner. Examine the dishes. V.-What does the doll Masha drink tea from (children: - from a cup). V.-And the cup just stands on the table or something else (children: - stands on a saucer). V.-I’ll now read you the riddles that the doll Masha sent you, and you try to guess them (riddles from publications on the Internet) Riddles: We put tea in it, pour boiling water. You, my friend, figure out what it is, tell me. (Kettle) We will drink tea from it, Coffee and cocoa, We will pour water into it, If we need to drink. (Cup) It stores sand in itself, It looks like a teapot, When tea is poured into cups, It will also be placed on the table. (Sugar bowl) V. - Well done, you guessed everything, the doll Masha is very pleased with you and asks you to glue a new cup and saucer for her for tea drinking. Shall we do it? (yes) V.-Children, take a tray on which you have strips and squares of colored paper. Take the scissors and glue out of your desk drawer. We take a red square and begin to cut a cup out of it, to do this we cut off the lower right corner diagonally (I show). Then we make roundings on the sharp, protruding places (I show), turn them over and do the same on the other side - this is the bottom of our cup. In order to continue our work, we need to take care of our fingers, for this we will do finger exercises. Finger gymnastics In our group, everyone is friends (claps hands). The youngest is me (we show thumbs up). This is Masha, this is Pasha, (we bend our fingers one for each name) This is Borya, this is Sasha. All our friends are great (bend and straighten the hand). V. - Now let’s glue a saucer from a strip of yellow rectangle. Take a rectangle and cut off the lower right corner diagonally (I show). Then we make roundings on sharp, protruding places (I show), turn them over and do the same on the other side, the main thing is to cut from the bottom side obliquely to the top corner. Now we take a glue stick, coat the edges of our saucer with glue and stick it on a sheet of white paper, from its very bottom edge. A sheet of white paper is positioned horizontally (I show). We glued it and pressed a napkin on top to remove excess glue. Now we cut out circles - this is the pattern on our cup. Made from brown squares. We cut off all the corners, rounding them (I show). Let's stick them on the cup so that there is a pattern of peas. Is everyone doing great? (Yes). V.- Let's select the best works to give them to Masha. Place the works on the edge of the table and choose the most successful ones (children actively discuss each work and choose several). Take the work in the hands of those who, in general opinion, did the best job and raise them high above your head so that Masha can see them. The lesson is over.
Download: [Download file to view link] 222.18 KB
Figure 1Figure 2Figure 3Figure 4Figure 5Figure 6Figure 7Figure 9 Figure 12ђHeading 215
Summary of GCD for the application “Let's decorate a cup for the holiday.”
The material will be useful to preschool teachers and parents. Target:
Developing the ability to create a pattern to decorate a cup using (ready-made) circles.
Objectives:
Continue to develop aesthetic perception, artistic and creative abilities.
Consolidate knowledge about colors: red, yellow. Develop fine motor skills of the hands. Material:
1) Silhouette of a white cup 2) Circles of red and yellow paper 3) Glue, brushes, napkins 4) Trays for each child 5) Cups with different patterns 6) Toys: dog, cat, rooster
PROGRESS OF THE CLASS.
1.Game moment. Educator
: Guests came to our lesson.
Meet them: the dog Sharik, the cat Barsik, the rooster Klepa. And when guests arrive, they are greeted warmly and treated to tea. - You know, today I wanted to buy beautiful tea cups at the store, but they turned out to be all white - like this! (The teacher shows cups without a pattern). Look what they are? What they have? Children's answers Educator
: But look what other cups there are!
(There are cups with different designs on the table) Children’s answers Educator:
Let us decorate the cups for our guests.
Look what you have on your trays? Children
: Circles.
Educator
: What are they?
Children
: Red and yellow.
Educator
: Let's put a beautiful pattern on the cup. Which one would you like?
Educator
: Well done!
Now let's glue the pattern onto the cup. How will you stick the circles? Children
: Turn over and spread with glue.
Apply with a napkin. 2. Physical education minute.
This finger is grandpa! This finger is grandma! This finger is daddy! This finger is mommy! Well, this finger is me! That's my whole family!
Educator: What beautiful cups you made. You like? What about you, our guests?
What did we do? You all worked diligently and did a good job. Well done!
Application
Practical part of the lesson with photo
1. Educator:
You know, today I wanted to buy beautiful tea cups in the store, but they turned out to be all white - like this!
(The teacher shows cups without a pattern). Look what they are? What they have? Children's answers Educator:
But look what other cups there are!
(There are cups with different designs on the table) Children’s answers
(beautiful, with flowers, stripes, circles)
Educator:
Let us decorate the cups for our guests.
Look what you have on your trays? Children:
Circles.
Educator:
What are they?
Children:
Red and yellow.
Educator:
Let's put a beautiful pattern on the cup.
Which one would you like? Children make patterns from circles. Educator:
Well done!
Now let's glue the pattern onto the cup. How will you stick the circles? Children:
Turn over and spread with glue.
Apply with a napkin. 2. Physical education minute.
Tell me, guys, who do you most often drink tea with at home?
With mom, dad, grandma, grandpa, etc. Let us tell you on our fingers. This finger is grandpa! This finger is grandma! This finger is daddy! This finger is mommy! Well, this finger is me! That's my whole family! 3. Independent work of children.
In the process of work, I help those who find it difficult.
As I complete it, I gradually post the work. Educator:
What beautiful cups you made. You like? What about you, our guests? I think after class they will be happy to drink tea from your cups. What activity did we have now? What did we do? You all worked diligently and did a good job. Well done!