Stages of work
- At the first stage of work, we will prepare the silhouette of the tree. We give the kids cut-out blanks from brown paper; for the older ones, we give them stencils from cardboard or plastic, if available, to trace and cut out. Don't forget to offer children the safety scissors I mentioned above. When the tree is ready, put it aside for a while and work on the background.
- As you remember, we have blue cardboard as the background. You can cut out a semicircle from green construction paper and glue it in the middle of the bottom of the sheet. This will be the greenery on which we will place the tree. We also glue it on top. But there’s never enough greenery, right? Bright rich colors can decorate any application, so next you need to cut a thin green strip of paper and fold it across the entire width like an accordion. It will be weed. We glue it along the entire lower width of the sheet on top of the trunk.
- Next, perhaps, comes the most painstaking stage of work. We will make leaves. You can alternate the stages as you wish. You can first prepare all the elements of the image, and then all that remains is to glue them, or do everything in stages. I recommend that teachers make blanks for the leaves, since this will take a lot of time for children. For leaves you need multi-colored squares 3cmx3cm according to the color of the leaves: red, green, yellow, orange, light green, etc.
- Now we form the leaves directly, fold the squares like an accordion starting from any corner. When the accordion is ready, bend it in half and glue the middles together - these will be the original leaves. You need quite a lot of them to make the tree beautiful, so allocate more time for this work. One tree will require at least 30 leaves. Glue them onto the branches.
- The final stage of the applique will be clouds, which are formed from torn, crumpled blue paper and glued to the top of the background.
If you do the work at home with children, you can buy this interesting set of “Peppa Pig” applique, which can be planted under a tree.
Lesson summary for the middle group on paper construction “Mushrooms for Autumn”
Olga Salnikova
Lesson summary for the middle group on paper construction “Mushrooms for Autumn”
Goal: to teach children to design from paper by folding it.
Objectives: - To develop children’s skills in planning stages of work, following a sequential chain of actions;
- cultivate a caring attitude towards native nature;
- strengthen the ability to fold paper in different directions, carefully work with glue;
- develop attention, memory, fine motor skills of the fingers. Materials and equipment:
For the teacher: illustration of an autumn forest, white rectangle, brown circle, glue, brush.
For children: white rectangle (15*7.5, brown circle, glue, brush, oilcloth, napkin.
Progress of the lesson: Educator: Leaves fly off the branches,
Birds fly away to the south.
“What time of year is it?” - we’ll ask.
They will answer us: “This is...”
Children: Autumn!
Educator: Correct. This is a beautiful autumn! And by what signs do we know that it’s autumn? Children: It’s getting colder outside, the leaves on the trees turn yellow and then fall off, it rains more often. Educator: Guys, let's invite autumn to visit. Repeat after me the magic words: “Autumn is a beauty, come for a visit, show yourself to all the guys!” (Children repeat). The group includes Autumn (the teacher of another group) with a basket of gifts (apple, pear, cones, nuts). Autumn looks sad. Autumn: Hello guys. I am very glad to be your guest. I did not come to you empty-handed, I brought my gifts. Educator: But why are you sad in autumn? Maybe the guys and I can help you? Autumn: Look at my forest where I live (showing an illustration of a forest). Tell me how you see him? (Compilation of a story based on the painting “Autumn Forest”). You are right, my forest is beautiful in its golden attire. But haven't you noticed that there are no mushrooms in it at all? And without them, it is difficult for forest animals to make provisions for the winter, and people also love to collect them. Educator: Don't be sad. The guys and I will make paper mushrooms for you and you will take them to your fairytale forest.
Look at our fungus: what parts does it consist of (cap and stem).
What geometric shape will we make a hat from? (from the circle).
What color is the hat (brown)
What shape will we make the leg from? (from a rectangle)
What color is the leg (white).
Detailed display with explanations.
Now you will become little wizards again and turn a paper rectangle and circle into a mushroom like this (showing a sample). We will twist the leg from a white rectangle, and the cap from a brown circle. But before work, let's ask Autumn to play the game “Sun and Rain” with us.
Clarification of the work sequence.
Invite the children to think and say in what order they will do the work: first fold the hat, then the leg and glue them together.
Techniques for individual work.
Partial demonstration of techniques for folding the cap and stem. Reminding the sequence of work to individual children.
Hat: make a cut on the circle to the center (radius); fold the circle into a cone and glue the tip.
Leg: roll the white rectangle into a tube and glue the edge. Glue the cap to the stem.
Analysis of children's works.
Educator: Autumn, look what beautiful mushrooms the guys made. How evenly and correctly the caps and legs of all mushrooms are folded.
Autumn: Yes, the mushrooms turned out wonderful. I will take them to my forest. Thank you! Goodbye, guys! See you again!
i]
Cotton wool applications
One of the most popular and simplest ways to imitate snow for crafts is cotton wool. The work done in this way turns out to be voluminous and truly winter-like.
Snow covered trees
What you will need:
- blue or light blue cardboard;
- pencil;
- glue;
- cotton wool
Let's get started:
- Take cardboard and draw a tree trunk on it.
- We coat the branches with glue and put cotton wool on them.
- In the background we draw snowdrifts and a few more trees, make clouds and bushes.
- We glue the cotton wool to the snowy hills and along the contours of the plants. The picture is ready.
We use cotton balls
For the next craft we will prepare: cardboard, colored paper and several cotton balls.
- We cut out snowdrifts from a strip of white paper and glue them at the bottom.
- We make several trunks for future trees from brown paper and place them on cardboard. We put a snow cap made of cotton wool on each of the branches.
- We cut out patterned snowflakes or make small circles using a hole punch and paste them over the trees.
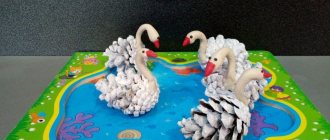
Forest of cotton pads
As an alternative to regular cotton wool, you can use cotton pads. Additionally you will need: colored cardboard, glue and scissors.
Let's start designing the application:
- To imitate snow-covered hills, take a cotton pad, cut it in half and glue it onto cardboard.
- Then we cut out several strips - these will be tree trunks. Glue them onto the snowdrifts.
- We make the crown of the tree from a whole disk.
- To add liveliness to our picture, we draw snowflakes. They can be cut out of paper, drawn with cotton swabs, or small circles of cotton pads made with a hole punch can be glued on.
Another craft option:
- We draw Christmas trees on several cotton pads: we got four, then we cut them out.
- From another disk we make a month and snowflakes.
- We take cardboard and glue a cotton swab in the middle at the bottom - this is the trunk of one of the trees.
- Cut several cotton pads in half. In our case - three. We glue them at the bottom with different sides - we get snowdrifts and snowy hills.
- Place a cotton pad on top of a cotton swab - this is the crown of the tree.
- We place the cut out Christmas trees on the snowdrifts. Glue the month and snowflakes.
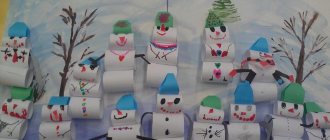
House in the forest made of cotton swabs
Don't forget about cotton swabs. With their help, you get cute snow-covered trees and houses.
Let's take: cardboard, colored paper, scissors.
- Whole sticks are suitable for tree trunks, but to create branches you will need to cut them.
- To make it at home, place cotton swabs next to each other horizontally or vertically. Cut out a triangular roof from white paper and glue it on top. We make windows and doors from colored paper. You can do the opposite: cut out houses from paper, and lay out the roof from sticks.
- We also cut out clouds, snowflakes and snowdrifts from white paper.
Making the application “Autumn Kaleidoscope”
So, we will be interested in a multi-colored applique that would best symbolize a beautiful autumn tree. Pupils from the middle group can be offered a voluminous applique - with your help they will cope with this task perfectly. Such work will contribute to the development of fine motor skills, strengthening skills in working with scissors, and cultivating beauty and neatness.
To make the application we will need:
- sheets of blue cardboard;
- tree templates (ready-made colored or white for tracing);
- colored paper;
- pencil, glue, scissors, ruler.