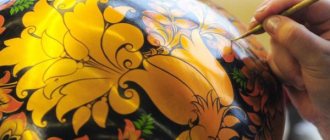
The word “Khokhloma” has several meanings. Khokhloma is the name of one of the most famous and popular types of Russian folk craft, which has been practiced by residents of the Volga region for several centuries. This type of painting is widely known both in Russia and abroad. Golden Khokhloma is the name given to the works of folk decorative art themselves, fiery-bright, full of gold and rich ornamentation. And finally, “Khokhloma” is the name of an ancient Russian village in the Nizhny Novgorod province, a shopping center where nameless craftsmen brought their wooden works of art. Then the merchants transported the products throughout Russia and to many countries.
Types of folk crafts and paintings
Russian regions are rich and diverse both in their landscapes and in their customs and traditions. Many places even have their own dialect. All this shaped the culture and artistic creativity of every corner of our country. For a long time, different traditions of folk crafts have developed. The most famous include the following:
- Dymkovo, Filimonovskaya, Bogorodskaya toy;
- Gzhel ceramics;
- Vologda and Vyatka lace;
- Tula samovars;
- Rostov enamel;
- Mstera, Fedoskino, Palekh miniatures;
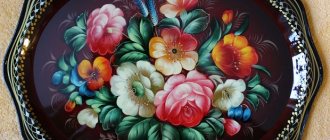
- Zhostovo trays;
- Gorodets, Khokhloma painting.
Each of them is very original and unique, but they all reflect the culture and spirituality of the Russian people.
Summary of a drawing lesson in the preparatory group: Khokhloma
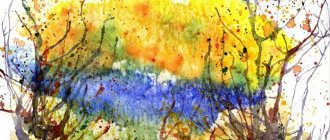
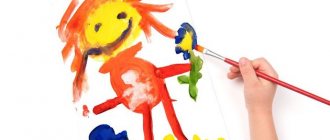
Summary of a drawing lesson in the preparatory group “Golden Khokhloma.
Painting a plate based on Khokhloma painting” (made using non-traditional techniques: wax pencils and watercolors). Author of the work: Kokorina Tatyana Nikolaevna teacher of additional education in fine arts. MBDOU No. 202 Kindergarten of a general developmental type “Fairy Tale” Description: this summary will be of interest to teachers of senior and preparatory groups, teachers of additional education in art activities, as well as simply creative people. Goal: expanding knowledge about the folk craft of Khokhloma painting. Objectives: - to form children’s understanding of the appearance of dishes in ancient times; — talk about the appearance of Khokhloma painting; — learn to consistently perform work using non-traditional techniques; — learn to beautifully place a pattern over the entire surface of the plate; - promote the development of aesthetic taste; — promote the development of fine motor skills of the hands, through drawing small curls; — to cultivate interest in Russian folk crafts and pride in our craftsmen; — cultivate interest in drawing through the use of unconventional techniques. Preliminary work: studying dishes and folk crafts in classes on the world around us. Methodological techniques: story, conversation-dialogue, visual material, practical work. Progress of the lesson: Teacher - Every day we use different utensils: kitchen, dining, tea. These dishes are metal, porcelain, glass. There are dishes that we use every day, and there are beautiful holiday sets that are taken out only on holidays to set the table. Do you know how the dishes appeared? Dishes appeared a very long time ago. At first, ancient people used tree bark to, for example, scoop up water or nut shells. They tried to hollow out vessels from stone and wood. Sea shells were used as spoons; they were convenient for scooping up food. Gradually the dishes were improved. People learned to make dishes from clay and fire them.
And of course, since ancient times, people have tried to make dishes not only convenient for use, but also beautiful, therefore, from ancient times, various designs began to be applied to dishes. The first patterns were simple, they were made with thin wooden sticks, these were geometric shapes, people, animals.
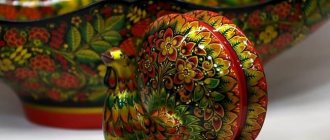
So wooden dishes appeared, clay dishes - ceramic, and later people learned to make porcelain, which we use now. Wooden utensils still exist today, but now they are more often used to decorate the interior. Beautiful, bright, it stands on a shelf or in a closet and pleases the eyes with its unique pattern. Do any of you know what this dish is called? Children - Khokhloma.
Educator - Correct. This wooden dish is painted with floral patterns. What does vegetable mean? Children are grass, flowers, berries. Educator - Yes, these are all kinds of plants: grass and leaves, berries, flowers with beautiful curls. According to legend, this painting was created by a talented master, icon painter Andrei Loskut. He worked for the king and he generously rewarded him for his work. But the master loved freedom most of all. One night he left the royal court and went to live in the forest. Andrey wanted to paint not only icons. He dreamed of creating something simple, necessary and at the same time beautiful, like the native nature around him. This is how the first wooden utensils appeared. And since the master lived in the forest, he began to paint it with flowers, berries, leaves, and twigs. The fame of the amazing master reached the surrounding lands. Many came to him to see this dishes, some stayed forever, wanting to learn how to create the same wonderful products. Andrey Loskut passed on the secrets of his skill to his fellow villagers; his skill has been preserved, pleasing the eyes and souls of people to this day. And since all this was in the village of Khokhloma, the painting began to be called Khokhloma. This painting is distinguished by obtaining a golden color without the use of precious metal. That’s why they often say “golden Khokhloma”.
Now we will paint our plates based on Khokhloma painting. For this we will need: - yellow and red wax pencils; - black watercolor; - wide brush No. 5 or No. 6. 1.first, using a yellow wax pencil, draw three leaves at the bottom of the plate.
2. Using a red wax pencil, we draw three large strawberries over the yellow leaves.
3.Draw droplet leaves between the berries with a yellow pencil from smallest to largest.
4.Draw curls between the lower leaves
5.add small flowers and curls at the top.
6. Paint the entire plate with black watercolor.
The plate painting based on Khokhloma painting is ready.
We recommend watching:
Unconventional drawing technique Blotography. Master class Summary of GCD in the senior group Khokhloma painting. Master class for 2nd-3rd grade students Summary of GCD in the senior group. Golden Khokhloma
Similar articles:
Painting a cutting board. Khokhloma
Painting a Khokhloma plate
Drawing autumn leaves, grades 1-2
Summary of a lesson in the preparatory group of a kindergarten on the topic Vitamins
Summary of the direct educational activity “Music” in the preparatory group
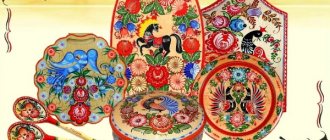
What objects are decorated with Khokhloma painting
Traditionally, any household items made of wood were made in this style:
- spoons;
- nesting dolls;
- trays;
- dishes;
- caskets;
- chests;
- barrels;
- boxes;
- spinning wheels;
- handles and handles;
- vases;
- cutting and decorative boards.
In its modern version, when interest in Russian folk motifs is quite high, Khokhloma painting sometimes appears on very exotic surfaces:
- fabric (for bed linen, for example);
- nails;
- keychains;
- lighters;
- screen and panels of a smartphone or laptop;
- body (tattoo and body art);
- cars (airbrushing);
- bags (paper and plastic).
Thus, almost any object can now be decorated with Khokhloma painting.
Samples on paper
If you are new to this business and are just starting to master the basics of drawing Khokhloma painting, it is better to practice on ordinary Whatman paper. As exercises for positioning your hand, choose simple elements: berries, leaves.
All of them are based on certain movements of the brush. Even if you later work on the finished pencil outline, the circles and curls should be even. It is better to do them in one go.
If you want to know how to learn how to draw a crested child, it is best to master this technique with him, also on paper. The same type of exercise in the form of leaves and berries quickly gets boring for children, so suggest depicting a round tray, plate, spoon or vase. Make the shape of the object yourself, and give your child the opportunity to decorate the object.
Features of patterns in Khokhloma painting: photos and recommendations
To understand the implementation of this technology, it is important to understand its essence and features: not only the combination of certain lines and curls makes “Khokhloma” “Khokhloma”, but also what is put into them, how they are connected, and what image they create as a whole. The development of Khokhloma painting was significantly influenced by oriental ornaments of carpets and shawls, as well as Russian patterns of house carvings in the form of stems and leaves. The church also made its contribution in the form of a general color scheme: black and pure red, gold - deep, strong tones. All this gave rise to the original technology of the Volga masters and remains the basis of the current “Khokhloma”.
- The drawing in Khokhloma painting is based on the “leading” one, represented by a smooth spreading branch. It gradually expands due to the addition of various elements, divided into main (large flowers, bunches of berries, etc.) and secondary (small leaves, single berries, blades of grass). In this case, the main element must be in the center.
Initially, Khokhloma painting was divided into 2 categories, differing in the style of execution of patterns: “horse” writing and “kudrina”. The latter has become the most famous - it is a dark (red or black) background, on which graceful and complex curls and natural elements are written. The scheme of work is the same - first the leading branch, then the additional parts. “Kudrina” looks heavier and fuller than the “mountain” letter, which is characterized by a golden background with an abundance of blades of grass of different sizes, and the remaining ornaments are made either as a berry or as a leaf. In addition, the location of the pattern itself should be a square that can be stretched into a rhombus.
- As for the technology of work, there are also some nuances here: Khokhloma painting is never written in clear lines, and there is no preliminary sketch stage. The master immediately completes the idea with paint, which causes a certain softness of even the smallest and most delicate patterns.
It should also be noted that some ornaments are not made by hand: more precisely, they are painted, of course, with a brush, but through a stencil - this technique has been used for a long time and can be combined with stamping, for which a felt or wooden tool is used.
Purchasing materials
Choose the right base. The shape can be round, rectangular, square, or complex carved. It is better if the board has a hole to hang it on a nail or hook. Avoid using plywood or untreated wood. The surface for applying the pattern must be smooth, without depressions, notches and burrs. The easiest way is to buy a high-quality base at a craft store. If this is not possible, but there is a board ready to size, properly treat the surface with sandpaper. If this is not done, all the unevenness will remain after applying the paint. They can interfere with the perception of the drawing and will interfere with drawing.
Pattern selection
Choose a suitable ornament motif. It doesn’t matter whether your Khokhloma painting will be simple or complex. Step-by-step drawing of each element will help you depict any object from a combination of twigs, leaves and berries to an exclusive bird of paradise. You just need to do everything piece by piece from simple to complex. Given the availability of computer technology, anyone can find the necessary image on the Internet, print it, for example, on film, and transfer the contours to a wooden base. It is more difficult to draw lines on a round surface. However, in this case, you can simplify your task by making several stencils of repeating elements.
Step-by-step drawing of Khokhloma painting for beginners
Despite the fact that some patterns can be created using a stencil, it is still worth learning Khokhloma painting from the simplest patterns with a brush. To do this, select several very thin and small (00, 01) brushes with squirrel or pony hair (it should be soft), and, guided by the instructions, first circle the proposed patterns several times, then try to draw them on the hatched tips, and then - on the same paper or clean glass.
- Blade of grass or sedge . The simplest and most basic pattern: a slightly curved line to the side, maximum brush pressure in the middle, tapering off at the edges. Thickening occurs very smoothly and has a minimal degree.
- Curl . The next most difficult element; the brush pressure does not change and remains the same throughout the entire length of the pattern; the line curls like a snail.
- Droplet . It’s good to practice pressure on it: place the brush with the base of the bristle, then rotate it 180 degrees and begin to carefully remove it from the surface. At the same time, it needs to be pulled forward. When you get a single pattern, try doing 2 drops in a mirror manner.
- Bush . It consists of droplets collected in a fan, at the base of which a small dot is placed with the tip of the brush.
- Leaflet . The easiest way to create this pattern is to create mirrored blades of grass that curve outward, then fill the inner void with the same color. A more complex version is to adjust the pressure and direction without lifting the brush, creating an oval with pointed ends.
After mastering those patterns that can only be drawn with a brush, it is recommended to try berry elements: for them you need a stamp that you make yourself - it will create the basis of the design. And small details will also be added with a brush. To make a stamp, just take a straw, attach a circle of paper down, and dip this part in paint.
- Lingonberries are made by simply stamping scarlet circles that do not need any additions.
- Currant - several circles of berries collected near a blade of grass, on which single golden dots are then placed with a brush.
- Rowan - in addition to the circles of berries, it is necessary to draw very narrow and elongated droplets and leaves at the base of the bunch. Specks with a brush and gold paint are also required.
- Malinka . A bunch of 6 circles of berries, which are already placed without maintaining a distance, by overlapping each other. The highlights are drawn using the technique of blades of grass, then dots are made with the tip of the brush. A sepal is blades of grass gathered together, a twig is leaves and a thin line.
Which color to choose?
You will need paints that are suitable for wood surfaces. The simplest and cheapest option is gouache. However, it does not form a waterproof surface once dry. It is necessary to add PVA glue to it, about a quarter of the volume of pigment, but not every color will respond well to this combination. It’s better not to take risks, but simply coat the finished product with transparent wood varnish. This will protect the drawing from moisture and other adverse factors. Another option is to use acrylic paints. They are waterproof and suitable for wood. Moreover, after such a layer has dried, you can even apply gouache on top. This means that the black background can be done with acrylic, and the pattern itself can be done with gouache.
Buy several brushes with fine tips. Squirrel, kolinsky and synthetic numbers from the first and above are suitable. The quantity and size depend on your design. You will need a thin brush in any case, and you can determine the maximum size visually depending on the planned design.
Khokhloma painting on a plate: step-by-step description
Decorating a plate or wooden spoon with an ornament is not at all difficult, the main thing is to know the basic principles. The drawn elements look colorful and solemn. Even a schoolboy can cope with this task.
What you will need:
- acrylic paints;
- pencil;
- tassels;
- palette;
- disposable plate;
- jar;
- varnish;
- ornament.
Decorating a plate with an ornament is not at all difficult
Progress:
- Choose a pattern that will be applied to the plate. It could be a rooster, a bird or simple berries.
- Transfer the ornament to a plate.
- Make the bon red.
- Carefully paint all other elements.
- Be sure to make a black rim both on the inside of the plate and along the edge.
- Add droplets along the rim.
- Leave the plate to dry completely in a suitable place.
Apply varnish and let the product dry.