Modular version of origami
Method No. 1
Such a design will only be possible for those experienced in modular origami or several people; it will take a lot of time, but the result is grandiose. In addition to paper, you will need a small piece of wire, glue, wooden axles for the wheels and the same base. Detailed assembly diagrams are shown in the photo below. First you need to prepare the required number of modules of different sizes.
Step-by-step instruction:
- For pipes you will need red modules of two sizes - 1/64 and 1/128 A4 sheet. The two shortest pipes of the eight rows are made up of 254 pieces of the first type. The longest of the 21 rows consists of 252 small modules and its fastening of 8 large ones.
- The spotlight consists of 96 large modules - 66 red and 30 yellow.
- For the boiler you need 756 blue parts of size 1/16A4, 175 of the same white and 20 pieces of 1/32 blue for fastening.
- The star on the boiler requires 50 red 1/64A4 parts, 5 of which are useful for connecting to the boiler.
- For large wheels you need 30 pieces of white 1/16A4, 70 of the same red, 40 white 1/64A4 and 20 red of the same size.
- Small wheel – 30 white 1/64A4, 50 red same and 40 white 1/128.
- Base – 776 blue 1/64A.
- Cabin - 231 blue 1/16A, 14 1/32 of the same color and 16 1/64A4.
- Cabin wing - 385 red 1/16A4, 104 1/16A4 of the same color, 50 blue 1/16A4 and 50 1/32A4.
- Drive – 75 red 1/64A4.
- Buffer – 13 red 1/4A4, 4 white 1/4A4, 1/8A4: 12 white and 15 red, 1/16A4: 20 white and 25 red, 1/32A4: 12 white and 41 red.
Method No. 2
The video below shows a version of a less detailed modular locomotive, consisting of convenient large parts.
A complicated version of origami
At first glance at this model, you can’t even believe that its carriages and locomotive are made from one piece of paper. However, this is true. All this was done thanks to a special pattern scheme once developed by Emmanuel Muzor. All you need to do is print out the diagram and, guided by the lines on it, make folds in the right places. If you wish, you can limit yourself to only a steam locomotive or still create carriages for it. There is also a more complicated version, in which the entire train is made from a long rectangle of paper, that is, the locomotive and cars are not separated in any way.
For those who have not yet used this method of folding origami, the model may seem complicated, but in fact it is not difficult to read the diagram.
- The straight line indicates the direction of the fold upward, that is, the edge should bend towards the top, and the dotted line, on the contrary, means the edge goes down. The result is a sort of alternation of ascents and descents.
- To accurately follow the diagram, you need to transfer it to a sheet of paper from which you plan to make a model.
- Without experience in assembling such figures, it is better to practice on a rough sheet.
Doctor Aibolit's car
Children certainly rush to help their little friends - animals. They need an ambulance. The material is similar to the previous work.
Execution Sequence
- Create a set of car parts. Round the edges of a rectangular sheet.
- Place two wheels on the bottom of the part.
- There is a window in front and a flashing light just above.
- Be sure to cut out a red cross.
- Glue the arranged figures onto the base. While working, you can read poems to your child about a specific machine.
As options, you can create an application for a fire truck, a passenger car and other types of vehicles.
Simple origami diagram for children
You can quickly make such a locomotive even while you are in line or on public transport with your child. It is enough to have a square piece of paper with you. At home, you can take one-sided colored paper in blue or light blue to simulate a modern high-speed train.
- Fold the square in half from top to bottom.
- Fold the bottom edges about 1-1.5 cm.
- Fold the top left corner inward. So, the simplest model is ready.
- To make it more recognizable, it is worth drawing windows.
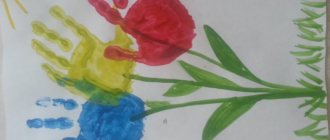
Applique car made of threads
This painting is a wonderful gift for a friend’s birthday or for dad on Motorist’s Day.
How to do:
- cut out a template for any car (car, truck, special-purpose vehicle);
- glue on cardboard - base;
- cut colored threads into small pieces (for the body, windows and wheels);
- Apply glue to the template and distribute the cut threads.
By working on creating such a craft - applique, the child develops creative abilities, tactile and visual perception, fine motor skills, as well as hard work, patience and attentiveness.
The kid will be happy to show a toy he made with his own hands and tell how he worked with mom and dad.
Fire engine
This application is proposed to be made using the fabric mosaic technique.
To work, you need to prepare fabric, scissors, glue, a sheet of thin cardboard, and a pencil. Draw a fire engine on a sheet of paper (you can choose a ready-made stencil of this vehicle) and cut pieces of multi-colored fabric into small pieces.
It is better to use the so-called “non-flowing” fabric - thin suede, raincoat material, teak, felt, etc. You can start creating a mosaic application.
Execution stages.
Fill the body of the fire truck with red scraps. The pieces of fabric are glued immediately. In this case, you need to try to glue them in such a way that they do not extend beyond the contours of this part.
The car windows are created using blue fabric.
Highlight the top of the wheel with light strips.
The base of the staircase is filled with blue pieces (the tone can be chosen a little darker than the window fabric).
Pieces of yellow material are used to cover the symbol of the fire engine “01”, as well as the wheel rims. The tires are made from brown scraps.
Finally, the bottom of the sheet is decorated with greenery right up to the wheels to give the appearance of a car standing on the grass. Cover all free space around the car with pieces of blue, dark blue and purple fabric.
This work can be placed in a frame under glass and decorate a child’s room.
Ready-made templates for cutting
This technique for making crafts has its advantages - it saves time, plus you don’t need experience, the ability to draw and work with folds and modules. The disadvantages are obvious - the lack of opportunity to personalize the craft, to show creativity, and such a locomotive is unlikely to be appreciated at an exhibition or competition.
However, ready-made templates can come in handy. All you need to do is print it on a color printer, cut out the parts and glue them in the correct order. And for creativity, you can circle these parts on a white sheet and draw your own version on it.
Fun Garage
A bright machine applique can be made using cereals and paints. The work is carried out collectively by children of senior preschool age. Half a sheet of whatman paper means a garage where various cars will be placed.
The teacher provides each child with templates of machine parts drawn on a separate sheet of paper. The child independently cuts them out and sticks them on a small piece of paper. Now - the most interesting part.
The cereal is selected according to the child's wishes. Therefore, on the work tables there should be containers with different cereals, paints, brushes, as well as cups of water and napkins for washing and wiping brushes, and glue.
Separately, each part is coated with glue and sprinkled with cereal. You can work with one type or combine different cereals. Having decorated one part of the product with cereal, give it time to dry. Shake off excess.
Paint this part immediately.
Complete all the fragments one by one.
By sending the car to the garage, the child can share knowledge about a specific car brand with friends. Children's collective works on this topic will be a wonderful decoration for the kindergarten foyer.