On the topic: methodological developments, presentations and notes
Continue to introduce children to wintering birds and their life in winter; develop creative imagination, attention, ingenuity; generalization and clarification of children’s knowledge about wintering birds; extension.
During the lesson, children get acquainted with the main representatives of wintering birds of the Astrakhan region.
I offer a summary of a lesson for children in the middle group when getting to know birds, in particular the woodpecker.
Summary of a lesson on environmental education for children of senior preschool age.
Summary of direct educational activities for the implementation of the educational area “Cognition” (the child and the world around him) in a preparatory group for school for children with general disabilities.
Summary of direct educational activities for the implementation of the educational area “Cognition” (the child and the world around him) in the middle group for children with general underdevelopment.
Source
On the topic: methodological developments, presentations and notes
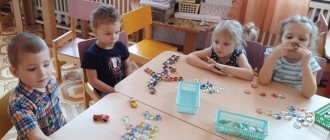
Children draw according to the “Development” program on easels, and paints are mixed on a palette. Paper size only A3.
Summary of the integrated lesson “Birds” (on getting to know the world around us) + drawing “Invitation card” in the senior group.
Very often children are careless towards the environment and animals. This is primarily due to the lack of proper knowledge. In kindergarten, children have been developed for each age group.
Summary of educational activities “It is difficult for birds to winter, the birds need to be helped” Integration of educational areas (in accordance with the Federal State Educational Standard): cognitive development: social and communicative times.
Games and exercises on the topic.
Summary of continuous educational activities “It is difficult for birds to winter, we need to help the birds.”
Source
Motivating start to class
One of the tasks of learning to draw from paper is to develop motivation to work with pencils, paints, and pastels. The most effective way to attract attention to the creative process and enhance cognitive activity is to use motivational material at the preparatory stage of the lesson. As a motivating start to the lesson, the teacher can use a variety of techniques and use additional equipment:
- Visual materials: thematic posters (domestic birds, migratory birds, those remaining for the winter), photographs, illustrations in books, bird figurines, bird toys of folk craftsmen.
- Use of texts from folk tales and original literary works.
- Reading poems, nursery rhymes, proverbs and sayings, riddles about birds.
- Appeal to the experience and knowledge of students: conducting a conversation, tasks for reflection.
- Use of technical means: listening to songs about birds, audio recordings of bird voices, viewing slides on a projector.
- Conducting thematic active or logic games, creating surprise moments and problematic situations.
Examples of using motivating materials at the beginning of a lesson on the topic “Birds”.
| Lesson topic | Motivating start |
| “Illustrations for the fairy tale by D. N. Mamin-Sibiryak “The Gray Neck”” | At the beginning of the lesson, the teacher asks the children whether they remember well the fairy tale “The Gray Neck” they previously read. A conversation is held on the content of the fairy tale: for what reasons did the duck not fly away with its flock, what happened in the fairy tale before meeting the hunter, how the fox behaved, and how the duck behaved, how she met the hare, etc. The teacher reads out passages from a fairy tale: with what feeling do birds prepare for a long journey to warm lands; a description of an autumn day when Gray Neck was left alone, and flocks of migratory birds flew in the sky; scene at the wormwood; meeting with a hare, etc. Carrying out a logical game “Find the difference”: two pictures are attached to the board with the same illustration for the fairy tale of Mamin-Sibiryak, but one of them has differences. The teacher stipulates how many differences the children must find. |
| "Bullfinch on a Rowan Branch" | Creating a surprise moment : the postman brings a letter to the group. It was written by Dunno, he tells the guys that Znayka gave him a very difficult riddle, he just can’t give the correct answer. Dunno asks the child to help him solve the riddle and send him an illustration of the answer in a return letter. Riddle : Red-breasted, black-winged, Loves to peck grains. With the first snow on the mountain ash, He will appear again. Next, a conversation is held to study visual material (pictures depicting bullfinches): the children determine the structural features of the bird, plumage, and posture. Physical education lesson “Look at the branches - bullfinches in red T-shirts.” Perhaps holding a logical game “Find bullfinches in the same poses”: on the table there are pictures of bullfinches (in flight, pecking berries, sitting on a branch, jumping, etc.), the guys must find the same ones. |
| "Owl Owl" | Prepares background accompaniment for the lesson - audio recordings of forest birds singing; visual material – illustrations for fairy tales and nursery rhymes, made by the artist Vasnetsov. At the beginning of the lesson, the teacher takes the child to an exhibition of illustrations and talks about the artist Yuri Vasnetsov. Afterwards, a conversation : what birds did the children see in the paintings, what colors predominate in the works shown, etc. The teacher reads a nursery rhyme : Oh, you little owl, You are a big head, You were sitting on a tree, You were spinning your head, You fell from a tree , Rolled into the hole. He asks what bird this nursery rhyme is about and asks to find an illustration with it at the exhibition. Discussion of the image of an owl: structural features of the bird, plumage, posture, what it sits on, what colors the artist used to draw the bird. The teacher asks if they have met an owl or an eagle owl in fairy tales, poems, songs and cartoons, and perhaps they have seen this bird outside the city or in the zoo. Outdoor game “Owl”: in the middle of the game room there is an owl’s nest, where the first driver stands. The teacher announces that night has fallen in the forest, the driver closes his eyes, and the rest of the children depict various inhabitants of the forest - insects, birds, animals, they run and play. When the teacher says that the day has come, the children freeze, and the owl flies out of the nest and looks to see if everyone remains motionless; those who move, the owl takes to its nest. Afterwards, it is calculated how many the owl managed to catch, and a new driver is selected. |
Pencil drawing
For those who paint landscapes, the problem arises of how to draw a bird with a pencil reliably, conveying its distinctive characteristics. Here you need to apply step-by-step instructions on how to draw a bird.
All birds have individual characteristics. Therefore, if the drawing does not involve a contour image, all the details are drawn.Draw a tit. To do this, a rounded head and an elongated oval body are depicted on the album sheet. The paws are thin, with four toes.
Soften the joints. They work on the head, the beak is long, the eyes are round.
The tit is small in size; when folded, the wings touch the edges of the middle of the body. The tail is given the shape of a rectangle, its length is equal to the length of the wings from the shoulder to the edges.
To give authenticity to the drawing, you need to work out the details. Carefully outline the contours of the wings, chest, back and tail. Drawing feathers takes a lot of time. There are small downy feathers on the belly and on the inside of the wings.
You can apply colors to the drawing; the tit has a beautiful color. The head is black except for a white area from the beak to the back, extending below the eyes. The abdomen is bright yellow. The back has a dark green color, turning into emerald and gray shades on the wings.
Flying bird
By studying drawn pictures of birds, they get an idea of the mechanism of movement. In flight, birds cut the air with their wings. The larger the bird, the larger its flight feathers. The shape of the wings varies. Short, elliptical ones give maneuverability, pointed ones allow you to quickly gain speed, and wide ones make it easy to soar in the sky.
In the middle of the leaf, the bend of the head with a pointed beak is noted. Draw the line down, forming a convex curve of the chest and a rounded belly. This line connects to the tail.
Draw a line above the head perpendicularly upward, drawing the left wing. Feathers are depicted as wavy. The right wing is made to unfold using straight and wavy lines.
Long thin ovals are connected to form a tail.
The seagull has a different body structure, which will be reflected in the picture.
Draw a rounded head. Connect to two parallel lines forming the body of the seagull. They will separate at the end to form the tail.Parts of the face are drawn, the eye is made round, with a small glare of light, the beak will be in the shape of a triangle.
To demonstrate flight, the open wings are drawn in a large arc crossing the body in the chest area. The borders are drawn with a wavy line. Remove unnecessary strokes.
Simple drawing
Children often draw nature and, in general, everything that surrounds them. While walking, or looking out the window, they have the opportunity to watch birds.
If a child wants to learn how to draw birds, you need to use step-by-step instructions for beginners. Then the drawing will definitely please the baby and his loved ones.
Two intersecting ovals are depicted. One of them should be smaller and located on the left. A highly elongated triangle is attached to the bottom of the large oval. A small triangle is depicted near the left oval. Paws are drawn with straight lines. The circuit is ready.
An eye in the shape of a leaf is drawn on the head. The small triangle is divided across by a stripe, finishing off the beak. An oval line is drawn on the body from the head, marking the wing of the bird. On each paw, 4 fingers are drawn, one of them is opposite. Soften lines and erase unnecessary strokes.
It turns out that just drawing a bird is accessible to everyone. The resulting sketch can be colored; the bird looks like a sparrow.
Eagle
- The proud master of heaven is extremely attractive.
- Having sketched out the bird's body, draw an open beak and a circle-eye on the head.
- Let's detail the picture.
- We frame the open wings with zigzag feathers.
- The tail section is lowered down.
A formidable predator sits on a rock or stump, clinging to it with powerful claws. On his paws are characteristic downy pants. It's not the most affordable offer, but it's worth a try.
Bullfinch
- The circle and oval are combined with rulers, the back of which will go into the wing.
- Draw the head elements and the triangular tail.
- We select the feathers and plant the bird on a branch.
We outline the outline in relief and color the winter singer, making the abdomen red, which is its distinctive feature.