Preview:
Topic: “These funny animals.”
- To acquaint children with the features of the animalistic genre, to define the concept of “artist – animalist”.
- Expand children's understanding of the work of the writer and artist E. I. Charushin.
- Teach children to depict animal fur using strokes, showing the features of stroke movements when creating an image.
1.Develop technical skills in working with graphic materials.
2.Improve the ability to depict animals using a diagram.
3.Develop creative thinking, imagination, speech activity, communication skills.
1. Cultivate a love for animals.
Equipment: Sandpaper, crayons.
Methodological material: presentation, methodological tables, sample work.
I. Organizational moment.
In one city there lived a little boy, Zhenya. He loved animals very much.
Many different animals lived in the house. It was a real home zoo. In the yard lived piglets, turkey poults, rabbits, chickens, kittens and all kinds of birds - goldfinches, siskins, waxwings. Cats lived in the house, cages with birds hung on the windows, and there were aquariums and jars with fish.
Zhenya not only loved animals, he cared for them, observed them, and also drew them.
The boy Zhenya grew up and became a wonderful artist and animal painter.
II. Conversation during the lesson.
— Guys, do you know who animal artists are?
-Let's take a trip through the pages of children's books and see.
-What do animal artists draw?
Well, let's go on a trip.
1 slide. -Guys, here is a portrait of the animal painter E. Charushin.
2 slide. – These are drawings from children's books drawn by E. Charushin.
- Guys, what do animal artists draw?
Animal artists paint animals.
An artist who draws animals is called an animalist.
3 slide. – Illustration for the story “The Little Wolf”.
-Do you like this little wolf?
-And why? (He is small, nice, looks like a puppy)
-What can you say about the wolf cub? (ears stick out, tail tucked)
The artist shows that the wolf cub is terribly uncomfortable in the forest.
4 slide. - “Bear cubs.”
-Look how funny the bear cubs are. The artist painted them so that we see soft ears, shaggy fur, serious faces and soft paws. One diligently sucks milk from a bottle.
- What can you say about the other? (He also wants milk and this will go either way).
— And here we see cubs on the roof of the house.
-What can you say about these cubs? (They carefully examine the brick that lies on the roof. The artist depicts one bear cub on its hind legs. The muzzle is elongated, surprised.
-What can you say about the other?
5 slide. – Here we see Tyupa hunting for a bird.
And this is Tomka. How funny and cute they are.
6 slide. – The artist depicts animal cubs that are fluffy, soft and completely helpless.
— Guys, did you pay attention to the fur of animals?
- What is it like for them?
— To draw fluffy fur, the artist uses his own techniques.
— Do you want to learn how to draw fluffy, funny animals?
-What materials can be used to draw fluffy fur?
-You can depict it in gouache or watercolor, as E. Charushin did, but you can also depict it with pencils and crayons.
Early in the morning from far away
Magpies flew to us (crossed hands, imitation of flight)
They began to chatter loudly (fist on fist three)
Wave a long tail (palms close to each other and tilt left to right)
They pecked the grains (Hands peck and peck)
Everything in the world was told. (Clench and unclench your fists)
V. Explanation of the material.
Today we will get acquainted with a new unconventional technique. And we will draw not on a sheet of paper, but on an unusual material.
-Maybe you know what kind of material this is. Look, touch it.
This is sandpaper.
-You and I are good at drawing pets.
And today this will be very useful to you. And I’ll tell you how, knowing how to draw pets, you can learn to draw other animals.
- Here's your first clue.
1. Find the differences between a kitten and a tiger cub. (Ears, color, tail).
2. Find the differences between a kitten and a lion cub. (Ears, color, tail, mane).
Conclusion: Knowing how to draw a cat, you can draw a lion, tiger, panther and other animals.
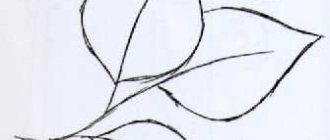
- Where do we start work? From the diagram.
-The animal can be depicted in motion, or lying down. Look at the diagrams.
- Now think about what animal you will draw.
-Let's get to work.
-Guys, you drew the outline. Now you need to draw the fur. Look how I will do it. I choose a color and paint it with small strokes. Adding different shades.
Source
Elephant in squares
The elephant has large volumes, as far as practically every person knows what it looks like. We have already studied the image of an elephant, but now we need to consolidate the material we have learned. We will depict it on a sheet of paper in a cage, since this is how it is easier to reinforce the lesson.
How to draw by cells:
- Having prepared the album and equipped it with a pen, preferably a light pencil for beginners, we present a horizontal segment in the shape of an arc. At the top of the sketch we introduce small volume contours and draw a border identical to the first line, but downwards. As we get closer to the edge of the line, we move the segment in the opposite direction to get the bottom outline of the elephant's head.
- Starting from the top, we show large ears on the head in the shape of an uneven semi-oval. We then mark from the beginning of the ear to the front of the torso. Let's draw a horizontal line and complete the back of the elephant.
- We use a winding line at the back to show the tail of this animal. We finish drawing the forelimbs. Let's detail the ear.
- Now, use the arches on the head to place the eyes. We complete the mouth and detail it with teeth and tongue. We painted the main part of the mouth and the area above the trunk. We expanded the silhouette from above with drops of water that the elephant releases from its trunk.
- We paint the small lake on the right side with a blue pen. We paint the drops one color, but there should be white spots on them. Also, draw the edge of the pond.
- Then use a simple pencil to outline the outline of the body and other areas. Cover the brush on the tail. We shade the entire body with a light tone. Draw green grass under the elephant. We paint over it and paint the lake with a blue pencil. Tongue red or pink.
The elephant is drawn. Schoolchildren will even be able to figure it out on their own with simple work.
Summary of drawing lesson “These fluffy little animals”
Svetlana Egorova
Summary of drawing lesson “These fluffy little animals”
To cultivate a caring attitude towards our smaller brothers, a love for nature in general, and a positive attitude towards the fine arts. Continue your acquaintance with the works of E.I. Charushin. Acquaintance with a new technical technique in the fine arts. Teach using a technique to convey the texture of a furry animal . Fix the name of the profession as an artist-illustrator.
Materials: Hard brush, ink or gouache, wet wipes, brush holders, illustrations, brushes, jars of water, landscape paper, oilcloth, musical recording “sounds of the forest”
.
A story and conversation about the illustrator E.I. Charushin. Examination of his works (illustrations)
. Reading the works of E.I. Charushin.
Beautiful dog
If the animals were depicted using previous methods, repeat the material on the outlines of dogs. We are going to introduce a cute puppy in a box. We use a pen and if you are not confident in your abilities, take a pencil.
Let's get creative:
- On top of the cage we draw two interconnected arches. To do this, we add half an oval in the form of a wave on top, in the middle of which we draw a triangle with a wide rounded side. It can be immediately painted black.
- To the lower area, right in the middle of the connection of the arms, we finish drawing the tongue. Place two circles on the sides of the upper part of the sketch. We show the pupils and highlights in them. Paint the main part black.
- We retreat to 2 edges and introduce the shape of hanging ears. We draw eyebrows above the eyes and mark the shape of the puppy's head with a wavy line.
- We step back, draw 2 paws and draw a uniform horizontal segment. Draw a bow just below the head on the left. We complement the picture with a wavy, inclined line and depict a collar.
- To the horizontal segment on the sides we add two vertical directions. Below we connect them with a horizontal line. At the top of the line, draw 2 diagonal segments on the sides, 1 square in size, and connect them with a horizontal line.
- We are preparing a set of pens and colored pencils. Use a pink pen to paint over the tongue and bow. Draw the outline of the dog in brown. Cover the entire body with a light brown pencil and use a darker shade to mark the dark areas of the puppy's coat. Paint the gift box green if you want, you can write a word and leave it blank or decorate it with the perfect color.
The adorable puppy in the box is finished. You can paint your dog in other colors as it is not necessary to use the colors shown to us.
Progress of the lesson:
- Guys, let's now hold hands and make a big circle. Well done! Look at each other. Now let each of you smile at your neighbor to your right and left. Very nice, isn't it? Do you know that there are good and evil words in the world? Which ones are more pleasant to hear?
- I have a surprise for you today: (the teacher takes out a fluffy plush toy bear from a magic box - chest) - Here it is. Now each of you will pass it on to your neighbor and say kind and affectionate words, and they are called “compliments”
For example: Milana, you have a wonderful dress today.
(children pass the teddy bear around and give each other compliments)
Did you enjoy receiving and giving compliments?
- Today we will continue to talk to Evgeniy Ivanovich Charushin. Who is he? (artist-illustrator)
-Who is an artist - an illustrator
(children's answers)
-I suggest you remember the heroes of his works and describe them. What are they? (children's answers)
-How do the illustrations of this amazing artist make you feel? (children's answers)
Would you like to become an illustrator and depict animals, as Evgeniy Ivanovich did?
Today two brushes came to visit us: one is our friend - a squirrel painting brush - Krasindia , and the other is her bristly friend - Shalunia. Although these tassels are friends, they are not at all similar to each other.
The teacher shows the children the brushes and invites them to touch and compare them in appearance and feel.
- Why do you think the brush was called Shalunia? Let's see how they draw, maybe then something will become clearer and you and I will find out what's going on here?
Show children how to paint with a hard brush.
-What do the marks from Naughty’s brush look like? Do you think she can help us depict animals like Evgeniy Ivanovich Charushin? What will we do with it? What will we paint with the second brush? (children's answers)
- That's right, she will help us draw faces and eyes .
- I suggest that each of you now imagine the animal that he most remembered and liked from the works of Evgeny Ivanovich Charushin and portray it.
Result of the lesson : Exhibition of works: each child talks about who he portrayed and why he chose this particular character, from which work he is.
— Guys, you worked very hard today. Did you enjoy being an illustrator today?
Notes on drawing in the middle group on the topic “Fluffy chickens” Topic: “Fluffy chickens” (poke method). Software tasks: 1. Develop the ability to perform expressive drawings using everything available.
Lesson on artistic and creative development “Furry little animals” Topic: “Furry little animals” Purpose and content of the lesson: To teach children to draw birds and animals throughout the entire space of the sheet in a new way of drawing.
Source
Nice cat
We talked about pictures of cats, now we combine knowledge and test the ability to imagine outlines. Let's pretend to be a good cat.
To depict the beast, we take a black gel pen; for beginners it is better to take a regular pencil, but when the image is ready, you will need to draw an outline.
- In the middle of the sheet we draw an arcuate segment. The arc should be directed downwards. At the end of the arc we draw cat ears on the two edges. From the edge of the colored ears we continue to show the circumference of the head.
- In the middle of the resulting figure, we will draw two circles apart, they will become the eyes of the cat. In the middle of the eye shape we show off the large pupils and add highlights. We go a little lower and depict a triangular nose with rounded corners. Let's add lips under the nose.
- Now let's outline the cat's fluffy chest. Under the chest we draw the front paws and divide their lower parts into fingers. Starting from the upper left side of the head, draw the torso and draw 2 hind limbs.
- Add a fluffy tail to the outline. We detail the ears and color the image. If you used a regular pencil to draw, outline the entire area with black.
- Use a black pen to fill in the eyes, leaving a shine. Use a pink pencil to color the inner edge of the ears. We show parts of the shadows in the image in black or gray. Paint the remaining perimeter of the eyes blue or green.
The cute cat is ready and now you can imagine how to make an animal drawing like a cat. The work is mostly simple. If you are a budding artist at a very young age, don't worry, if you meet our conditions, you will get a real creation.
Drawing animals step by step: some tips
When teaching your child the basics of drawing animals, take three main points as a basis:
- Explain to him what shapes the chosen animal will consist of. Most often it is a circle, oval or rectangle.
- Show your child how to make sketches that will later become filled with details.
- Start your training by mastering the simplest plots. Only after mastering the technique, move on to more complex objects.
To create simple drawings you will need paper, a medium-hard pencil and a soft eraser, as well as a set of colored pencils for coloring the finished picture.
Classes for senior and preparatory groups
Schemes for drawing various animals for preschoolers are also used in master classes at preschool educational institutions. A popular technique is drawing with geometric shapes, from which not only insects are obtained, but also flowers, large animals and people. There is also a secret to using the number 8, which is demonstrated to children in open lessons in the form of presentations with templates. When teaching an algorithm for drawing a fly or a wasp, a figure eight is used, the horizontal arrangement of which helps to proportionally depict the head and abdomen of the insect.
More complex drawing algorithms
In the senior group of kindergarten, children already have a fairly broadly developed horizon, they think and fantasize more broadly, so at this age they can already learn more complex compositions.
More complex drawing techniques
These lessons pay more attention to detail, using shading, curved lines and irregular geometric shapes.
Using available templates and diagrams for drawing, you can teach your child to depict all representatives of the animal world, not only in our country. Many adults, trying to teach a child to create their own drawings, are so carried away by the diagrams that, to their surprise, they discover the hidden talent of an artist in themselves.
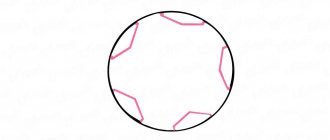
Animals from circles
The easiest way to teach a child to draw domestic and wild animals is to use ordinary circles as a basis. This option is perfect even for kids of preparatory age.
Look how easy and simple everything is! Each time the starting point when creating a drawing will be an ordinary circle. The young artist’s task is to strictly follow the sequence of actions.
Start with the simplest characters - a puppy and a goldfish, or a curled up cat and a cute owl
Do you want to portray a forest dweller? Why not draw the face of a kind bear cub. Please note that the basis of the picture is made up of only a few circles of different diameters.
What do you think of this snail with a house on its back? To create it, you need to perform only 6 simple steps: draw teardrop-shaped figures of the body, draw eyes and a mouth, and design the twisting spiral of the house.
Creating a drawing of the inhabitants of the underwater kingdom will not cause any particular difficulties. To the round body you only need to draw the head and limbs.
The idea of such drawings is simple: the circle is simply “overgrown” with ears, noses, eyes, paws and tails. Using this simple technique, it will not be difficult to depict not only animals, but also cartoon characters beloved by many, for example, the same Smeshariki.
Schemes and templates for children 4-5 years old
Children at five years old already have basic drawing skills, especially if they attend a preschool where they are taught by teachers. But in the hot summer, many kindergartens are closed, and not all parents know how to draw themselves. In order to help your child with creativity, you can use children's instructions from the Internet.
How to draw a bee by creating your own coloring book.
Step-by-step instruction:
- Draw a round head.
- The body is drawn towards the head, like a flower petal or a propeller blade.
- Slightly curved lines divide the body into segments, depicting striped coloring.
- Children's imagination perceives animals as endowed with emotions, just like people. Therefore, the bee needs to finish drawing her eyes and smile.
- Now it's time to add antennae and wings.
- The final touch is a sting in the form of a narrow inverted cone.
More complex drawing techniques
Interesting! Insects are the best representatives of the fauna on which you can train your artistic skills. It’s easy to draw them using the simplest geometric shapes: a circle and an oval, which make beautiful caterpillars, bumblebees and bees.
Drawing lessons in preparatory groups