Mood corner in kindergarten. consultation
Mood corner in the group and at home. We develop the emotional sphere of the child.
The mood corner is a means of self-knowledge and development of the child’s emotional sphere. But there are many means of developing a person’s emotional world. Here are the simplest and most accessible ways to develop and shape a child’s emotional world.
Goal: expanding teachers’ understanding of the meaning and ways of organizing a mood corner in group rooms.
The developmental environment of a preschool educational institution should be enriched with various elements that create in children a positive attitude and impression of the kindergarten, which will help (tasks):
1. Overcome the stress of admission,
2. Successfully adapt to a preschool institution,
3. Will promote the psychological and emotional health of each child’s personality,
4. Development of the emotional and sensory sphere.
Such an environment can be called an emotionally developing environment or a mood corner.
How is it different from the usual one? Certain zoning, which ensures the child’s privacy during a long stay among a large number of peers. This is an important point to prevent the child from becoming overly excited, leading to fatigue of his nervous system. The effectiveness of transforming group space and interaction with it is significantly enhanced if children themselves take part in this process. In this case, it is possible to avoid the existing problem of “inaccessibility” of various equipment and toys, as well as their meaningless mass use, inappropriate for the age and psychological characteristics of children.
One of the options for zoning and enriching group premises with a variety of game elements aimed at preserving the psychophysical health of preschool children, developing their emotional, sensory and communicative sphere, positive acceptance of themselves and the world around them:
1. “Welcome Corner”
Goal: to promote the mental and personal growth of the child, uniting the children's team, creating a positive emotional mood, an atmosphere of group trust and acceptance; the ability to notice positive qualities in people and talk about it.
Mood Corner"
Goal: to form expressive standards in children, to contribute to the enrichment of the emotional sphere, to give the concept of the separation of positive and negative emotions, to teach them to recognize their own emotions and feelings, helping them to adequately respond to the mood of a peer or adult.
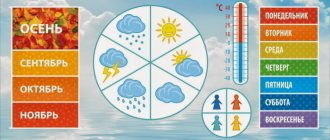
• “My Mood” shelf – children indicate their mood during the day using “pictogram chips”, and the teacher gets the opportunity to determine the emotional state of each child, the reasons for its occurrence and provide timely emotional support to children in need. In each group, the panel has a specific shape: a house, a flower, etc. In the center of each panel there are pockets made of colored ribbons that indicate a certain mood (purple - “I’m angry”, blue - “I’m sad”, green - “I’m calm”, red - “I’m happy”). Each color strip is divided into 6 equal parts (pockets). The first pocket contains a schematic image of the faces of boys and girls with a certain mood. The remaining five pockets represent the days of the week. In order for children to reflect their mood, schematic images of the faces of boys and girls with corresponding emotions are made from colored cardboard.
(Design option)
• Various didactic games for studying emotional states, pictogram cubes, a card index of portraits with various facial expressions and excerpts from various poems for them.
- Poster “The ABC of Emotions” is a set of photographs of children expressing various emotions (joy, anger, horror, fear, etc.).
Basic requirements for mood corners.
- The mood corner should be at the child's eye level.
- Changes to the mood corner are made by the child himself.
- Both color and pictogram images are used to determine mood. Their simultaneous use is possible.
- When decorating a mood corner, it is unacceptable to use more than 3 color options (with the exception of the mood color).
- Mood colors are entered simultaneously with the corresponding definition:*
| happiness | happy | ||||
| sadness | sad | (required) | |||
| fun | funny | (required) | |||
| joy | joyful | ||||
| calmness | calm | (required) | |||
| resentment | offended | ||||
| anger, anger | angry, angry | (required) |
- The mood is recorded in the corner every day after the child arrives at kindergarten.
- To track emotional state throughout the month, teachers keep a report card
- The timesheet calendar is located in the reception area in a place convenient for parents to view.
- The mood calendar has variable forms that differ from each other (by age group).
NOTE: When determining the color scheme, you can use M. Luscher’s color choices and their characteristics:
- blue (dark blue) – calm, contentment;
- green (blue-green) – confidence, perseverance;
- red (orange-red) – aggressiveness, excitement;
- yellow (light yellow) – activity, cheerfulness;
- brown – tension, anxiety;
- black – stress;
- gray (zero) – tension, grief.
* This methodological development uses recommendations on the color preferences of preschool children S. V. Velieva (“Diagnostics of mental states of preschool children”)
Variable forms of maintaining and designing mood calendars in different age groups.
I-JUNIOR GROUP (2-3 years).
The mood corner can be presented in the version “Hello, I’m here.” The report card is not shown to parents.
Tasks:
- Form a positive emotional attitude towards visiting kindergarten.
- Control and regulation of the child’s emotional state.
II JUNIOR GROUP (3-4 years)
Until the middle of the school year, a mood corner is held in the form of “Hello, I’m here.” From the second half of the school year, a new form is being introduced - “Mood Corner”. When indicating mood, object symbols are used (for example, a “sun” in yellow flowers - a cheerful mood and a “cloud” in blue - a sad mood).
Tasks:
- Learn to determine your mood based on two opposite states: “cheerful” and “sad.”
MIDDLE GROUP (4-5 years old)
When indicating mood, you can enter pictograms - schematic images of conventional faces with corresponding facial expressions. Terms that denote a certain mood are given and corresponding pictograms are shown. The concept of “pictogram” is not given. Children are asked to define three options for emotional states. Children determine only their emotional state.
Tasks:
- Learn to use the concept of “calm” mood (in addition to those used from the 2nd junior group).
SENIOR GROUP (5-6 years old)
Color codes for mood are introduced. The concept of whether the chosen color corresponds to a certain mood is not given.
Tasks:
- Learn to use the concepts of “joyful”, “sad (resentment)”, “angry (angry)”, “happy” mood.
- Involve children to determine the mood of another person (you can teach to determine the mood of another child, an adult, including a teacher)
PREPARATORY GROUP (6-7 years old)
When indicating mood, you can use the technique of “attracting the opinion of another child”: Sasha, determine what mood Dima is in today?
Tasks:
- Reinforce previously acquired knowledge and skills.
- Determine the emotional state of children twice a day: in the morning and in the evening (after sleep).
Monitoring the stability/instability of the emotional state of children and the general mood of the group.
In accordance with the work plan, the educational psychologist regularly (preferably daily) reviews the Mood Corners in order to determine the reliability of the data demonstrated.
At the end of the month, report cards are handed over to the teacher-psychologist for joint analysis of the data obtained with the teacher. At the end of the year, the results of work in this direction are summed up.
Conversations and work are held with children who define their mood as negative to form a positive attitude towards events that influenced the decrease in the child’s emotional background.
It is preferable that each group of preschool educational institutions develop their own design options based on the recommendations proposed above.
Plasticine traffic light
What child doesn’t like to stretch their hands with plasticine? But don’t just stretch it, create something. In this case we will make a traffic light. For this we need:
- Plasticine
- Chupa Chups stick
- Pen refill
Progress:
- First we need to make the body of our road assistant.
- Let's take a piece of black plasticine and knead it thoroughly, giving it the shape of a rectangle.
- Next you will need to use red, yellow and green plasticine. From these pieces you need to roll into small circles.
- Then, carefully take them with your fingers and flatten them a little.
- And at the end we assemble the traffic light craft. Glue the circles to our body.
- A traffic light, as everyone knows, is mounted on a pole; you can use a candy stick or a pen rod as a pole.
- The fake is ready.
Traffic light from a plastic bottle
This fabulous option is very easy. Let's turn on our imagination. We will need:
- Plastic bottle
- Brushes and paints (preferably gouache)
- Colored paper
- PVA glue
- Scissors
Work progress:
- We choose a plastic bottle, it is better to take the one with a longer neck.
- We paint it a neutral color (meaning not red, not yellow, not green). Let it dry.
- Next, we cut out circles from colored paper for the traffic light itself and details for our fairy-tale character. These are eyes, mouth, nose, ears, hands.
- The bottle is dry. Carefully glue the finished parts and, of course, the circles, making sure that the distance between them is the same.
- But our hero cannot be without hair! We also make hair from paper. Cut into thin strips and twist with scissors.
- We also make the cap out of paper. And look what happened. To fully complete our hero, we will add a rod or a road sign to the handles.
Edible traffic light
Well, everything here is generally very simple. All children love sweets. And here, when making crafts, they can not only enjoy themselves, but will also forever remember the role a traffic light plays in traffic.
- For the base we need a wafer or cookie. Make a rectangular shape and fill it with chocolate.
- Then add red, yellow and green caramels. You can use M&Ms.
That's all! Looks very tasty.
The role of the psychological relief center
Modern children find it difficult to adapt to life in a group of peers, which is expressed in:
In this regard, the teacher is faced with the task of creating conditions for the formation of the emotional well-being of children. The model of a subject-development environment—a center of psychological relief—helps solve this problem.
The Center for Psychological Relief helps children learn to calm their negative emotions
Goals and objectives of the corner
The content of the psychological relief center has the following goals:
The tasks of organizing a corner of psychological relaxation are universal for all groups of a preschool educational institution (preschool educational institution), however, there are still some nuances associated with the age of the pupils.
It is very important to teach girls to cooperate, to put up with boys and vice versa, since with age children begin to be embarrassed by each other, and this leads to avoiding joint tasks, increasing the number of mutual grievances
Themed traffic light
We all love balloons, but kids especially. Our traffic light is made from these and can be used as an educational game.
Any child will love a party dedicated to Traffic Rules.
For production we need:
- Airy small black balls
- Balls with more signal colors
- A thread
- Rack
Work progress:
- The stand can be made from long balloons.
- First, we inflate black balloons and tie them to our finished stand. We try to give it a rectangular shape. We tie red, yellow and green balls in the middle in the correct order.
- The airy structure can also be decorated with balloons in the shape of cars or road signs, which correspond to our themed party.
Traffic light from packages
The option is a little more complicated, but quite interesting.
Required:
- Bags (can be trash or cellophane)
- Scissors
- Plastic cover
- A thread
Progress:
- You need to fold the bags into an even stack, carefully cut off the bottom and top from them to get even rectangles. Cut them into even strips.
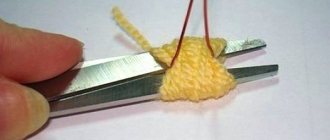
- Next, take a plastic lid and cut out two rings from it. We put them next to each other and wrap the polo with nets. Then we cut everything along the outer edge, push the rings apart and tie the pom-poms with thread. Trim the edges to make the pompoms even.
- We should end up with three pompoms of different colors. You need to connect them together with a thread. And our traffic light is ready.
- Very funny crafts can also be made from disks; you can crochet a traffic light, or you can simply make one from balls of thread. Much depends on your imagination, and there will always be enough available means.
Fabric craft
This version of the traffic light is more suitable for girls and real needlewomen. A sewn fake can also serve as an educational toy if the circles are made with Velcro.
So, let's begin:
- You need to take rectangular pieces of black fabric and lay a small layer of foam rubber between them. Sew it together.
- Next, cut out circles from felt (red, yellow, green). We sew them along the edges. You need to sew one part of the Velcro to the traffic light body itself, and the second part directly to the circles.
- For a more interesting design, you can make a fabric lid on top. Having previously divided it into three parts. Thus, each color will be opened separately, or all at once. The fabric craft is ready.