Requirements for design and size
Shields are made hinged or installed on racks.
A hinged fire shield is a plywood (wooden) or metal sheet to which hooks for equipment are attached. You can also find a more rational model, in which only a durable metal frame is made. There are fasteners attached to it. If the frame is painted red and hung on a white wall, it will satisfy all design requirements. Closed type panels are made in the form of boxes with lattice or glass doors. This makes it possible to see the contents, but protects against unwanted penetration inside. The depth of the box should be such that it does not block the passage, and at the same time accommodate all the necessary tools.
The edging of the fire shield has a width of 3...10 cm and is also painted red or in red and white stripes running at an angle of 45°...60°. The field on which the tool is attached is white. On white, red and black details are visible from afar.
According to the requirements, in addition to tools for fighting a fire, telephone numbers are placed on the shield by which you can call the Ministry of Emergency Situations or contact details of the nearest fire station. There is also an inventory of tools.
The height and width of the fire shield does not exceed 1.5 m. Each item is placed on the shield separately, so the dimensions may vary depending on the configuration.
Tools must not be screwed or nailed tightly. They are hung on hooks so that they can be easily removed. You can do this yourself by purchasing equipment and a shield separately. You can also buy all the necessary fire tools in a kit.
Plasticine models
One of the first craft materials that a child gets acquainted with in early childhood is plasticine. You can make a beautiful fire truck out of it.
Master Class:
- Two large parts are formed from red plasticine - the base and the cabin, which are connected to each other.
- Windows made of thinly rolled white plates, yellow circles of headlights, a small blue signal light and a black bumper (a strip of black plasticine at the front bottom of the cab) are fixed to the cab.
- Thin strips and a number (01) made of white plasticine, as well as a fire hose coil in the form of a spiral made of gray plasticine flagellum, are installed on the base.
- The wheels are made of 2 parts: first, a disk is formed from black plasticine, a notch (tread) is applied to it along the perimeter, and a yellow circle is attached in the center.
- The ladder is made of gray material: cylinders with a diameter of 5-7 mm are formed and installed in parallel. Steps of the same color are attached to them.
Plasticine is a very malleable material. In addition to the car, you can make figures of firefighters out of it. A firefighting helicopter or airplane looks modern.
Fire shield, fire safety layouts - Layout “Fire shield”
Publication “Layout “Firefighter...” If you don’t know what craft to make for school on the theme of fire safety, then read the article and look at the photo. It is very useful for a child to know that fire is not a toy. Thanks to classes in kindergarten or school, children clearly learn how to behave in the event of an emergency...
Image library "MAAM-pictures"
Educational "Fire shield" in the senior group
Educational “Fire Shield” in the senior group Teaching children fire safety rules is one of the most important and primary tasks of parents, educators and teachers. This board will help you visually study the rules for handling equipment (shovel, hook, axe, bucket, sand box,...
Layout “Fire Shield” Fire safety for children is one of the important issues that not only parents, but also teachers should pay special attention to! The issue of security is very important and relevant at all times. Children from a young age get acquainted with the basic rules, professions, tools! What..
Didactic game “Fire Shield” Purpose: To give children an idea of a fire shield; about the profession of firefighter. To develop the ability to realistically assess possible danger and help remember fire safety rules. Development of visual attention, memory, logical thinking. Equipment: panel - shield, cards with...
Poster “Matches are not toys!”
Fire-fighting crafts are aimed at strengthening safe life skills.
Very often, parents and children follow the path of least resistance and use matches in crafts. Inspectors from the Ministry of Emergency Situations and the All-Russian Fire Department categorically do not recommend doing this! Because now the child has glued a match to give “vitality” to the drawing, and then he decides to set fire to the piece of paper in order to stick it, burnt, also for vitality. Therefore, no matter how much you want to save time and effort in this way, it is better not to take risks.
The correct handling of matches is taught in posters, which can be done in groups at school and in kindergarten.
Take a sheet of whatman paper in format A 1 or A 3. Create a “match”. It can be cut out of paper. You can draw with a felt-tip pen, gouache or watercolor.
We paint the flame with paints or create an applique using a stencil from colored paper. If the flame is not glued completely, but only at the beginning or end, you will get a three-dimensional applique. We add the poster with the inscription “Matches are not toys!” You need to try to correctly calculate the place for the letters. To do this, we measure the distance that we have for the inscription.
We count all letters, punctuation marks and spaces in a word. Divide the distance in centimeters by the number of characters. We get the distance that we can allocate to one letter. Divide the segment into equal rectangular parts. Now we can draw the letters using a ruler. Since the letters are all straight, we will only have to draw the central and middle details with a ruler.
Drawings on the topic of fire safety.
Pencil drawing “A fireman extinguishes a fire in a house”
Drawing a fireman is quite a challenging task for preschoolers of any age. But if you do this step by step, the child will easily cope with the task. Where to start and how to draw the details can be seen in the drawings, but an adult will explain much better with his own example. All that remains is to finish drawing the fire in the house and color the drawing.
Everything that the child was told in kindergarten about fire safety, he will remember if these lessons were reinforced with creativity. DIY crafts will help your child learn information. This knowledge will be strengthened and expanded at school. In the meantime, the kindergartener can draw, sculpt and glue, learning the basics of his safety.
Be careful, fire!
Home Security
Home safety plays an important role in a child's development. Once children are taller and able to take things off the shelves, new safety topics need to be introduced.
Create a short comic. For this you will need felt-tip pens or pencils.
- A cooking stove is drawn on a piece of paper. The burners should be depicted in red, thereby indicating their temperature.
- A child touches the stove and severely burns his hand.
- The child decides to repeat his mother’s actions and drain the water from the pan into the sink, but cannot cope and is doused with boiling water.
- You need to eat carefully and slowly, otherwise you may choke.
- You cannot drink various liquids without adult permission.
- Well, the last picture can depict careful handling of cutlery. Especially with knives and forks.
All crafts should be created as clearly as possible and accompanied by clear explanations of the actions. It is better to show the fork and its correct position in the hand. Explain that the knife is held in the dominant hand and the fork in the other.
Fire shield, fire safety layouts - Fire shield layout
Publication “Firefighter Layout...” Teaching children fire safety rules is one of the most important and primary tasks of parents and educators. This board will help you visually study the rules for handling equipment: hook, axe, shovel, bucket, sand box, fire extinguisher. The fire shield is equipped with a standard set…
Image library "MAAM-pictures"
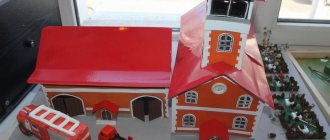
Do-it-yourself fire shield model for kindergarten
DESCRIPTION OF THE MATERIAL: the material will be useful in the work of teachers when studying the topic of fire safety with preschool children. OBJECTIVES: to introduce children to the profession of firefighter. Talk about fire safety rules, give an idea of primary means...
Craft “Fire Shield” for kindergarten
You never know when the need to make a fire shield quickly and easily with your own hands may strike you. And it’s good if it’s a craft for kindergarten, and not something larger. In fact, these shields, which according to fire safety rules must be...
Layout for the fire safety corner “Fire Shield” The problem of forming the foundations of fire safety is becoming increasingly relevant
It receives the closest attention in educational institutions of all types and levels. The most vulnerable category exposed to various types of danger are preschool children..
Fire shield, fire safety layouts - Layout “Fire shield”
Article “Layout “Firefighter...””. I would like to present to you the design of the SECURITY CORNER in the middle group. Together with the children, we created a model of a “fire shield”, thanks to which it is much easier to get acquainted with the profession of a firefighter. Fire shields are considered the primary fire extinguishing means. The main purpose of creating...
Design of a safety corner. Layout “Fire Shield” Good afternoon, dear colleagues. I would like to present to you the design of the SECURITY CORNER in the middle group. Together with the children, we created a model of a “fire shield”, thanks to which it is much easier to get acquainted with the profession of “Firefighter”. The main purpose of creating a mockup is to teach...
DIY fire shield model for a kindergarten. My daughter and I created this model to decorate a fire safety corner in our favorite kindergarten. I think the material will be useful for teachers when studying topics on fire safety with preschool children. Objectives: introduce children to fire safety rules...
Photo report on the competition "Fire Shield"
Regulations on the review-competition “Fire Shield” 1. General provisions. 1.1 These Regulations regulate the procedure for holding a review competition in the middle group among the families of pupils. 2. Goals and objectives of the competition 2.1 The competition is held with the aim of creating conditions for organizing…
Fire shield, fire safety layouts - go to the main page of the section.
Pages: 4 ...
Craft for school
The school is also an institution that is responsible for the safety of the children there.
And the main task of teachers is precisely to teach useful lessons to students and protect them from various disasters and regularly occurring crimes. Therefore, they also hold competitions and exhibitions of similar children's products. And they also encourage talented students for their efforts and diligence when working on such a significant project.
How to make a fire shield with your own hands in a master class: equipment
The list of equipment on the fire panel is strictly regulated, as are the sizes and number of items. According to the official document, one fire shield, if used correctly and competently, can save an area of 200 square meters from fire. Fire shields come in two types - open and closed, but the equipment for all of them is almost the same. It must include:
- Two fire extinguishers (foam or powder)
- A bayonet shovel that can be used to fill flammable and burning materials
- Hook - used to open windows and doors that are jammed or closed. Long handle minimizes fire injuries
- Crowbar - for breaking and pulling away burning structures
- Cone-shaped bucket - for sand or water
- A cloth is a thick and dense material that can, if necessary, be used to extinguish the clothes of victims or cover flammable materials or equipment.
- Box of sand or container of water
Sometimes the fire shield also includes a shovel and an ax. All items are securely fastened to the shield, but can be easily removed and used for their intended purpose.
Actually, this information is repeated from an early age. And to reinforce it, they play various games with the kids and offer to make a mock-up of a fire shield on their own or with the help of their parents.
The most rewarding material for children's crafts is paper. Almost anything can be made from paper of different densities and textures.
A small master class on making such a model.
To work you will need:
- A large candy box, or any suitable sized box (approximately 40 by 40 cm)
- Gouache in red, black and brown colors
- Juice box 0.3 ml
- Unnecessary spray bottle, small
- Pencil, scissors, ruler, glue, and other office supplies
- Red cardboard and colored paper
- A can of red paint - preferably
- Alcohol and cotton wool
First stage. Preparing the base - the shield itself, on which all the equipment will hang. Its background is usually light, so that red objects stand out as brightly as possible. If you have a candy box, the color of the inside does not need to be changed. Only the top cover needs to be cut off from the box itself if it is hinged. If it is removable, then simply choose the part that is lighter and stronger. The outer sides of the box can be covered with red paper.
Second phase. Inventory. We need: a crowbar, a hook, a shovel, an axe, a bucket, a fire extinguisher, a box of sand. Draw a crowbar, a shovel, a hook and an ax on cardboard, cut them out and color them. Another option is to take a picture, print it, stick it on cardboard and cut it out. The bucket is made of cardboard, rolled into a cone. The handle is made from a strip of cardboard painted black.
A box of sand is made from a juice box cut in half. Accordingly, it needs to be covered with red paper or painted with red paint, and “sand” signed on the side.
The most difficult element is the fire extinguisher. If you have a small, simple-shaped spray bottle, then everything is very simple - you need to paint it red with gouache or spray paint. The future fire extinguisher must first be degreased - wiped with a cotton swab with alcohol or nail polish remover, then the paint will lie smoothly. If the shape or size is not suitable, then you can screw the spray bottle itself onto a half-liter bottle and paint it too
All equipment is ready, it can be fixed in place according to the diagram in the photo.
If desired, the shield can be equipped with another fire extinguisher, or a hose, the role of which can be performed by any piece of cord rolled into a circle.
If you don’t have spray bottles at your disposal, and you really need a fire extinguisher for the shield, you can also print them out and stick them on cardboard. And glue them to the shield with a piece of voluminous (“car”) tape, then they will look more voluminous.
Road traffic
Applications on the topic of traffic rules are especially interesting. Since using paper it is easy to depict traffic lights and road crossings.
- You will need paper in three traffic light colors.
- Create two traffic lights, one with two colors and the other with three.
- Draw a man on one and a car on the other.
Sometimes it happens that a child can confuse the traffic lights and start crossing the road at the green traffic light intended for cars. If an adult does not react in time, this can cause irreparable consequences for both sides of the movement.
People should look at their traffic light, which has two lights, green and red. Accordingly, the red path is prohibited, and the green path allows movement. Picture it that way!
On a large traffic light with three colors, draw a large red cross. And on the second there is a green tick in a circle.
Through these activities, you can learn all the basic aspects of traffic that your child will need. And when the child goes to school alone, he will be able to easily navigate and not get lost when he sees two traffic lights.
- It's easy to make big cars out of paper milk cartons. The headlights are made of paper, and the bumper is made of toothpicks.
- The man can also be assembled from toothpicks using chestnuts (if the season of the year allows).
- Several installations will briefly and easily explain the dangers of the road.
- You cannot cross the road without adults; even with an adult you should look around and make sure there are no cars.
Be careful about your child's safety. Crafts are just a way to explain the correct actions in the event of a fire or other threat. Or behavior to prevent such dangerous phenomena. You can use photographs of a burning forest. They will definitely evoke sympathy for the inhabitants of the forest.
Fire shield signs
The location of fire panels must be indicated on the evacuation plan. There is GOST R 12.4.026-2001, which lists the requirements for signal signs and colors. A red rectangle or square is used to indicate the location of fire-fighting tools. To indicate the location of several protective equipment, a white semicircle is depicted on a red background. This way, not only shields can be identified, but also fire hydrants and fire extinguishers installed in one place.
The inscription “fire shield” is optional. If desired, it can be placed next to or on the doors of a closed stand.
There are requirements for the design of directional signs. The directional sign, which is hung on the walls of premises to show where fire equipment is located, is a white arrow on a red background. There is also a sign with the red letters PSH and the serial number of the shield on a white background. This designation must correspond to the actual numbering of the shields.
Why do we need a threat model?
The need to develop a threat model is regulated by a number of regulatory documents. Here are some of them.
Part 2 of Article 19 of Law No. 152-FZ “On Personal Data”:
2. Ensuring the security of personal data is achieved, in particular:
1) identifying security threatspersonal data when processed in personal data information systems;
The composition and content of organizational and technical measures to ensure the security of personal data during their processing in personal data information systems (approved by order of the FSTEC of Russia dated February 18, 2013 No. 21):
4. Measures to ensure the security of personal data are implemented, including through the use of information security tools in the information system that have passed the conformity assessment procedure in accordance with the established procedure, in cases where the use of such tools is necessary to neutralize current threats to the security
of personal data.
Requirements for the protection of information that does not constitute a state secret contained in state information systems (approved by the FSTEC of Russia dated February 11, 2013 No. 17)
Formation of information security requirements... including: ... identification of information security threats
, the implementation of which may lead to a violation of information security in the information system, and the development of an information security threat model based on them; ...
Requirements for ensuring the protection of information in automated control systems for production and technological processes at critically important facilities, potentially hazardous facilities, as well as facilities that pose an increased danger to human life and health and to the environment (approved by order of the FSTEC of Russia dated March 14, 2014 No. 31):
Formation of requirements for information protection in an automated control system... including: ... identification of threats to information security, the implementation of which may lead to disruption of the normal functioning of the automated control system, and development
on their basis
of a model of threats to information security
;
Requirements for ensuring the security of significant objects of critical information infrastructure of the Russian Federation (approved by order of the FSTEC of Russia dated December 25, 2022 No. 239):
11. The development of organizational and technical measures to ensure the security of a significant object is carried out by the subject of the critical information infrastructure... and should include:
a) analysis of threats to information security and development of a model of threats to information security or its clarification (if any);
So, the conclusion from here is simple: for any information systems that are somehow subject to protection in accordance with the law, it is necessary to develop a threat model.
Inventory of PSH
The fire safety corner equipment must be described in accordance with the requirements of the PPR. The list is drawn up on paper, secured by the signature of the responsible employee and the inspector of the Ministry of Emergency Situations. The equipment must be checked regularly to ensure that all tools are present. This responsibility lies with the person in charge. The results of inspections are recorded in the logbook of primary fire safety equipment. Inspections must take place at least once a quarter. During the check, you should perform the following actions:
What is a fire shield, what does it come with, where is it installed, what types are there?
- clean equipment from dust and dirt;
- pockets of corrosion are eliminated;
- if a layer of paint is destroyed, it must be restored;
- dull instruments must be sharpened in accordance with the standards defined by the standard;
- If the number is lost on the instrument, it must be reapplied.
Sample inventory
Introduction to the Threat Model
Okay, let's move on to the contents of the document.
I think about the title page, the list of abbreviations, terms and definitions, everything is clear. Although, perhaps, it’s worth taking a closer look at... suddenly the title page.
In the template, it is signed by the manager of the owner of the information system. It's not just like that.
Decree of the Government of the Russian Federation of May 11, 2022. No. 555:
4. The terms of reference for the creation of the system and the model of threats to information security are approved by an official of the executive authority who is entrusted with the appropriate powers.
Naturally, if the information system is not state-owned and the system operator is not an executive authority, then anyone can sign the threat model. It’s just that we have encountered more than once when, when the above conditions were met (state information system of an executive authority), the customer asked us to change the title page so that there were signatures only of representatives of the licensee company (that is, ours). We had to explain why FSTEC would return such a threat model for revision.
DIY fire shield - detailed diagram with description and photo
Being prepared to fight fire is an important indicator of the safety of a home or other building. All tools and equipment for extinguishing a fire should be collected in one place, easily accessible and ready for use. This place is usually a fire shield.
Making a fire shield with your own hands is quite simple, although you can purchase a finished product. The main thing is that it fully corresponds to its purpose.
Requirements for fire shields
A fire shield is a place in which equipment intended for extinguishing a fire manually is collected. There are certain requirements for it from state standards and fire safety regulations.
The dimensions of the fire shield are not directly regulated; they must be sufficient to accommodate the equipment. The standards, in turn, determine the color of the shield. The main color is white, with a red stripe as a frame. With such ratios, the shield is clearly visible in poor lighting. It is necessary to have hooks on which tools and accessories will be placed.
Types and configurations
There are open and closed fire shields
An open shield is a rectangle made of plywood or metal sheet with a frame of beams and hooks, of a certain color and size. It can be mounted, hanging on the wall, or attached, placed on special devices.
The photo shows an open type fire shield
A closed fire shield is a metal box, the doors of which are covered with a metal mesh. It can also hang on the wall or stand next to it.
Placing such a shield is also possible inside buildings. Typically, a closed shield is sealed or locked.
The photo shows a closed type fire shield
Fire shields are also divided into categories based on fire and explosion hazards. This division determines the configuration of the fire shield and its markings.
Thus, the ShchP-A fire shield, designed to counteract the combustion of solid substances, must contain a 200-liter water barrel, two specially shaped buckets, a hook, a crowbar, two shovels and two foam fire extinguishers.
The ShchP-V shield, designed to counteract the combustion of liquid substances, among other things, contains a box with sand, a special cloth and a powder fire extinguisher. There are also special equipment for boxes of other categories.
Making a fire shield
To make a shield with your own hands, you will need material (plywood or sheet metal, hooks, bars, paints, etc.), tools (for cutting metal or wood, hammer, etc.) and appropriate equipment. The beginning of work consists of preparing a drawing, taking into account all regulatory requirements. Typically the side dimensions are 1400x1250 mm, but this is not a requirement.
If an open-type metal fire shield is being made, it is enough to cut a sheet of appropriate size, paint it and attach hooks for placing equipment. In the rear part, a frame made of beams is attached to the sheet. In addition, it is necessary to apply appropriate inscriptions and designations.
To make closed fire shields, you will have to make a drawing in three projections, as well as a drawing of the door. Attached fire shields also require a drawing of the racks.
The production of a closed shield begins by welding a tubular frame onto which a box made of a metal sheet and a corner measuring 20x20 mm is attached.
stroykadoma.org
Dough crafts
Salt dough successfully replaces plasticine. It is also malleable, but when hardened it becomes hard and can retain its shape for a long time. This blank can be painted and varnished. Dough recipe:
- For 200 mg of flour add 150 mg of table salt and 5 tbsp. vegetable oil.
- The components are diluted with water to the desired consistency.
From the prepared plastic mass you can easily fashion a fire truck and a helicopter, houses engulfed in flames, emergency workers, etc. The workpiece is placed in the oven and dried at a temperature of +70...+80 0C for 1 hour. Accelerated drying is provided at a temperature of +110...+120 0C for 25-30 minutes. After cooling, the hardened workpiece can be painted in any color using acrylic paints.
Where to place the PSH
Whether you purchased a ready-made fire shield or made it yourself, it is important to choose the placement location wisely. Since safety requirements apply to all objects, such stands must be installed:
- educational institutions;
- healthcare institutions;
- children's and sports grounds;
- gas stations;
- car parking;
- vehicle parking lots and garages;
- catering establishments;
- trading enterprises;
- cultural and entertainment establishments;
- industrial enterprises and surrounding areas;
- sanatoriums, holiday homes, children's camps;
- hotels and motels;
- warehouse terminals;
- river and sea vessels;
- railway transport and so on.
Inventory standards
A funny presentation of a serious topic
When creating crafts about fire safety, set a cheerful tone. Drawings and crafts should not be alarming. Concern with a touch of humor and jokes - this is the main direction of such children's crafts. Along the way, the rules of behavior of people in case of fire are studied. What to do and what not to do.
There should be an explanation for children why they are not allowed to use matches. Along the way, crafts are made from plasticine depicting a matchbox and a fire.
And nearby there is a fire extinguisher and a man with a hose and mask. Here several useful things are done for the child at once. He gains knowledge, trains his fingers, his mind, and learns things useful for life. It turns out to be fun in the form of a game.
Equipment according to GOST
From the listed types of fire shields, you can determine the basic configuration of a fire shield in accordance with GOST. This package is standard and includes the following equipment:
- shovel,
- fire protection fabric,
- axe,
- metal gaff,
- buckets,
- scrap.
Fire-resistant fabric is used to prevent fire from growing. It can also help to eliminate the source of fire if its effect is supplemented with primary fire extinguishing agents. The cloth is useful in case of ignition of clothing on a person or with equipment on fire. The panel is created from heat-insulating fabrics. Its dimensions can be 1 or 2 meters in width and length. Handles (2 or 4 pieces) are attached to the edges of the canvas for ease of use. Care should be taken to ensure that there are no stains or holes larger than 10 mm in the fabric.
Fire-resistant sheet fabric with obligatory indication of expiration date
Crowbars, shovels and hooks are used to clear debris that forms during fires.
The purpose of the scrap is to open roofs, clear ice from a well with a fire hydrant, clear fires, and open hatches.
The gaff is a solid metal rod with a hook at one end and a ring handle at the other. The length of the hook should not exceed 2 meters, its weight should start from 5 kg. The length of the crowbar is 1100 mm, the diameter of the device is 25 mm. Its weight is at least 4.5 kg. It should be checked periodically, since cracks or scale may form in it, which should not happen. If the inspection reveals the indicated defects, you should start sharpening and heat treating the tool.
Buckets from fire shields are used to deliver sand or water to the fire. These buckets are painted red and the volume of the buckets must be at least 0.008 cubic meters. m.
Axes on the shield are needed to clear debris and remove obstacles from the path, and to open various structures. The end of a fire ax is very sharp. It consists entirely of metal or is complemented by a wooden handle. If the handle is made of iron, then it should have a rubber coating. It allows you to protect yourself from possible electric shocks if you are dismantling debris from energized structures. This handle also prevents slipping. The wood must be durable. There should be no chips or cracks on it. Periodic inspection of this equipment is required for defects, which should either be promptly eliminated or the instrument replaced with another.
The fire-resistant fabric is placed in a special fabric container. Container sizes may vary. The container can also be made of polymers. The cloth should be cleaned monthly to remove accumulated dust.
The handle of the bayonet shovel should have a length of 1100 to 1300 mm. The diameter of this shovel is most often 400 mm.
Powder fire extinguishers are located on the panel. In winter, they should be removed from the panels, since they may lose their functionality due to the cold. But you can’t just take them off. It is imperative to place on the board information about where the fire extinguishers are placed.
Standard fire shield with water tanks, each holding 100 liters
Barrels for storing water intended for extinguishing fire must have a volume of at least 0.2 cubic meters. m. The barrel should be refilled once every 10 days, and the water should be completely replaced quarterly.
Sand boxes require a capacity of 0.5 to 3 cubic meters. m. Before filling the box, the sand must be sifted and dried. Once a decade you need to inspect it and dry it if there are lumps or moisture. The box should be designed in such a way as to prevent water from entering it, but to ensure convenient removal of sand when the need arises.
Vulnerabilities
As we remember, the threat model must indicate possible vulnerabilities. This section is not yet included in the downloadable threat model template, so we will briefly describe how to deal with it.
The compiler of a threat model should immediately have a question: should a list of vulnerabilities identified by the scanner be attached to the document? The question is good and the answer is not clear-cut. We know colleagues who do exactly this, but we think this approach is wrong and here’s why.
Firstly, the information security threat model is a document, although subject to change, but still more or less static. Developed once and forgotten until significant infrastructure changes in the system.
The list of vulnerabilities generated by scanners is very dynamic information. Today we identified vulnerabilities, tomorrow we fixed them and scanned them again - we received a new report. The day after tomorrow new signatures appeared, the scanner was updated and found new vulnerabilities, and so on in a circle. What is the point of attaching a vulnerability scanner report made at the time the threat model was developed? None.
Secondly, a threat model can be created for an information system that does not yet physically exist (designed but not built). In this case, we can’t even scan anything.
The way out of this situation is simple.
Indicate in the threat model not specific vulnerabilities indicating the CVE identifier and CVSS rating, but list possible classes of vulnerabilities for a specific information system. And to give this list some credibility, let’s take this list not from our heads, but from GOST R 56546-2015 “Information Protection. Vulnerabilities of information systems. Classification of information system vulnerabilities." The list is under the spoiler. We take it and remove the unnecessary ones that are not compatible with the structural and functional characteristics of our system. The section is ready! Vulnerability classes according to GOST
Vulnerabilities by area of origin:
- code vulnerabilities;
- configuration vulnerabilities;
- organizational vulnerabilities;
- multifactorial vulnerabilities.
Vulnerabilities by type of information system deficiencies:
- vulnerabilities associated with incorrect configuration of software parameters;
- vulnerabilities associated with incomplete verification of input data;
- vulnerabilities associated with the ability to follow links;
- vulnerabilities associated with the possibility of OS command injection;
- vulnerabilities associated with cross-site scripting (script execution);
- vulnerabilities associated with the injection of arbitrary code;
- memory buffer overflow vulnerabilities;
- vulnerabilities associated with deficiencies leading to leakage/disclosure of restricted information;
- vulnerabilities related to credential management;
- vulnerabilities related to permissions, privileges and access management;
- authentication vulnerabilities;
- vulnerabilities associated with cryptographic transformations;
- cross-site request forgery vulnerabilities;
- vulnerabilities related to resource management.
Vulnerabilities by place of occurrence (manifestation):
- vulnerabilities in system-wide (general) software;
- vulnerabilities in application software;
- vulnerabilities in special software;
- vulnerabilities in technical means;
- vulnerabilities in portable hardware;
- vulnerabilities in network (communications, telecommunications) equipment;
- vulnerabilities in information security measures.
What should be in the fire safety corner in kindergarten
A model of a gaming educational environment in the second junior group, effective forms of cooperation with parents to create a home gaming environment... Older children can perform compositional appliqué. Their creations will feature a fire truck, a bonfire, a house with windows where the fire is burning and smoke is pouring out. All this can be depicted using torn appliqué: pieces of colored paper, dry autumn leaves. This can be a voluminous work, 3D application.
Fair of Masters - handmade Educational Tabletop Module “Geared Wheels” Montessori (gears.
The fire shield is equipped with many special tools. Children learn which object is used for what. All parts are removable.
Crafts from cereals
Quite simple crafts can be created from semolina. To do this, colored semolina is prepared: the cereal is mixed in a container with gouache of the desired color until a rich shade is obtained and dried. For a fire truck you will need red, black and gray semolina, as well as undyed (white) semolina.
The outline of the machine is drawn on a sheet of thick paper or cardboard. Glue is applied inside the lines and red material is poured in a thin, even layer, and excess grain is shaken off. Then other colors are carefully formed into small details. When the picture is ready, glue is applied to the paper outside the outline, creating a general background of unpainted semolina.
DIY fire shield - detailed diagram with description and photo
Being prepared to fight fire is an important indicator of the safety of a home or other building. All tools and equipment for extinguishing a fire should be collected in one place, easily accessible and ready for use. This place is usually a fire shield.
Making a fire shield with your own hands is quite simple, although you can purchase a finished product. The main thing is that it fully corresponds to its purpose.
Requirements for fire shields
A fire shield is a place in which equipment intended for extinguishing a fire manually is collected. There are certain requirements for it from state standards and fire safety regulations.
The dimensions of the fire shield are not directly regulated; they must be sufficient to accommodate the equipment. The standards, in turn, determine the color of the shield. The main color is white, with a red stripe as a frame. With such ratios, the shield is clearly visible in poor lighting. It is necessary to have hooks on which tools and accessories will be placed.
Types and configurations
There are open and closed fire shields
An open shield is a rectangle made of plywood or metal sheet with a frame of beams and hooks, of a certain color and size. It can be mounted, hanging on the wall, or attached, placed on special devices.
The photo shows an open type fire shield
A closed fire shield is a metal box, the doors of which are covered with a metal mesh. It can also hang on the wall or stand next to it.
Placing such a shield is also possible inside buildings. Typically, a closed shield is sealed or locked.
The photo shows a closed type fire shield
Fire shields are also divided into categories based on fire and explosion hazards. This division determines the configuration of the fire shield and its markings.
Thus, the ShchP-A fire shield, designed to counteract the combustion of solid substances, must contain a 200-liter water barrel, two specially shaped buckets, a hook, a crowbar, two shovels and two foam fire extinguishers.
The ShchP-V shield, designed to counteract the combustion of liquid substances, among other things, contains a box with sand, a special cloth and a powder fire extinguisher. There are also special equipment for boxes of other categories.
Making a fire shield
To make a shield with your own hands, you will need material (plywood or sheet metal, hooks, bars, paints, etc.), tools (for cutting metal or wood, hammer, etc.) and appropriate equipment. The beginning of work consists of preparing a drawing, taking into account all regulatory requirements. Typically the side dimensions are 1400x1250 mm, but this is not a requirement.
If an open-type metal fire shield is being made, it is enough to cut a sheet of appropriate size, paint it and attach hooks for placing equipment. In the rear part, a frame made of beams is attached to the sheet. In addition, it is necessary to apply appropriate inscriptions and designations.
To make closed fire shields, you will have to make a drawing in three projections, as well as a drawing of the door. Attached fire shields also require a drawing of the racks.
The production of a closed shield begins by welding a tubular frame onto which a box made of a metal sheet and a corner measuring 20x20 mm is attached.
stroykadoma.org
Fabric crafts
Applications using colored patches look very impressive. Such paintings have an important advantage: they can be made soft using thick fabric as a base. The photo shows a warning picture that will remind you of the dangers of matches. The necessary details are sewn onto the woven base. To add volume, cotton wool is placed under some flaps. Human figures or his face can be embroidered or drawn.
Another direction is voluminous woven crafts. In the photo there is a “Fun Fire Extinguisher”. You can use foam rubber or polystyrene as a base. The base is covered with red fabric. Characteristic small details are sewn on. They can be made from ribbons, braid, felt. This craft is absolutely safe for kids.
Where to place the PSH
Whether you purchased a ready-made fire shield or made it yourself, it is important to choose the placement location wisely. Since safety requirements apply to all objects, such stands must be installed:
- educational institutions;
- healthcare institutions;
- children's and sports grounds;
- gas stations;
- car parking;
- vehicle parking lots and garages;
- catering establishments;
- trading enterprises;
- cultural and entertainment establishments;
- industrial enterprises and surrounding areas;
- sanatoriums, holiday homes, children's camps;
- hotels and motels;
- warehouse terminals;
- river and sea vessels;
- railway transport and so on.
Inventory standards
Basic standards for fire control panels
The control panel must be located in a publicly accessible place, which is known to all employees of the enterprise or residents of the house. Access to it must not be obstructed. Primary fire fighting equipment in a certain configuration is located on the panel on convenient stands. The presence of a fire corner is mandatory, according to the PPB. The owner of the object is required to perform the following actions:
establish the fire hazard class of the object, and according to it, select a set of what should be on the fire panel; install one or more standard products, at the rate of 1 for every 200 m2 of premises; next to the stand there should be a container with either sand or water, which are also included in the primary means of extinguishing fires; the frame and equipment must be exclusively red in order to attract human attention; the central surface of the stand is painted white so that the instruments are as visible as possible; the product must be marked with its number and the telephone number of the part of the Ministry of Emergency Situations supervising the object.
Option for mobile buildings
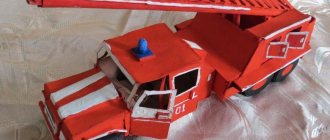
Making a fire truck
Fire smoke detector: models, characteristics, principle of operation
Sometimes kids in kindergarten get scared when they see a fire truck. And they may even start crying. They can be understood. A huge car, buzzing with a beacon, rushes through the city at great speed.
To instill in children a friendly attitude towards the fire truck and their owners, it is made with them using various techniques.
Crafts from semolina
This technique is useful for developing fine motor skills. You will need gouache, semolina, glue, colored paper or pencil.
- First we color the semolina. In an art bowl, we color the semolina. Mix it evenly with gouache. Then we lay it out on old paper (you can use old wallpaper) to dry.
- After complete drying, draw (or stencil) a fire truck on colored paper.
- Apply glue to the drawing.
- Semolina is taken and poured in this way, first along the contours of the pattern, and then from the edges to its middle. Waiting for it to dry completely. The excess semolina is removed and the fire truck is ready!
Craft applique
The application method is very simple. But it is suitable for both babies and older children.
- Find a drawing of a fire truck
- Transfer to cardboard.
- Cut out all the parts.
- We outline the blanks on colored paper (We will need black, white and red paper).
- Cut out colored blanks.
- On blue cardboard we outline the outlines of the drawing. We glue the parts of the fire truck one by one in accordance with the diagram.
- When the car is ready, you can outline it with a black or red marker for clarity. Clouds can be glued to the top of the work using cotton pads or cotton wool. If the fire truck does not occupy the entire sheet, then you can create a tree nearby. Also by application method. You'll get a whole landscape.