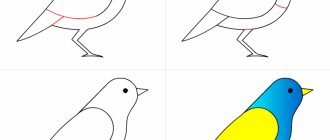
Simple drawing of a birch tree
Drawing an elegant tree is not at all difficult, as you might think at first glance. Training should begin with the simplest image of it, which will be within the power of every novice artist, gradually complicating the work.
So, to begin with, you will need: a checkered notebook sheet, simple and green pencils, an eraser, black and green ballpoint pens for drawing outlines.
If this is your first experience of drawing a birch, we recommend working with a simple pencil first so that you can correct some things along the way. Let's get started.
In the center of the notebook sheet, using a simple pencil, draw the trunk of the future birch tree.
Two vertical lines, slightly widened at the base. The height of the trunk should be approximately half the size of the leaf.
- Continuing the lines of the trunk upward, we draw three large branches, i.e. the tree trunk smoothly branches first to the right, then to the left and again to the right. Make them not too wide. The ends of the branches should smoothly fall down. You can add several medium-sized branches.
- Evenly along the large branches, using falling wavy lines, we draw many thin branches up to the level of the middle of the trunk, giving the crown the most natural “weeping” look. We complete the pencil drawing by drawing the grass around the base of the tree in the form of a broken curve.
- If necessary, erase all unnecessary strokes and lines with an eraser. Draw all the lines with a black ballpoint pen. This way, the contours will become clearer.
- Take a closer look, is our tree missing something to make it look like a birch? Well, of course! Let's add distinctive black patterns resembling semicircles on the trunk and large branches in a checkerboard pattern.
It turned out to be a very nice birch tree.
Now let's move on to working on the color design of the sketch. Use a green pencil to color the grass and boldly draw the contours of the thinnest branches.
Next, along the entire length of the thin branches, with a green pen you need to draw small leaves, which are shaped like an inverted drop.
We arrange the leaves alternately, applying them to the fragile branches, left and right. To make the foliage look denser, try to space them fairly close to each other.
If your child easily managed to cope with the task, doing the work step by step, then we offer a more complex, but much more interesting technique for depicting birches below.
How to draw a birch
How to draw a birch? Even if you are a complete beginner artist, this will not be a problem, because you have a good and simple step-by-step drawing lesson from LessDraw. If you have already prepared everything you need for drawing (in our case, a pencil, an eraser, plain white paper and some materials for coloring the picture, for example, paints or colored pencils), then you can safely begin! You will definitely succeed.
First, let's draw a birch trunk, leaving a little space at the top and bottom. We try to make the lines neat and beautiful, and if something doesn’t work out, we correct ourselves with an eraser. Notice how slender the trunk of such a tree is - like a birch, it is not at all similar to the trunk of, for example, an oak. We make a smooth bend and a gradual narrowing towards the top.
Now we need to add additional branches. The lower the birch branches, the longer. Notice how they curve sharply towards the tip. Add the required number of branches and at the same time make sure that even at this stage the birch tree looks harmonious.
At this stage I make a few strokes, these will be the outlines of the crown. Next, I will erase these lines; I need them to build the shape of the crown and the overall volume.
Throughout this area, from the main branches we draw additional ones. They have the shape of a wave, several come from one branch at once and they are all of different lengths. As a result, you should end up with something like this.
Now we remove the extra lines and start coloring the trunk. A distinctive feature of birch is dark spots on the bark, and we definitely need to take this point into account in the drawing process. If you are planning to draw a winter birch, then you can stop at this stage - all that remains is to just finish drawing the bluish snow, landscape and get rid of unnecessary strokes. We will continue to draw.
Next, draw leaves on each branch separately. We started drawing birch leaves from below. You can use different shades of green, then the drawing will look very lively and healthy.
Gradually fill the birch branches with leaves. Try to draw leaves of approximately the same size; they may become only a little smaller than the standard ones at the ends of the branches.
Step by step we fill the entire crown. Birch leaves can also be drawn on top of the trunk, if some branches cross it, and behind it.
That’s all, as you can see, it’s very easy to draw a beautiful birch tree without any special skills, even a child can do it! The process is quite fast; you can complete it in 10-30 minutes, depending on your experience and materials used. Be sure to send your birch drawings in the comments!
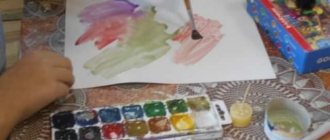
Drawing birches with gouache, an unusual technique
First, you need to know that landscape is a genre of fine art in which the main subject of the image is nature, where special importance is attached to the construction of the composition, as well as the conveyance of the atmosphere, the state of the air and light.
Get ready, we will learn to draw a beautiful landscape with birches. Now we will introduce you to one interesting way of painting with gouache.
For this work you will need very unusual materials:
- a circle cut out of a white sheet of paper;
- used plastic payment card;
- adhesive masking tape 1 cm wide;
- set of gouache paints;
- paint brushes;
- a sippy cup with plain water;
- scissors.
We draw a landscape step by step:
- We place the paper circle on the surface of the desktop on the backing. We cut the masking tape with scissors into five strips, approximately equal in length to the diameter of the circle. Cut one strip in half lengthwise.
- We glue the stripes as indicated in the diagram, first the wider ones, and then in the center of the composition, at an angle, thin strips of tape. Using the sticky edges of the strips protruding beyond the circle, we secure the circle to the work surface. Now is it clear that the areas covered with tape are the trunks of the birch trees in our picture?
- Next we work with gouache. Taking a medium-sized brush, paint the sky with blue gouache, using light strokes to paint the upper part of the circle with a smooth increase in the intensity of the blue color towards the very top edge of the sky.
- To the middle of the circle, paint the space between the trees with strokes using gouache paint in green tones: from light green to light green. In the middle part of the composition we diversify the palette of colors with orange highlights.
- And now we work in the same manner to the very bottom, applying dark green gouache to the very bottom of our drawing, smoothly creating transitions from one shade of green to another. The background forbs are ready. Now let’s add red and yellow colors with a few strokes. Look at the resulting picture from above, did you really see blooming summer grasses?
- And now, let's return to our birches.
- Carefully remove the tape. Inside the circle, the slender outlines of trees remained.
- Let's apply a characteristic black pattern to the white bark in an unusual way. Attention! Apply a little black paint to the edge of the used plastic card.
- We apply the painted edge to either side of the selected trunk and, pressing tightly, stretch the card to the other side. If you did everything correctly, you will get the effect of birch bark on the trunk. Great?
- We will do a similar procedure with other birches, changing the direction of action on some of them, for example, from right to left and vice versa.
- At the top of the birches we will draw branches.
- Paint them with black paint using a thin brush.
- Finally, we casually paint the branches with green paint to create foliage.
The result was a picturesque landscape. Through the whitish trunks of birches one can see the blooming, juicy May herbs, and the expanse of heaven soars upward! The work is really worth the result, but very little time is spent on it.
Let's move on to the next master class. We will learn to draw a winter birch grove.
Winter birch
For winter, a drawing of a birch tree without leaves will be taken as the basis for coloring. There are many options for how to paint a winter birch tree. The simplest one is using a wax candle. To ensure that the wax is applied well to the entire image, small branches are not drawn too small.
1. With strong pressure on the candle, outline the trunk and all branches.
Wax lines on the sheet are visible at a certain angle. This will help you not miss a single branch. Snowflakes in the air and snowdrifts under a tree are drawn with wax.
2. Before you start painting with watercolors using the wet-wet technique, the entire sheet is moistened with water. To do this, use either a wide brush or foam rubber.
3. The entire sheet is filled with paints, moving down in multi-colored horizontal lines. By making smooth transitions from one color to another from top to bottom, it is possible to convey the color of the sky and dawn. At the same time, a snow-covered birch tree appears on the sheet. Children of any age are interested in watching this trick.
Winter landscape with birches in watercolor
Birches are especially beautiful in winter. Their white trunks look even thinner and more transparent, as if dissolving in space.
You can convey lightness and airiness using watercolors.
The tendency of this technique is that for work we take watercolor paints, which are first diluted with water before painting. Paints are applied in thin layers. Sometimes we additionally moisten the parchment.
The paper here is not just a canvas, but also a pictorial element: the background will become space and “air.”
If you love winter and nature, then this master class is just for you. We are starting to work on a winter landscape with birches.
Prepare the following materials:
- watercolor paints;
- paint brushes of different sizes;
- a small container of water;
- watercolor paper;
- masking tape;
- used plastic card.
How to gradually create a winter landscape with birches using watercolors:
- Use tape to secure the watercolor paper to the work surface. Pre-soak the following paints with water: blue, brown, yellow and white paint.
- Visually divide the sheet in half horizontally.
- At this stage, we moisten the upper part of the sheet.
- This is done using a wide brush dipped in clean water.
- Using a wet brush, pick up blue paint and a little brown paint and mix them. Using the resulting grayish-blue tint in the upper third of the sheet, we create the background of the composition, in the form of wavy transparent stains in shape reminiscent of trees.
- A little closer, using dense blue paint, we will draw in a zigzag pattern the pyramidal silhouettes of the fir trees.
- At the left edge there is a larger one, in the center there is a smaller one. The bottom background edge is located in the form of a convex arc.
- Using brown paint, closer to the right edge, draw two vertical lines.
- The result was tree trunks.
- As soon as the wet image dries and becomes slightly damp, take a plastic card and apply a thin layer of white paint of a thicker consistency to its edge. On a blurred background of the forest, vertically and obliquely applying and stretching the card, we draw white silhouettes of several birch tree trunks and branching zones. This group of birches will form the center of the composition.
- Next, we add black paint to the edge of the card and make marks on the white silhouettes of birch trunks. Then, we move to the lower plane. And on the white section of the sheet, in a similar way, we finish drawing the lower parts of the trunks. Pay special attention to the location of birch trees, as well as giving them advantageous shapes.
- While the upper part of the drawing dries, we will draw a stream in the foreground. Moisten the bottom of the sheet. Let's paint the open surface of the stream with mixed blue-gray paint. We apply the strokes in several steps, layer by layer, to create the effect of living water. Using darker, thicker paint, we will paint several streaks of the reflection of the birches. Using white watercolor paint we apply highlights on the surface of the water, and with blue strokes we shade the trunks from the main mass of snow.
- The top half of the drawing is completely dry. Using a thin brush, paint gray, thin, protruding branches at the tops. Around the central birches and along the banks of the stream we will depict gray tufts of dried grass. You can add some warm accents to the overall picture by applying yellowish-brownish paint to the trunks and grass.
- Using a thin brush, to give it a snowy look, we’ll “walk” along the branches of the birch trees with white paint. And finally, to add dynamics to the composition, we will depict falling snow with white paint with chaotic pokes. That's all. Carefully remove the strips of tape.
Take a look at the image from the outside and evaluate it. The result was a magnificent winter landscape.
Such a picture can take its rightful place in your home gallery.
And it will be a good gift for your family and friends.
This job is not easy!
But if you want, if you are careful and consistent, anyone can cope with it, even a child! We wish you success!
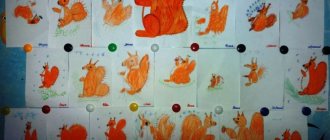
Image of a birch branch with leaves
After it is clear how to draw one birch leaf, it is not difficult to move on to the image of its branch.
- In the figure, one of the branches with small branches is selected.
- Several leaves and buds are added, as a decoration characteristic only of birch.
- The contours of the leaves are drawn with sharp teeth. The buds have their own texture.
- A black pen emphasizes the shapes of the leaves and the veins on them. The kidneys are not left unattended either.
- At this stage, the leaves and buds are painted in shades of green and yellow.
- To make the drawing more expressive, the teeth, veins and contours of the buds are re-drawn with a black marker.
Now you can cover the entire tree with leaves and decorate it with earrings.